Wi-Fi Smart Garage Door Controller Setup Guide

PACKAGE CONTENTS

SPECIFICATIONS
Operating ambient temperature:
-13 to113°F (-25°C to 45°C) Sensor battery: CR2450
Battery life:
6-12 months depending on usage and temperature Controller operating voltage: 120VAC 60Hz, 6W
Wi-Fi:
2.4GHz b/g/n compatible
Sensor operating frequency:
433MHz
BEFORE YOU START
Garage door

Your garage door must be a sectional garage door. (This controller does not work with one-piece or swinging-door-style garage doors.)
Your garage door must have two electric eye sensors near the ground to make sure that it detects an obstruction.

Make sure that the wall-mounted garage door button inside your garage does NOT have an additional button labeled “learn.”
Note:
Compatible wall controls are likely a single- or three-button design. Check with your garage door opener manufacturer for more information or visit http://connect.bestbuy.com/GDC for a list of compatible garage opener units.
Wi-Fi signal

SAFETY INFORMATION
![]() WARNING: To reduce the risk of injury, only use with sectional doors that are equipped with electric eye sensors to detect doorway obstructions.
WARNING: To reduce the risk of injury, only use with sectional doors that are equipped with electric eye sensors to detect doorway obstructions.
- For use only with garage door openers complying with UL 325, manufactured after 1993.
- DO NOT install this door control on garage door openers controlling one-piece or swing doors.
DOWNLOAD THE APPLE HOME APP
On your iPhone, download the free Apple Home app from the App Store if it is not already on your phone.
Note:
The garage door controller is compatible with iOS 10.1 or later. You can also control your Smart Garage Door Controller with Apple Siri. Follow the Apple Home app instructions to connect.
Your Home Kit Code:
Home Kit code sticker
Controlling this Home Kit-enabled accessory automatically and away from home requires an Apple TV with tv OS 10.1 or later or an iPad with iOS 10.1 or later set up as a home hub. If you don’t have an Apple TV, Home Pod or iPad set up as a home hub, your phone must be connected to the same Wi-Fi network as the controller to control your garage door.
Note:
After scanning the Home Kit code, it may take several minutes for the Apple Home app to connect to your controller. If it doesn’t connect, press and hold the controller’s button for ten seconds to reset it’s Wi-Fi connection, then try again.
INSTALLING YOUR GARAGE DOOR CONTROLLER
Before installing the controller, make sure that you have full Wi-Fi strength in your garage. You must also have a 2.4GHz network that uses either WPA or WPA2 security.
- Plug the controller into the power outlet above your garage door motor. The controller’s green LED flashes.
- Disconnect the power to your garage door motor by unplugging it from the ceiling power outlet. If your garage door motor is
hardwired, locate your circuit breaker and turn the power to your garage off. After the power is disconnected, try to operate the
garage door with the wall-mounted garage door button to make sure that the power is off. - Connect the motor control cable to your garage door motor.
Note:
You may need to remove a cover on your motor to access the wire terminals.

- Connect the other end of the motor control cable to the controller’s side socket.
- Reconnect the power to your garage motor by plugging it back into the ceiling power outlet. If you turned the power to your garage off through the circuit breaker, turn the power back on now. The green LED on the controller flashes, then lights solid green when it re-establishes its connection.
- To test the wiring, press the button on the controller once. The door should close. If it does not, check the wire connections from steps C-E.
Warning:
Keep your hands away from the door motor’s moving parts.
If your motor has screw terminals:
- Select the motor control cable with the spade connectors.

- Follow the wires back from the terminals to identify which two wires connect to your wall-mounted garage door button.
- Loosen one of the terminal screws slightly with the screwdriver. Do not remove the connected wires.

- Slide either end of the spade connector behind the screw that you loosened in step C, then tighten with the screwdriver to hold it in place. Pull on the wires slightly to make sure that they are secure.

- Repeat steps C and D to connect the second end of the motor control cable.
- Continue to step 4 below.


If your motor has quick connect terminals:
- Select the motor control cable with the exposed wire ends.

- Follow the wires back from the terminals to identify which wires connect to your wall-mounted garage door button.
- Push in a tab to remove one of these wires from its terminal with a screw driver.

Note:
Remember which terminal you remove the wire from. It will need to be reconnected to the same terminal. Take a picture of the terminals with your phone to reference later.

- Twist either end of the motor control cable together with the wire you removed from the terminal.

- Push in the tab, reinsert the wires back into the same terminal, then release the tab to secure the wires. Pull on the wires slightly to make sure that they are secure.

- Repeat steps C-E to connect the second end of the motor control cable.
- Continue to step 4 below.


INSTALLING YOUR GARAGE DOOR SENSOR
Installing the door sensor battery
- Take the cover off of your door sensor by removing the screw on the bottom edge, then slide the cover down and out.

- Insert the CR2450 sensor battery, making sure that the + terminal faces out toward the cover. The sensor LED flashes for five minutes or until it’s paired to the controller.

- Decide whether to attach the sensor to your garage door with screws or adhesive strip. Choose either “Option A: Secure with screws” or “Option B: Secure with the adhesive strip” to attach the sensor to your garage door.


Attaching the door sensor
![]()
OPTION A –
Secure with screws (recommended) To mount with screws, you’ll need a:
- Drill with a 2.9 mm (#33) drill bit
- A garage door panel and railing that are at least .5 in. (1.3 cm) thick (to ensure that the screws don’t protrude through the outside of your garage door). If your mounting surface isn’t thick enough, use OPTION B.
- Close your garage door.

- Hold your door sensor up to a railing on the inside, top panel of your garage door, and then mark the mounting holes with a marker. You can attach your sensor to a rail along the edge or in the center of the door.

Note:
The door sensor will only work if mounted to the top panel of your garage door. Any other placement will cause incorrect readings. - Drill two holes with a 2.9 mm (#33) drill bit at the positions you marked. Make sure that you do not drill through the outer panel of your garage door.

- Make sure that the cover’s screw hole is facing down.

- Use the included screwdriver and two screws to secure your door sensor to the garage door.

- Replace the sensor’s cover and secure with the screw.


![]()
OPTION B
Secure with the adhesive strip 4 Replace the sensor’s cover and secure with
the screw.
- Close your garage door.
- Clean the area where you will attach the sensor and let it air dry. It should be attached to the inside, top panel of your garage doorNote:
If your garage door is not smooth, try mounting to a railing. - Make sure that the arrow on the door sensor cover is pointing up, then peel the backing off of the adhesive strip and press the door sensor firmly to the garage door.

CONNECTING TO A WI-FI
- Press and hold the button on the controller for 10 seconds (until you hear a double beep). The green LED blinks.
- Open the Apple Home app.
- Tap + in the top right corner of screen, then tap Add Accessory.
- Follow the on screen prompts to scan the Home Kit code from step 2 (see reverse side) to complete setup.
- The controller’s green LED lights solid green when it’s connected to Wi-Fi.
Note:
If your controller won’t connect to Wi-Fi from your garage, move it to a plug inside your home (closer to your router), complete setup, then move it back into your garage afterward. (It will be easier for the controller to re-establish an existing connection then to create a new one.)
USING YOUR GARAGE DOOR CONTROLLER
Use the Apple Home app to operate your garage door opener controller and sensor:
- Open and close the garage door
- View garage door open/close status
- Receive push and in-app notifications
Opening or closing your garage door - Use your Apple Home app controls to open or close your garage door. There is a five second delay before your garage door closes while the controller flashes its light and beeps to warn that the door is closing.Note:
When operating your garage door with the app, the door status updates may be delayed a few seconds. Wait for the door status to update before using the app to open or close the door again. If the door is obstructed, the obstruction message may appear a few seconds after the door status is shown.
OR
Use your wall-mounted garage door button or remote control as usual. - If your garage door is blocked while closing, the door will reverse and re-open. If the door is blocked twice, the app sends you an alert and door operation through the app is disabled.
Note: To use the app again, you must remove the obstruction, then open or close the door with your wall-mounted garage door button or remote control.
Sensor
LED/button:
- Check battery: To test the battery level, quickly press and release the sensor button. Replace the battery if the sensor LED doesn’t flash.
- Check controller pairing: Quickly press and release the button. If the controller beeps, they are paired.
- If sensor’s battery is low, controller will beep once every 15 seconds.

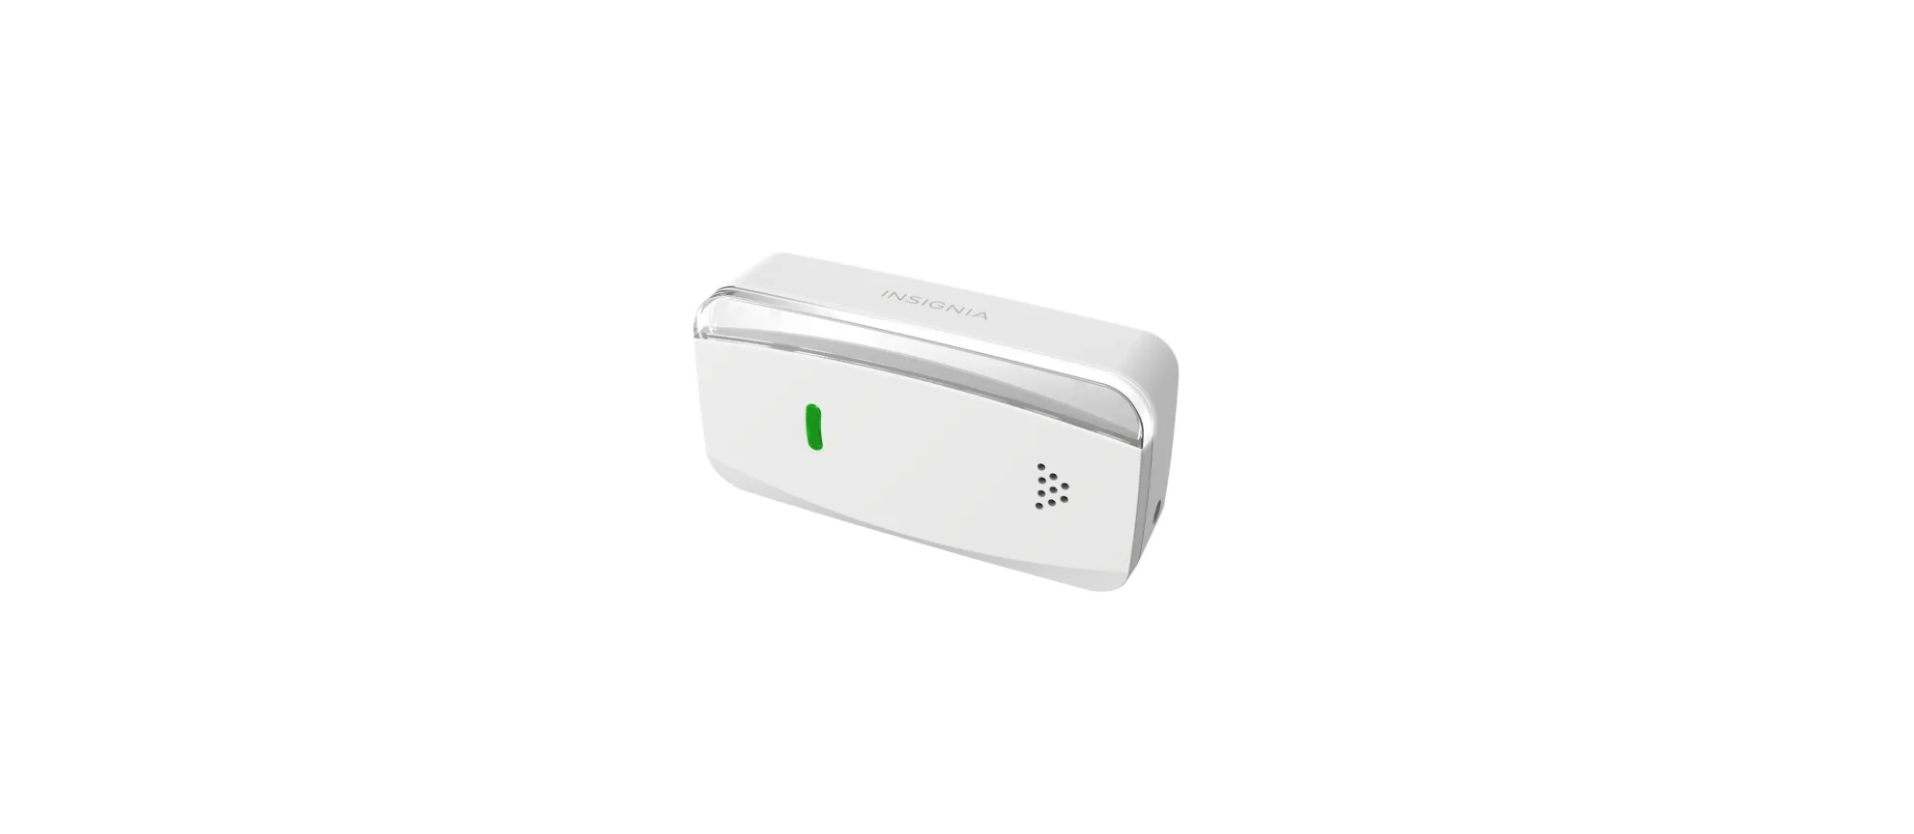
Controller
LED bar:
Flashes for five seconds: App is closing the door
Speaker:
Beeps for five seconds: App is closing the door

Connection LED & button:
- Blinks green once per second: No internet or Wi-Fi connection
- Lit solid green: Connected to the internet and operating normally
- Wi-Fi reset: Press and hold for ten seconds until you hear a double beep and the green LED blinks.
- Sensor pairing: See “Pairing your controller & sensor.”
- Test garage door operation: Press and release quickly to open/close the garage door.
Resetting your garage door controller
Reset Wi-Fi connection
- Press and hold the button on the controller for 10 seconds (until you hear a double beep). The green LED blinks.
- Use the iOS Home app to reconnect to Wi-Fi.Note:
Make sure that your controller and mobile phone are on the same Wi-Fi network.
PAIRING YOUR CONTROLLER & SENSOR
The controller and sensor are shipped from the factory paired together. If the pairing is lost, follow these steps to re-pair the sensor:
- Make sure that your sensor has a fresh battery.
- Press and hold the controller’s button for 15 seconds.Note:
The controller will beep twice at 10 seconds—continue pressing until you hear another beep and the controller’s green LED blinks. - Press and hold the sensor’s button for five seconds. The LED blinks quickly. When pairing is complete, the LED on the sensor will turn off and the controller will beep.
- To check the pairing, press and release the sensor button quickly. The controller should beep once. If it doesn’t, wait five minutes & repeat these steps.
- Open and close the garage door with the app and make sure that the app shows the correct door status.
TROUBLESHOOTING
Note:
The garage door controller only works with the Apple Home app on iOS devices (10.1 or later).
Garage door does not open or close from the app, but it works normally from the wall-mounted garage door opener and remote control.
- Make sure that your internet is working.
- Make sure that the controller is plugged into the ceiling power outlet securely and its green LED is on (if the LED is not solid green, the controller is not connected to Wi-Fi).
- Make sure that the motor control cable is connected to the garage motor terminal securely. Inspect the cable for any sign of cuts or damage and replace if needed.
- Make sure that the motor control cable is connected securely to the controller.
- Restart the app.
- To control your garage door automatically or while away from home, the Apple Home app requires an Apple TV (with tvOS 10.2.2 or later) and iPad (with iOS 10.1 or later) set up as a home hub. If you don’t have an Apple TV and iPad set up as a home hub, your phone must be connected to the same Wi-Fi network as the controller to control your garage door.
The controller will not connect to my Wi-Fi network.
- Connect your mobile phone to the same Wi-Fi network that you want to use, then hold your mobile phone near the controller. Check your Wi-Fi status on your mobile phone. If the signal strength is weak, the connection may fail. To improve your Wi-Fi signal, you can move the router closer to the garage or install a Wi-Fi extender midway between the controller and your Wi-Fi router.
- Make sure that you are using a 2.4GHz network. Some routers have only their 5GHz network on by default. Use your router’s setup process to enable the 2.4GHz network.
- Make sure that the security option on your router is set to WPA/WPA2.
- Move the controller inside your home close to your Wi-Fi router and set up its Wi-Fi there, then move it back to the garage and check to see if Wi-Fi is re-established. If green LED blinks after a minute from power-up, the Wi-Fi signal in the garage is weak and will need a Wi-Fi extender.
- If you are using the controller in a detached garage, you will need to install a Wi-Fi extender to boost the signal in the garage.
The app operated the door, but it does not show the door status correctly.
- Make sure that the sensor is mounted to the door securely.
- To make sure that the battery is not low, press the button on the sensor. If the LED flashes once and the controller beeps once, the battery is still working. Replace the battery if the sensor’s LED does not flash.
- Make sure that the sensor is mounted with its UP arrow pointing up.
- The door sensor may need to be paired with the controller again. See “Pairing your garage door controller & sensor”.
The app indicates that there is a door obstruction, but there is nothing obstructing the door.
- Make sure that the Insignia sensor is mounted close to the top end of the garage door.
- Recalibrate the door sensor by opening and closing the garage door once using the wall-mounted garage door opener panel.
- Make sure that your garage door’s eye sensors are clean and correctly aligned.
- Make sure that the door moves up and down the guide rails smoothly.
LEGAL NOTICES
FCC Statement
This device complies with Part 15 of the FCC Rules. Operation is subject to the following two conditions: (1) this device may not cause harmful interference, and (2) this device must accept any interference received, including interference that may cause undesired operation.
FCC Caution
Changes or modifications not expressly approved by the party responsible for compliance could void the user’s authority to operate this equipment.
Note:
This equipment has been tested and found to comply with the limits for a Class B digital device, pursuant to Part 15 of the FCC Rules. These limits are designed to provide reasonable protection against harmful interference in a residential installation. This equipment generates, uses, and can radiate radio frequency energy and, if not installed and used in accordance with the instructions, maybe cause harmful interference to radio communications. However, there is no guarantee that interference will not occur in a particular installation. If this equipment does cause harmful interference to radio or television reception, which can be determined by turning the equipment off and on, the user is encouraged to try to correct the interference by one or more of the following measures:
- Reorient or relocate the receiving antenna.
- Increase the separation between the equipment and receiver.
- Connect the equipment into an outlet on a circuit different from that to which the receiver is connected.
- Consult the dealer or an experienced radio/TV technician for help.
CAUTION: To assure continued FCC compliance:
Any changes or modifications not expressly approved by the grantee of this device could void the user’s authority to operate the equipment.
To assure continued FCC compliance:
- Any changes or modifications not expressly approved by the grantee of this device could void the user’s authority to operate the equipment.
- This equipment complies with FCC radiation exposure limits set forth for an uncontrolled environment. This equipment should be installed and operated with minimum distance 20cm between the radiator & your body.
CAN ICES-3 (B) NMB-3(B)
Industry Canada Compliance
IC Statement
This device complies with Industry Canada’s licence exempt RSSs. Operation is subject to the following two conditions:
(1) This device may not cause interference; and
(2) This device must accept any interference, including interference that may cause undesired operation of the device.
This equipment complies with IC radiation exposure limits set forth for an uncontrolled environment. This equipment should be installed and operated with minimum distance 20cm between the radiator and your body. Use of the Works with Apple Home Kit logo means that an electronic accessory has been designed to connect specifically to iPod touch, iPhone, or iPad, respectively, and has been certified by the developer to meet Apple performance standards. Apple is not responsible for the operation of this device or its compliance with safety and regulatory standards.
ONE-YEAR LIMITED WARRANTY
For complete warranty, visit www.insigniaproducts.com.
Download PDF Link