
Jlab Neon Wireless Headphones
FIRST TIME SETUP: BLUETOOTH PAIRING
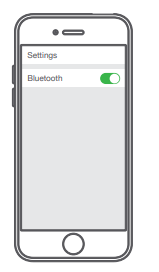
- Turn on the Bluetooth in your device settings.

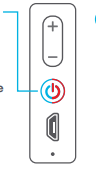
- When the Neon Wireless Headphones are powered off, press and hold the Power Button for approximately 10 seconds. Fast blinking red and blue light indicates searching for Bluetooth device

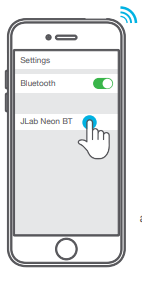
- Select “Jlab Neon BT” in your device settings to connect.

- When the headphones are paired, voice prompts “You are connected” and blue light will flash slowly.

- Notes:
Bluetooth is a wireless radio technology, which means it is sensitive to objects between the headphone and the connected device.
The headphone is designed to be used within 33 feet (10 meters) of a connected device, with no major objects in between (walls, etc.). - Once successfully connected, the headphone will memorize your device and automatically pair when turned on in the future.
Only one device may be connected at a time. To pair a different device, first unpair the current one through its Bluetooth settings. - If for any reason Bluetooth connection is lost, manually reconnect your Bluetooth device.
ACCESSORIES

CHARGING
Note: For optimum performance, charge overnight with Micro USB cable prior to using. Allow about 3 hours to fully charge. Connect the Micro USB (included) to the headphone and connect the USB into a computer or AC adaptor (not included). Make sure the USB connection has a power output source. Solid red light indicates the headphone is charging. Solid blue light indicates charging is complete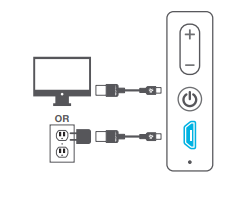
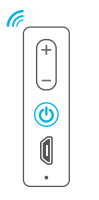
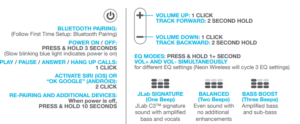
BUTTON FUNCTIONS
WARM-UP YOUR HEADPHONES
Optional: Burn-in is the process for exercising new audio equipment. We recommend 40 hours of burn-in time for most headphones to reach optimal performance. The main purpose of the process is to loosen the diaphragm of a newly crafted headphone and to stress the headphone driver. Normal everyday use can also burn-in the headphones, though JLab’s proprietary burn-in provides an ideal mix of sounds and frequency sweeps to achieve this.
Burn-in your audio equipment with the JLab Audio app available on the App Store and Google Play Or access the burn-in method at: jlabaudio.com/burnin
CAUTIONS
- Avoid extreme heat, cold, and humidity.
- Avoid dropping or crushing the earbuds.
- Wax may build up in the earbud tips, lowering the sound quality.
- Carefully remove the wax with a cotton swab or other small tool to improve the sound quality.
- If you experience discomfort or pain, try lowering the volume or discontinuing use temporarily.
- If you experience regular discomfort while using this product, discontinue use and consult your physician.
- We recommend you treat your earbuds as you would a nice pair of sunglasses and keep them in safe location when not in use.
 YOUR WARRANTY
All warranty claims are subject to JLab Audio authorization and at our sole discretion. Retain your proof of purchase to ensure warranty coverage.
CONTACT US
Reach out to us at support@jlabaudio.com or visit jlabaudio.com/contact
Download Pdf Link
https://cdn.shopify.com/s/files/1/0240/9337/files/Neon_Wireless_Headphone_Manual.pdf?3948


 Afrikaans
 Albanian
 Amharic
 Arabic
 Armenian
 Azerbaijani
 Basque
 Belarusian
 Bengali
 Bosnian
 Bulgarian
 Catalan
 Cebuano
 Chichewa
 Chinese (Simplified)
 Chinese (Traditional)
 Corsican
 Croatian
 Czech
Czech Danish
 Dutch
Dutch English
 Esperanto
 Estonian
 Filipino
 Finnish
 French
 Frisian
 Galician
 Georgian
 German
 Greek
Greek Gujarati
 Haitian Creole
 Hausa
Hausa Hawaiian
 Hebrew
 Hindi
Hindi Hmong
Hmong Hungarian
 Icelandic
 Igbo
Igbo Indonesian
 Irish
Irish Italian
 Japanese
 Javanese
 Kannada
 Kazakh
 Khmer
Khmer Korean
 Kurdish (Kurmanji)
 Kyrgyz
 Lao
Lao Latin
Latin Latvian
 Lithuanian
 Luxembourgish
 Macedonian
 Malagasy
 Malay
Malay Malayalam
 Maltese
 Maori
Maori Marathi
 Mongolian
 Myanmar (Burmese)
 Nepali
 Norwegian
 Pashto
 Persian
 Polish
 Portuguese
 Punjabi
 Romanian
 Russian
 Samoan
 Scottish Gaelic
 Serbian
 Sesotho
 Shona
Shona Sindhi
 Sinhala
 Slovak
 Slovenian
 Somali
 Spanish
 Sundanese
 Swahili
 Swedish
 Tajik
Tajik Tamil
Tamil Telugu
 Thai
Thai Turkish
 Ukrainian
 Urdu
Urdu Uzbek
Uzbek Vietnamese
 Welsh
Welsh Xhosa
Xhosa Yiddish
 Yoruba
 Zulu
Zulu