Table of contents
show
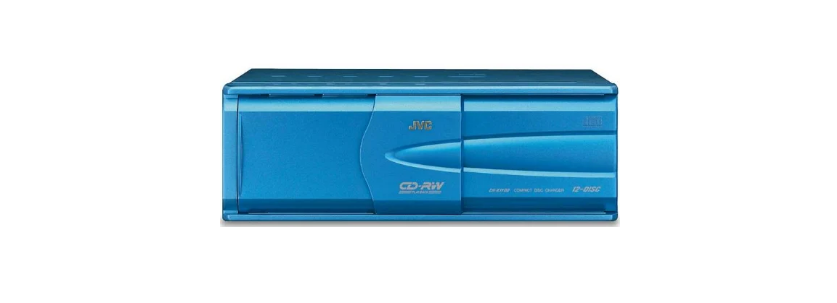
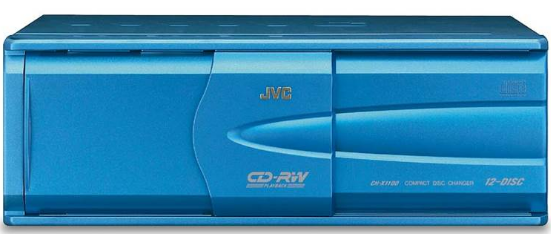
JVC CH-X1100 12-Disc CD Changer User Guide
IMPORTANT FOR LASER PRODUCTS
PRECAUTIONS
- CLASS 1 LASER PRODUCT
- Invisible laser radiation when open and interlock failed or defeated. Avoid direct exposure to beam.
- Do not open the top cover. There are no user serviceable parts inside the unit, leave all servicing to qualified service personnel.
- The compact disc player uses invisible laser radiation and is equipped with safety switches which prevent emission of radiation when unloading the CD magazine and the safety interlocks have failed or are defeated. It is dangerous to defeat the safety switches.
- Use of controls or adjustments or performance of procedures other than those specified herein may result in hazardous radiation exposure.
Car’s Internal Temperature
Before listening to CDs after your car has been parked for some time in low or high temperatures, wait until the temperature inside the car stabilizes.
INSTALLATION
- Avoid installing the unit in the following places
- Where it would be exposed to direct sunlight or heat directly from the heater or in an extremely hot place.
- Where it would be subject to rain, water splashes or excessive humidity.
- Where it would be subject to dust.
- Where it would be positioned on an unstable place.
- Above connection cords or on the floor under which there is piping.
- Where it could damage the car’s fittings (spare tire, etc.) in or under the trunk.
- Before drilling holes in the trunk to install the unit, make sure that there is a sufficient space under the trunk so that you do not drill holes in the fuel tank, etc.
- Firmly install the unit using the provided screws.
When installing the unit horizontally
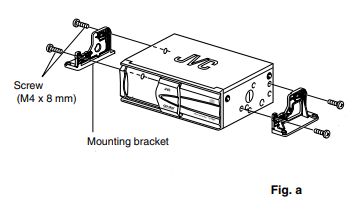
- Attach the mounting brackets on the side panels of the unit using screws. (Fig. a)
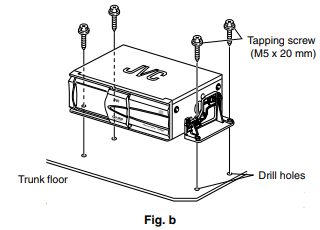
- Install the unit on the floor of the trunk using tapping screws. (Fig. b)
When installing the unit upright (Fig. c)
Notes:
- When fixing the unit with the screws, refer to “ A When installing the unit horizontally” above.
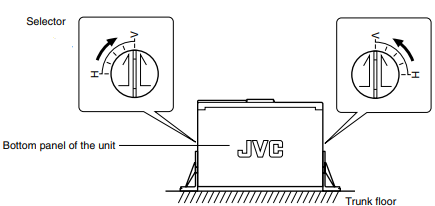
- When installing the unit upright, set the selectors located on both sides to the “V (vertical)” position. (When it is installed horizontally, be sure to set the selectors to the “H (horizontal)” position.)
- When installing the unit upright, securely install to the trunk floor.
- If you install the unit without setting the selectors correctly, the symptoms below may occur.
- Sounds are intermitted.
- CDs are damaged.
When installing the unit on an inclined plane (Fig. d)
Notes:
- When fixing the unit with the screws, refer to “ A When installing the unit horizontally” above.
- When installing, five angles can be selected. Be sure to position the selectors on both sides of the unit pointing upward, perpendicular (90°) to the earth surface.
- If you install the unit without setting the selector correctly, the symptoms below may occur.
- Sounds are intermitted.
- CDs are damaged.

LOCATION OF CONTROLS
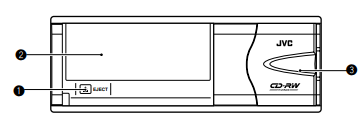
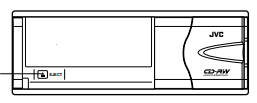
- EJECT button
- Reset button: When pressing and holding for a few seconds
- CD magazine slot
- Door
ELECTRICAL CONNECTIONS
- This changer can be connected to JVC KD-MX, KD-SX, KDLX, KD-SH, KD-LH or KS-FX series receivers that include a Changer Control function. For more information, consult your nearest JVC car audio dealer.
- To prevent short circuits from occurring, while making connections, keep the battery’s negative terminal disconnected. We recommend that you make all electrical connections (see Fig. f) before installing the unit. If you are not sure of your ability to correctly install this unit, have it installed by a qualified service technician.
Note:
- This unit is designed for 12 volts DC, negative ground. If your vehicle does not have a 12 volt negative ground electrical system, you need a voltage inverter which can be bought from a JVC car audio dealer.
- Be sure to ground this unit to the car’s chassis.
HANDLING MAGAZINES AND COMPACT DISCS
How to handle the magazines
- Care in handling the magazines
- Do not carry the magazine with its inserting slot facing down so that the CDs do not drop.
- Always keep the twelve disc trays loaded in the magazine.
- When sliding the disc trays out or in to place CDs, hold the magazine horizontally not to drop CDs.
- Without pulling out the disc trays from the magazine, do not insert CDs. Never place CDs directly into the magazines.
- Do not expose the magazines to high temperatures or direct sunlight.
- Do not disassemble the magazines.
- Take care not to drop or hit the magazines. Do not apply excessive pressure to the disc trays which have been removed from the magazines.
- Never apply solvents such as benzine, thinner or insecticide to the magazine or trays. These solvents may erode their surfaces.
SPECIFICATIONS
CD CHANGER SECTION
- Frequency response : 5 Hz – 20 000 Hz
- Dynamic range : 93 dB
- S/N ratio : 96 dB
- Distortion : 0.006%
- Wow & flutter : Less than measurable limit
- Output terminal : Analog (8 pin x 1), 1.5 V (full scale)/less than 1 kΩ
Power requirement
- Operating voltage : DC 14.4 V (11 V – 16 V allowable)
- Grounding system : Negative ground Allowable working temperature –10°C to +50°C (14°F to 122°F)
- Dimensions (W x H x D) : 252 mm x 88 mm x 174 mm (9-15/16″ x 3-1/2″ x 6-7/8″)
- Mass : 2.3 kg (5.1 lbs.) (excluding accessories)
Precaution for Using the Magazine
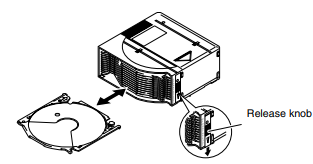
Use the release knob to remove the disc trays when cleaning them.
- While pulling down the release knob, pull out the disc tray.
- After cleaning, insert the disc tray into the magazine while pulling down the release knob.
-
- Clean the trays one by one to avoid inserting two trays into one slot of the magazine
How to load the magazine
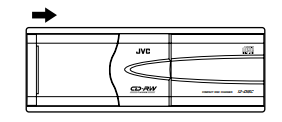
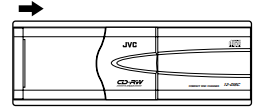
- Slide the door to the right.
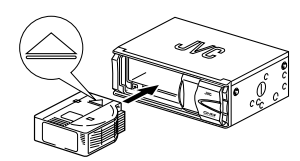
- Load the magazine.
- Close the door.
-
- Load the magazine into the CD changer with the ) mark on top and the CD insertion side to the right.
How to unload the magazine
- Slide the door to the right.
- Press the 0 EJECT button.
-
- The magazine ejects from the loading slot
TROUBLESHOOTING
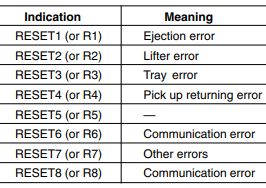
- “RESET 1–RESET 8” or “R1–R 8” appears on the display of the connected receiver (or other equipment).
- Are the units connected correctly? After checking, press and hold the EJECT button for a few seconds to reset this unit. If the problem still persists, consult the JVC authorized dealer.
