
JVC GC-FM1 HD Memory Camera User Instructions
Safety Precautions
- To reduce the risk of fire, electrical shock, and injury to person, carefully follow these instructions.
- Do not expose this product to liquid, rain, moisture, or extreme temperatures.
- Do not disassemble this unit.
- Do not insert foreign objects into the this unit – this may cause damage to internal components or cause
injury to you. - It is recommended to charge the battery connecting to PC with the USB cable.
- Do not charge this product if damaged, or has been immersed in liquids.
- Do not store this unit in extreme cold or high temperature areas.
- If the LCD breaks, do not touch the glass or liquid.
- Do not attempt to remove or replace the battery.
- Do not attempt to disassemble or repair the camcorder.
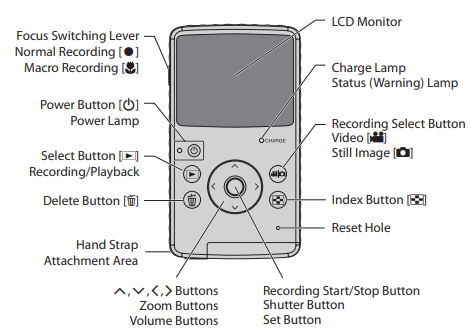
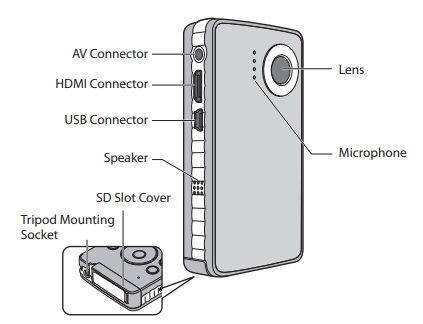
Names of Components
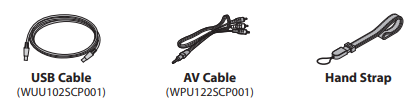
Accessories
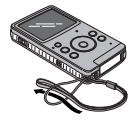
Attaching the Hand Strap
To guard against dropping the camcorder, we recommend attaching the hand strap.
NOTE
- When carrying the camcorder, please be careful not to drop it. Dropping it may cause injury or a malfunction of your camcorder.
- When a child uses the camcorder, there must be parental guidance۔
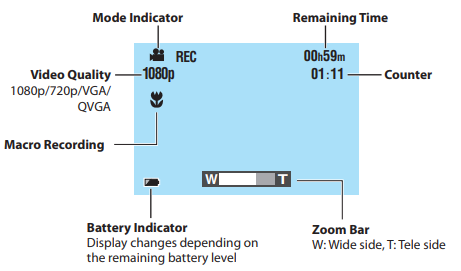
Indications on LCD monitor
Videos /Still Images

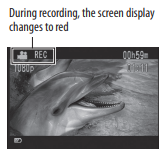
During Recording
Still image

Charging
Charge the battery connecting to the computer with the USB cable.
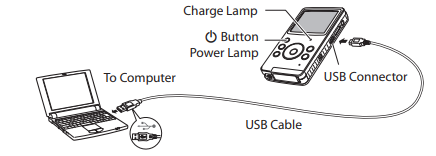
- Press the button to turn off the camcorder. The power lamp goes out.
- Connect the camcorder to a computer. Camcorder’s LCD monitor will turn off when the USB cable is connect
NOTE
- Charging is not possible while the camcorder is turned on.
- Make sure that the computer is turned on during charging.
- The camcorder is not charged when it is shipped. Charge the camcorder before using it for the first time.
- If there is a trouble in charging, the charge lamp/warning lamp blinks in green. Connect the camcorder to the computer again
Turning the Power On and Off
- Press the button for more than 1 second. The power lamp turns on.
- To turn off the power, press the < button again. The power lamp goes off.
NOTE
- To conserve power, the camcorder turns off automatically if there is no operation for 3 minutes.
- If the only operation is turning on the power, the camcorder enters the video recording ready status.
- When you first turn on the power after purchasing the camcorder, the [Time setup] screen appears. Set the date and time before using the camcorder. (Z p. 11)
Necessary Settings before Use
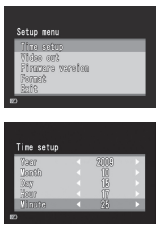
Setting Date and Time
Turn on the power and select the recording mode.
- While pressing the $ button, press the 7 button.
- Select [Time setup], and then press the set button.
- Set the date and time by selecting items with and setting values.
- After completing the setting, press the set button.
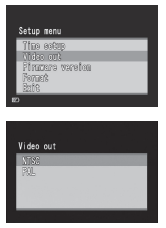
Setting the Video Output
Turn on the power and select the recording mode.
- While pressing the button, press the 7 button.
- Press the buttons to select [Video out], and then press the set button.
- Press the buttons to select [NTSC] or [PAL], and then press the set button.
Recording/Playback
Video Recording
- Press the button to turn on the power. The camcorder enters the video recording ready status.
- Press the set button. The recording starts.
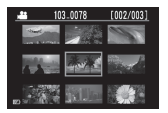
Video Playback
- Press the button to select the playback mode.
- Press the buttons to select a video.
- Press the set button to start playback. Press it again to stop the playback.
Still Image Recording
- Press the button to turn on the power.
- Press the button to select .
- Press the set button. The recorded still image is saved.
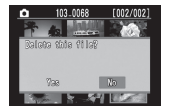
Deleting Files
Preparation:
Select the playback mode.
- Press the 7 button.
- Press the buttons to select a file.
- Press the $ button.
- Press the buttons and press the set button to select [Yes].

NOTE
- You can also delete by pressing the button while a video is playing back or a still image is displayed.
- You cannot delete all the files at once.
Saving Files on a Computer
Preparation:
- Turn on the computer.
- Turn on the camcorder. You can save recorded videos and still images on a computer.
- Connect the camcorder to a computer: Camcorder’s LCD monitor will turn off when the USB cable is connected. This occurs during battery charging or when connected to a PC.
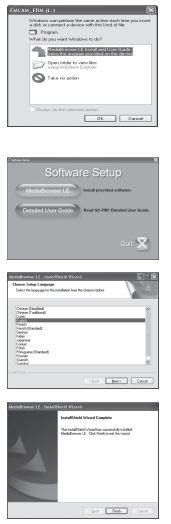
Installing the Supplied Software
Preparation:
- Turn on the camcorder.
- Connect the camcorder to a computer.
- The screenshots in the steps below are for Windows XP.
- [FM CAM_FRM] window appears.
- Select [Media Browser LE Install and User Guide] and click [OK].
- Select [Media Browser LE].
- In the [Choose Setup Language], select a language and click [Next]. Follow the on-screen instructions.
- Click [Finish]. An icon appears on the desktop
Exporting to iTunes®
You can easily transfer videos recorded to iTunes® and play back them on iPod®, using the supplied Media Browser LE software. For details about iTunes® and iPod®, see the website. Z http://www.apple.com/itunes/
Preparation:
- Install the supplied Media Browser LE software to the computer. (Z p. 20)
- After the software is installed, disconnect the camcorder from the computer.
- If the software is already installed, turn on the camcorder.
- Connect the camcorder to a computer. Media Browser LE starts.
- Edit the file using Media Browser LE if necessary.
- Transfer files using the [Export] function of Media Browser LE.
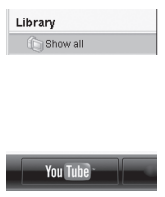
Uploading to You TubeTM
You can easily upload videos to You TubeTM, the video sharing website, using the supplied Media Browser LE software. For details about YouTube™, see the website. Z http://www.youtube.com/
Preparation:
- Install the supplied Media Browser LE software to the computer. (Z p. 20)
- Turn on the camcorder.
- Connect the camcorder to a computer. Media Browser LE starts.
- Click the [Device] icon of Media Browser LE.
- Click the date containing video files, then drag and drop the selected files to [Show all] in the [Library]. The files are imported into Media Browser LE.
- Disconnect the camcorder from the computer.
- Upload files to You TubeTM using the [YouTube] (uploading) function of Media Browser LE.
Specifications
General
- Power consumption: 1.9 W
- Dimensions: (W × H × D) 53.0 mm × 97.0 mm × 17.0 mm (2-1/8″ × 3-7/8″ × 11/16″)
- Weight: 95 g (0.21 lbs), 100 g (0.23 lbs) (Including SD card)
Operating environment
- Operating temperature: 5 °C to 40 °C (41 °F to 104 °F)
- Storage temperature: –20 °C to 60 °C (–4 °F to 140 °F)
- Operating humidity: 35 % to 85 %
Camera/LCD monitor
- Pickup: 1/3.2″ (8,170,000 pixels) progressive CMOS
- Lens: F 2.8, f = 3.9 mm, 35 mm equivalent
- Video: 1080p 55 mm
- Still image: 30 mm
- LCD monitor: 2.0-inch LCD
- Zoom: Digital ×4
HDMI connector
- HDMI Mini Connector (V 1.3)
- Output: 1080i