Table of contents
show
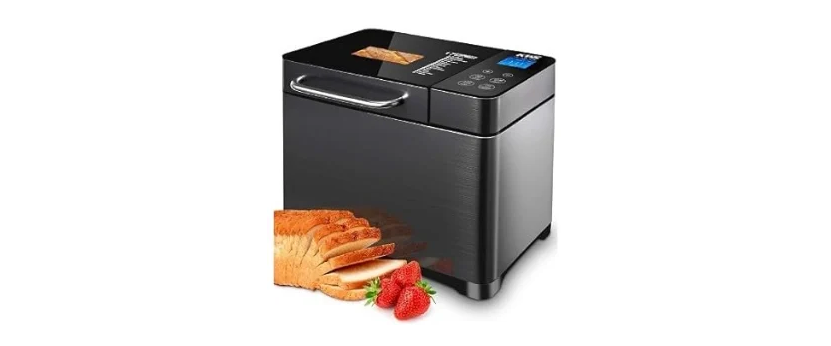
KBS MBF-010 Stainless Steel Bread Machine User Guide

IMPORTANT SAFEGUARDS
- Read all instructions, product labels and warnings carefully before using the bread maker.
- Do not touch hot surfaces. Use handles or knobs.
- To avoid electrical shock, do not immerse cord, plug, or appliance in water or other liquid.
- Close supervision is necessary when any appliance is used by or near children.
- Unplug form outlet when not in use and before cleaning. Allow to cool before attaching or removing parts.
- The use of accessory attachments not recommended by the appliance manufacturer may cause fire, electric shock or injury.
- Do not use outdoors.
- Avoid contact with moving parts.
- Do not use appliance for other than intended or specified uses.
- Do not place the appliance on unstable surfaces or near a hot gas or electric burner, or in a heater oven
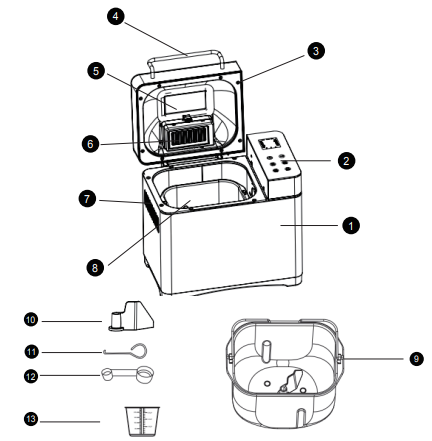
PARTS AND FEATURES

- Steel Housing
- LCD Touch Control Panel
- Steel Lid
- Handle
- Viewing Window
- Fruit/Nut Dispenser
- Air Vent
- Baking chamber
- Bread Pan with handle
- Kneading blade
- Hook
- Measuring Spoon
- Measuring Cup
CONTROL PANEL
- “MENU”: The MENU button is used to select the desired program. Press the MENU button repeatedly to scroll through the menu. Select your program on the control panel menu repeatedly, the LCD display will show corresponding programs. When you see the number of the program you required, stop pressing.
- “LOAF”: Press the LOAF button and select the bread size from 1.0 lb/1.5 lb/2.0 lb. This function is just available for program 1 to 9.
- “COLOR”: Press the COLOR button to select a LIGHT, MEDIUM or DARK colored crust.
“START/STOP/PAUSE”:
- Press the START/STOP/PAUSE button once to start a cycle. A short beep will be heard. The colon in the time
display will begin to flash, and the cycle will start. When the bread maker starts to work, it will star“Exceptional
Stop“ as protection performance to avoid exceptional contact or collision. - When press the button for at least 2 seconds until hear a prompt sound “Buzz”, the unit will stop working
immediately. - To pause the programme, you should press the button within one second, then the program will stop countdown, while the machine is at the state of “Pause” and you can add some ingredients, etc. Press again to quit the status “Pause” and then all programs will continue the action.
OPERATION GUIDES
Please be careful before use:
- Check wire cord, socket and fuse box in order; Rating Load is higher than 6A.
- Bread Maker must be grounded in safe. Earth Wire and Zero Line must be separated, preventing them from
twisting in each other over three-plug connector.
For the First Use:
- The appliance may emit a little smoke and a characteristic smell when you turn it on for the first time. This is normal and will soon stop. Make sure the appliance has sufficient ventilation.
- Please check whether all parts and accessories are complete and free of damage.
- Clean all the parts according to the section“CLEANING AND MAINTENANCE”.
- Set the bread maker on BAKE mode and bake empty for about 10 minutes. Then let it cool down and clean all the detached parts again.
- Dry all parts thoroughly and assemble them, the appliance is ready for using.
Operation Instruction on Making Bread:
- Open the lid and take out bread pan from the inside of container, attach the kneading blade to the rotating shaft and push down firmly
 Add the appropriate measured ingredients in the bread pan. Insure yeast to be added above flour and do not mix yeast with water, sugar and salt, otherwise the activation of yeast will be weaken.
 Put the bread pan into the Bread Maker and turn slightly clockwise. Close the lid.

CLEANING & CARE
Regular maintenance of your appliance will keep it safe and in proper operational order. Before cleaning always
disconnect the appliance from the mains supply. Wash removable parts in warm, soapy water then rinse and dry
all parts. Allow the bread maker and all accessories to cool completely before disassembling and cleaning.
Cleaning the Stainless Steel Housing and Lid
- Wipe the exterior of the stainless steel housing and the LCD screen with a soft, damp cloth. A non-abrasive liquid cleanser or mild spray solution may be used to avoid build-up of stains. Apply the cleanser to the sponge, not the outer surface or LCD screen, before cleaning. Do not use a dry paper towel or cloth to clean the LCD screen, or use an abrasive cleanser or metal scouring pad to clean any part of the bread maker as these will scratch the surface.
- If over-spills such as flour, nuts, raisins etc. occur in the interior baking chamber, carefully remove them using a soft, damp cloth. Use extreme caution when cleaning the heating elements. Ensure the bread maker is completely cool then gently rub a soft, damp sponge or cloth along the length of the heating element. Do not use any type of cleanser or cleaning agent.
- Let all surfaces dry thoroughly prior to inserting the power plug into a power outlet.
TECHNICAL SPECIFICATION
| Item No. | MBF-010 |
| Rating Voltage | AC 120V~60Hz |
| Rating Power | 710 W |
| Rating capacity | 1000 g(2 LB) |
Operation
| Problem | Possible Issues | Solution |
|
Bread Maker fails to mix flour and work | Check if plug into outlet | Press “Start/Stop” and Bread Maker begins to work |
| Check if operation is delayed | Indicator “:” is flashing, and countdown begins to work | |
| Damage of Parts | Send To Maintenance Department | |
|
Abnormal Sound | There is a litter of hard stuffs or crumbs in barrel | Remove anything found inside the unit before re-start |
| Lock Barrel into position | Re-place bread barrel into position | |
| Abnormal Smell/Taste | Wire cord damaged | Keep wire cord away from heated objects |
| something left on heating tube | Remove the matter left on heating tube | |
| LED indicates ”LLL” | Temperature inside the unit lower than 14°F | Use the unit under the environment at 14°F~ 104°F |
| LED indicates “HHH” | Temperature inside the unit higher than 122°F | use electric fan to cool it or naturally cool to be at room temperature |
| LED indicates “EE0” or ” EE1” | Defect with sensor | Sent to Maintenance Department |
| Bread is partly raw | Bread is raw | less water or water temperature is high |
TROUBLESHOOTING
- Can other bread recipes be made in this machine?
Results may vary when using other recipes as the recipes in this booklet are sized so that the dough is kneaded
properly and the finished bread does not exceed the bread pan capacity. Use only recipes with similar quantities of ingredients. As a general guide, a minimum 2 cups and maximum 4.5 cups of total dry ingredients is recommended on the bread settings. On the jam setting, as a general guide, a maximum 3 cups of fruit should be used.
- Can other sweetening agents be used in place of sugar?
Yes, honey, golden syrup or brown sugar can be used. When substituting honey or similar sweet liquids for sugar, ensure to decrease the same measurement of liquid to equal the liquid sugar substitute. We do not recommend powdered or liquid artificial sweeteners. - Can butter or margarine be used in place of oil?
Yes, but the bread crumb may appear a more creamy, yellow color.
- Can salt be omitted?
Salt plays a very important part in bread making. Omitting it will decrease water retention in the dough, as well as affect mixing, the strength of the gluten development and the fermentation of the yeast. In the finished bread, salt improves the loaf shape, crumb structure and crust color, as well as extending shelf life and enhancing flavor. - Why do the ingredients need to be placed in the bread pan in the specified order?
To ensure all dry ingredients are mixed with the water and to avoid the yeast activating prematurely with the water, salt or sugar when using the Delay Start feature.
- What do I do if the bread rose too much?
Try using less yeast (1/4 teaspoon less at a time). This could also be the result of forgetting to add salt to the
recipe or forgetting to put the kneading blade into the baking pan.


 Add the appropriate measured ingredients in the bread pan. Insure yeast to be added above flour and do not mix yeast with water, sugar and salt, otherwise the activation of yeast will be weaken.
 Put the bread pan into the Bread Maker and turn slightly clockwise. Close the lid.
 Afrikaans
 Albanian
 Amharic
 Arabic
 Armenian
 Azerbaijani
 Basque
 Belarusian
 Bengali
 Bosnian
 Bulgarian
 Catalan
 Cebuano
 Chichewa
 Chinese (Simplified)
 Chinese (Traditional)
 Corsican
 Croatian
 Czech
Czech Danish
 Dutch
Dutch English
 Esperanto
 Estonian
 Filipino
 Finnish
 French
 Frisian
 Galician
 Georgian
 German
 Greek
Greek Gujarati
 Haitian Creole
 Hausa
Hausa Hawaiian
 Hebrew
 Hindi
Hindi Hmong
Hmong Hungarian
 Icelandic
 Igbo
Igbo Indonesian
 Irish
Irish Italian
 Japanese
 Javanese
 Kannada
 Kazakh
 Khmer
Khmer Korean
 Kurdish (Kurmanji)
 Kyrgyz
 Lao
Lao Latin
Latin Latvian
 Lithuanian
 Luxembourgish
 Macedonian
 Malagasy
 Malay
Malay Malayalam
 Maltese
 Maori
Maori Marathi
 Mongolian
 Myanmar (Burmese)
 Nepali
 Norwegian
 Pashto
 Persian
 Polish
 Portuguese
 Punjabi
 Romanian
 Russian
 Samoan
 Scottish Gaelic
 Serbian
 Sesotho
 Shona
Shona Sindhi
 Sinhala
 Slovak
 Slovenian
 Somali
 Spanish
 Sundanese
 Swahili
 Swedish
 Tajik
Tajik Tamil
Tamil Telugu
 Thai
Thai Turkish
 Ukrainian
 Urdu
Urdu Uzbek
Uzbek Vietnamese
 Welsh
Welsh Xhosa
Xhosa Yiddish
 Yoruba
 Zulu
Zulu
Our bread machine was damaged when it fell from the counter. The stainless steel top needs replacement which is easily accomplished by removal of the screw at the point of rotation. Can you supply this part? Please look for my email with more information and attached photos of damaged machine model MDF – 010
Thank you