Laser SPK-QC001 Wireless Alarm Clock User Guide
IMPORTANT SAFETY INSTRUCTIONS
- Read all instructions carefully before use.
- Retain manuals for future reference.
- Use this product only in the manner described.
- Only use a water-dampened soft-cloth to clean the surface of this product.
- The following will damage this product: any liquid such as water or moisture, extreme heat; cold; humidity, dusty or sandy environments.
- Only place this device on stable surfaces and ensure that any attached cables are secure and will not cause the device to fall.
- If charging is required, it is recommended to thoroughly charge electronic devices for the first time overnight. Subsequent charges can be as needed. During charging, or extended use, the product may become warm.
- There are no user serviceable parts in this product.
- Unauthorized attempts to dismantle or repair this product will void product warranty
- Using this device near other electronic devices may cause interference.
GETTING TO KNOW YOUR CLOCK RADIO
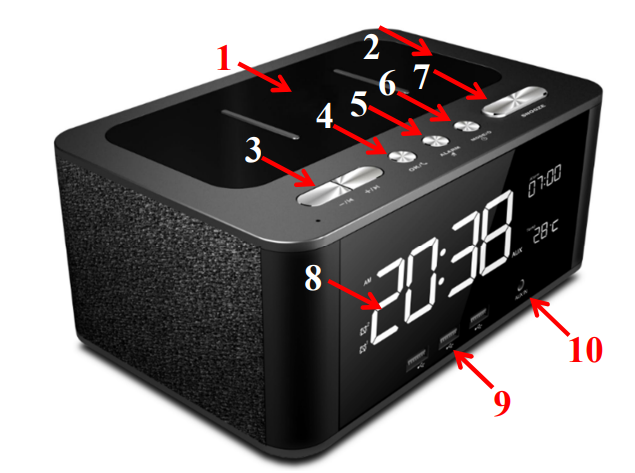
| 1 | Charging Pad | Wireless charging pad for compatible devices |
| 2 | Indicator Lamp | Indicator light while wireless charging |
| 3 | Volume/Next/Previous | Adjust volume and music tracks for playback |
| 4 | OK / Hands free | Confirm selections and answer phone calls via hands free |
| 5 | Alarm Settings | Set and check alarm settings |
| 6 | Mode / Power | Turn audio mode On or Off and change between
alarm clock and Audio settings |
| 7 | Snooze | Delay alarms for 9 mins |
| 8 | Clock Display | Display for time, alarm and audio settings |
| 9 | USB Charging Sockets | Connect your portable device via a USB to begin
charging |
| 10 | AUX Input | Connect your portable audio device via a 3.5mm
audio cable |
CLOCK AND AUDIO MODES
Your SPK-QC001 has two different modes; a normal clock mode and an audio mode. When in audio mode, you can access music for playback via Bluetooth, AUX (3.5mm Audio cable) or via FM Radio. The Audio mode can be turned ON or OFF by pressing and holding the MODE/POWER button. When audio mode is ON, press the MODE/POWER button to select the type of audio playback as displayed on screen: BT (Bluetooth), FM (FM Radio) or AUX (3.5mm
Audio cable). To turn OFF the audio mode press and hold the MODE/POWER button again until the audio mode icons (BT, or AUX or FM) disappear from screen. (You can now access the user settings for the alarm clock radio as described later on in this manual).
SETTING THE TIME (From Clock Radio Mode)
Press the MODE button. The hour digit will now blink Set the hours by pressing the – or + buttons Short press the MODE button again. The minute digit will now blink. Set the minutes by pressing the – or + buttons again Short press MODE or wait 15 seconds to return to the clock view
12 HOUR/24 HOUR MODE (From Clock Radio Mode)
Press and hold the OK button to switch from 12 hour mode to 24 hour mode
TEMPERATURE DISPLAY (From Clock Radio Mode)
To switch the temperature display from Celsius to Fahrenheit, press the – button and the + button at the same time (The room temperature display is accurate to +/- 3 degrees).
WIRELESS CHARGING
Note: First ensure wireless charging in turned on, on your compatible Qi enabled Smart Phone. (Refer to the end of this manual for various Qi enabled Smart Phones) Place your Smart Phone on the center pad, at the top of your SPK-QC001. The indicator light will turn ON while charging.
Note: Due to the nature of wireless charging, devices may get warm to touch while charging. Wireless charging is unavailable in FM mode.
USB CHARGING
There are 3 USB ports at the front of the alarm clock. Simply connect your portable device using a USB cable to begin charging.
AUDIO MODE – BLUETOOTH MODE
- Press and hold the MODE button to enter the audio mode. The first MODE by default, is Bluetooth mode.
- You will see letters BT begin to blink on the LED display, followed by a confirmation sound that your SPK-QC001 is ready to pair.
- Turn on Bluetooth from your portable media device and search for your SPK-QC001. Then tap and pair.
- Once connected a second confirmation will sound and BT will stop flashing on screen. You can now begin music playback.
- To exit Bluetooth mode, long press the MODE button until BT disappears from the LED display and to be returned back to normal clock mode.
RECEIVING/REJECTING CALL – BLUETOOTH MODE
While in Bluetooth mode, press OK to accept a call Press OK again to hang up from a call
Note: You can only reject a call from your device, not from the speaker
MUSIC CONTROLS VIA THE SPEAKER – BLUETOOTH MODE
- Press the OK button to play or pause music playback
- Press the – button to go to the previous song
- Press and hold the – button to decrease volume
- Press the + button to go to the next song
- Press and hold the + button to increase volume
AUDIO MODE – FM RADIO MODE
- Use the MODE button to select FM mode.
- Press and hold the OK button to auto-search and store all available FM stations
- Press the – or + buttons to move between saved stations
- Press and hold the – or + buttons to change volume
- To exit FM mode, press and hold the MODE button until FM disappears from the LED display and to be returned back to normal alarm clock mode.
AUDIO MODE – AUX MODE
- Use the MODE button to select AUX mode.
- Use a 3.5mm audio cable to connect your portable media device to the AUX input – socket at the front of the speaker.
- To exit AUX mode, long press the MODE button until AUX disappears from the LED display and to be returned back to normal clock mode.
SETTING AN ALARM
Set alarm 1
- Press the ALARM button. The ALARM 1 text and icon will appear. The ALARM 1 time will begin to blink
- Press the + and – buttons to adjust the hour. Press the ALARM button to move to minutes, using the same buttons to make adjustments.
- Press the ALARM button then the – or + buttons to choose buzzer (shown as Bu22) or FM radio (shown as the radio station frequency) as the alarm tone
- Press the ALARM button a last time to confirm and exit the alarm settings.
- The set time for Alarm 1 and the Alarm 1 icon/text will remain on screen.
Note: The last radio station you listened to will be the FM alarm tone
Set alarm 2
- After Alarm 1 has been set, press the ALARM button (5 times) until the ALARM 2 icon and text appear on the screen.
- The Alarm 2 time will begin to blink.
Follow on from the instructions above for ALARM 1 to adjust the Alarm 2 time and settings.
SNOOZE
Press the SNOOZE button to snooze an alarm for 9 minutes When the alarm sounds, press the ALARM button to cancel the alarm and snooze
CHECK ALARM
- Press the SNOOZE button to check the ALARM 1 time.
- The ALARM 1 text will blink on screen and underneath it, the set time.
- Press the SNOOZE button to check the ALARM 2 time.
- The ALARM 2 text will blink on screen and above it, the set time.
- Press the SNOOZE button again to exit.
TURN ALARMS OFF (OR ON)
- Press the SNOOZE button. The ALARM 1 text will blink
- Press and hold the ALARM button to turn ALARM 1 OFF (or conversely ON).
- The ALARM 1 icon will turn OFF (or conversely ON).
- Press the SNOOZE button again. The ALARM 2 text will blink
- Press and hold the ALARM button to turn ALARM 2 OFF (or conversely ON).
- The ALARM 2 icon will turn OFF (or conversely ON).
- Press the SNOOZE button a last time to exit the settings