
Nizoni INV00783 Wireless Charging Dual Alarm Clock User Manual
Overview
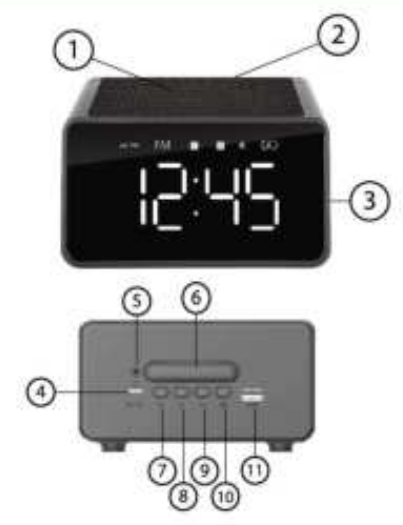
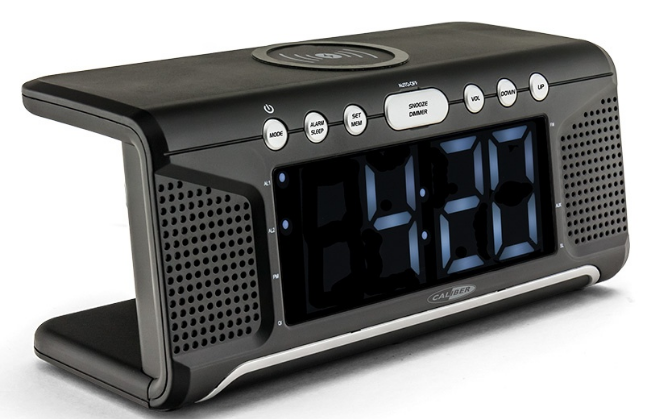
FUNCTION KEYS:
- Wireless charge area
- Wireless charging indicator
- Display
- Type-C input Port
- Product charging indicator
- SNOOZE button / Brightness adjustment
Music Mode:
Long press: increase Volume
Short press: Next track button
Clock Mode:
Long press: Continuos add by one digit
Short press: Add one digit
Music Mode:
Long press: Decrease volume
Short press: Previous track button
Clock Mode:
Long press Continuos minus by one digit
Short press: Minus one dig
Mode button
Music Mode:
Long press: Close playing
Short press: Switch modes Bluetooth / FM Radio
Clock Mode:
Long press: Swict to Bluetooth
Short press: Setting alarm Clock.
BLUETOOTH CONNECTION
The operating instructions of your Bluetooth device for pairing with the speaker, press and hold the “M” button to enter the Bluetooth mode. When pairing, The Bluetooth icon will be on the display, use a cell phone or computer device, or other device and search for device name “INV00783* dick to connect, A voice will confirm the device has successfully connected.
TO TURN ON
After unpacking, press the “Power button” to enter the startup program. The LED on the front display interface lights up for 5 seconds for self-inspection to ensure the normal use of the splay screen at the same time. Self-inspection will occur during every start-up time.
CLOCK SETTING
The default clock mode of the device is 12H Short press the “Power button” to enter the clock setting mode. At this point the number of hours (000 will illuminate, adjust the hour by pressing the “+*/”-” key, then short press the M key to switch to the minute setting area, and the minutesCo0) with illuminate, adjust the minutes by pressing “4”/*.* ley. Short press the M key to complete setting the clock. To change the clock between 12H and 24H mode. Make sure both alarm clocks are turned OFF After the device is turned ON. Quickly double-press the “Power button” to change the 12H / 24H dock mode.
ALARM SETTING
After setting up the clock, short press “M° to switch to the setting of “Alarm 1° (short press “M” again to switch to the setting of “Alarm 2*3. At this time the logo of Alarm 1 or Alarm 2 illuminates, then press the “Power button” to enter the setting alarm. Setting mode. When hour number 400J illuminates, adjust the hour by pressing the “+*/”-” key, then short press the “M° key to switch to the minute setting area, the minutes 001 will illuminate, adjust the minutes by pressing “+*/* key Short press M key to go to next setting.
Front Back
ALARM SOUND:
There are 6 kinds of chord alarm tones to choose from, which can be selected by pressing the *+” I* key. When the tone is selected press “M” to enter the next setting ALARM ON/OFF: Press the *+* J*-* key to choose the clock ON or OFF. After selecting the ON option, on the display ICONS of Alarm 1 or 2 will light up, which means the alarm clock set is successful After selecting the OFF option, on the display ICONS of Alarm 1 or 2 will not be displayed, it means the alarm clock is not 3e6. Short press the M key to go to the next setting.
SNOOZE BUTTON
When the alarm clock rings, Sheet presses the SNOOZE button to snooze the alarm for 5 minutes. To stop the snooze mode, short press any other button and the alarm will not ring anymore. BRIGHTNESS Select the brightness level as per your comfort by short-pressing the “SNOOZE” button. When the clock is not plugged in charging, the brightness will reduce automatically to save battery
RESET THE ALARM SETTING
When on the main screen, long press the ” SNOOZE” button for 5 seconds to reset the alarm setting to the default factory setting. Both alarm clocks will turn off.
RADIO FM MODE
When the Bluetooth mode, Short press “M” to switch to Radio FM mode. During Fadio FM mode, short press the “Power button” to scan and search the FM stations automatically. After completion of the automatic search, short press the *+*/** key to select the channel. Long press the “+”/*-*key to adjust the volume.
BUILT-IN BATTERY:
Please charge this clock by using the Type-C charging cable provided. (DO NOT USE ANY 3RD PARTY CABLES) LOW battery: The battery icon will flash on the upper right of the display. Charge the unit using the Type C charging cable provided. When charging RED light will shine brightly, Once the clock is fully charged, the RED light will turn off and the BLUE light will shine brightly.
WIRELESS CHARGING FUNCTION
The wireless charging function will only work when the clock is connected to a power source using the Type C charging cable Please use DC power output DESV 2A. Face your mobile phone on the top center of the clock to start charging wirelessly. Only devices with witness charging functions can be used RED light indicates the wireless charging function is ready to use. BLE light indicates the mobile phone is charging.
TROUBLESHOOTING
- If the Bluetooth does not function or powers off after powering on the speaker is low in power and needs to be recharged.
- The speaker and pairing device need to be within 16 feet of each other with no major obstacles in order to paint. device pared successfully but there is no sound device and speaker connected to your device and effective operating distance signal. Marything @stort or be fragmented attery warring.
CARE AND MAINTENANCE
Do not expose the unit to moisture or hum avoid damage to the internal circuitry Do not use abrasive dearing solvents to dean the unit. Do not expose the uns to it as this will shorten the extremely high or low temperatures of the electronic device destroy the battery, and/or distort certain plastic parts Do not dispose of the unit in the fire as they may explode or combust Do not expose the unit to contact with sharp objects as this we cause scratches Do not let the unit fall from high places, as doing so may damage the internal cecal Do not attempt to disassemble the unit.
FCC Statement:
Changes or modifications not expressly approved by the party responsible for compliance could void the user’s authority to operate the equipment. This equipment has been tested and found to comply with the limits for a Class B digital device, pursuant to Part 15 of the FCC Rules. These limits are designed to provide reasonable protection against harmful interference in a residential installation. This equipment generates uses and can radiate radio frequency energy and, if not installed and used in accordance with the instructions, may cause harmful interference to radio communications.
However, there is no guarantee that interference will not occur in a particular installation. If this equipment does cause harmful interference to radio or television reception, which can be determined by turning the equipment off and on, the user is encouraged to try to correct the interference by one or more of the following measures:
- Reorient or relocate the receiving antenna.
- Increase the separation between the equipment and the receiver.
- Connect the equipment to an outlet on a circuit different from that to which the receiver is connected.
- Consult the dealer or an experienced radio/TV technician for help.
This device complies with part 15 of the FCC rules. Operation is subject to the following two conditions (1)this device may not cause harmful interference, and (2) this device must accept any interference received, including interference that may cause undesired operation. This equipment complies with FCC radiation exposure limits set forth for an uncontrolled environment. This equipment should be installed and operated with a minimum distance of 20cm between the radiator & your body.
Can’t shut the alarms off even after hitting snooze for 5 seconds. I’m close to throwing the clock away.