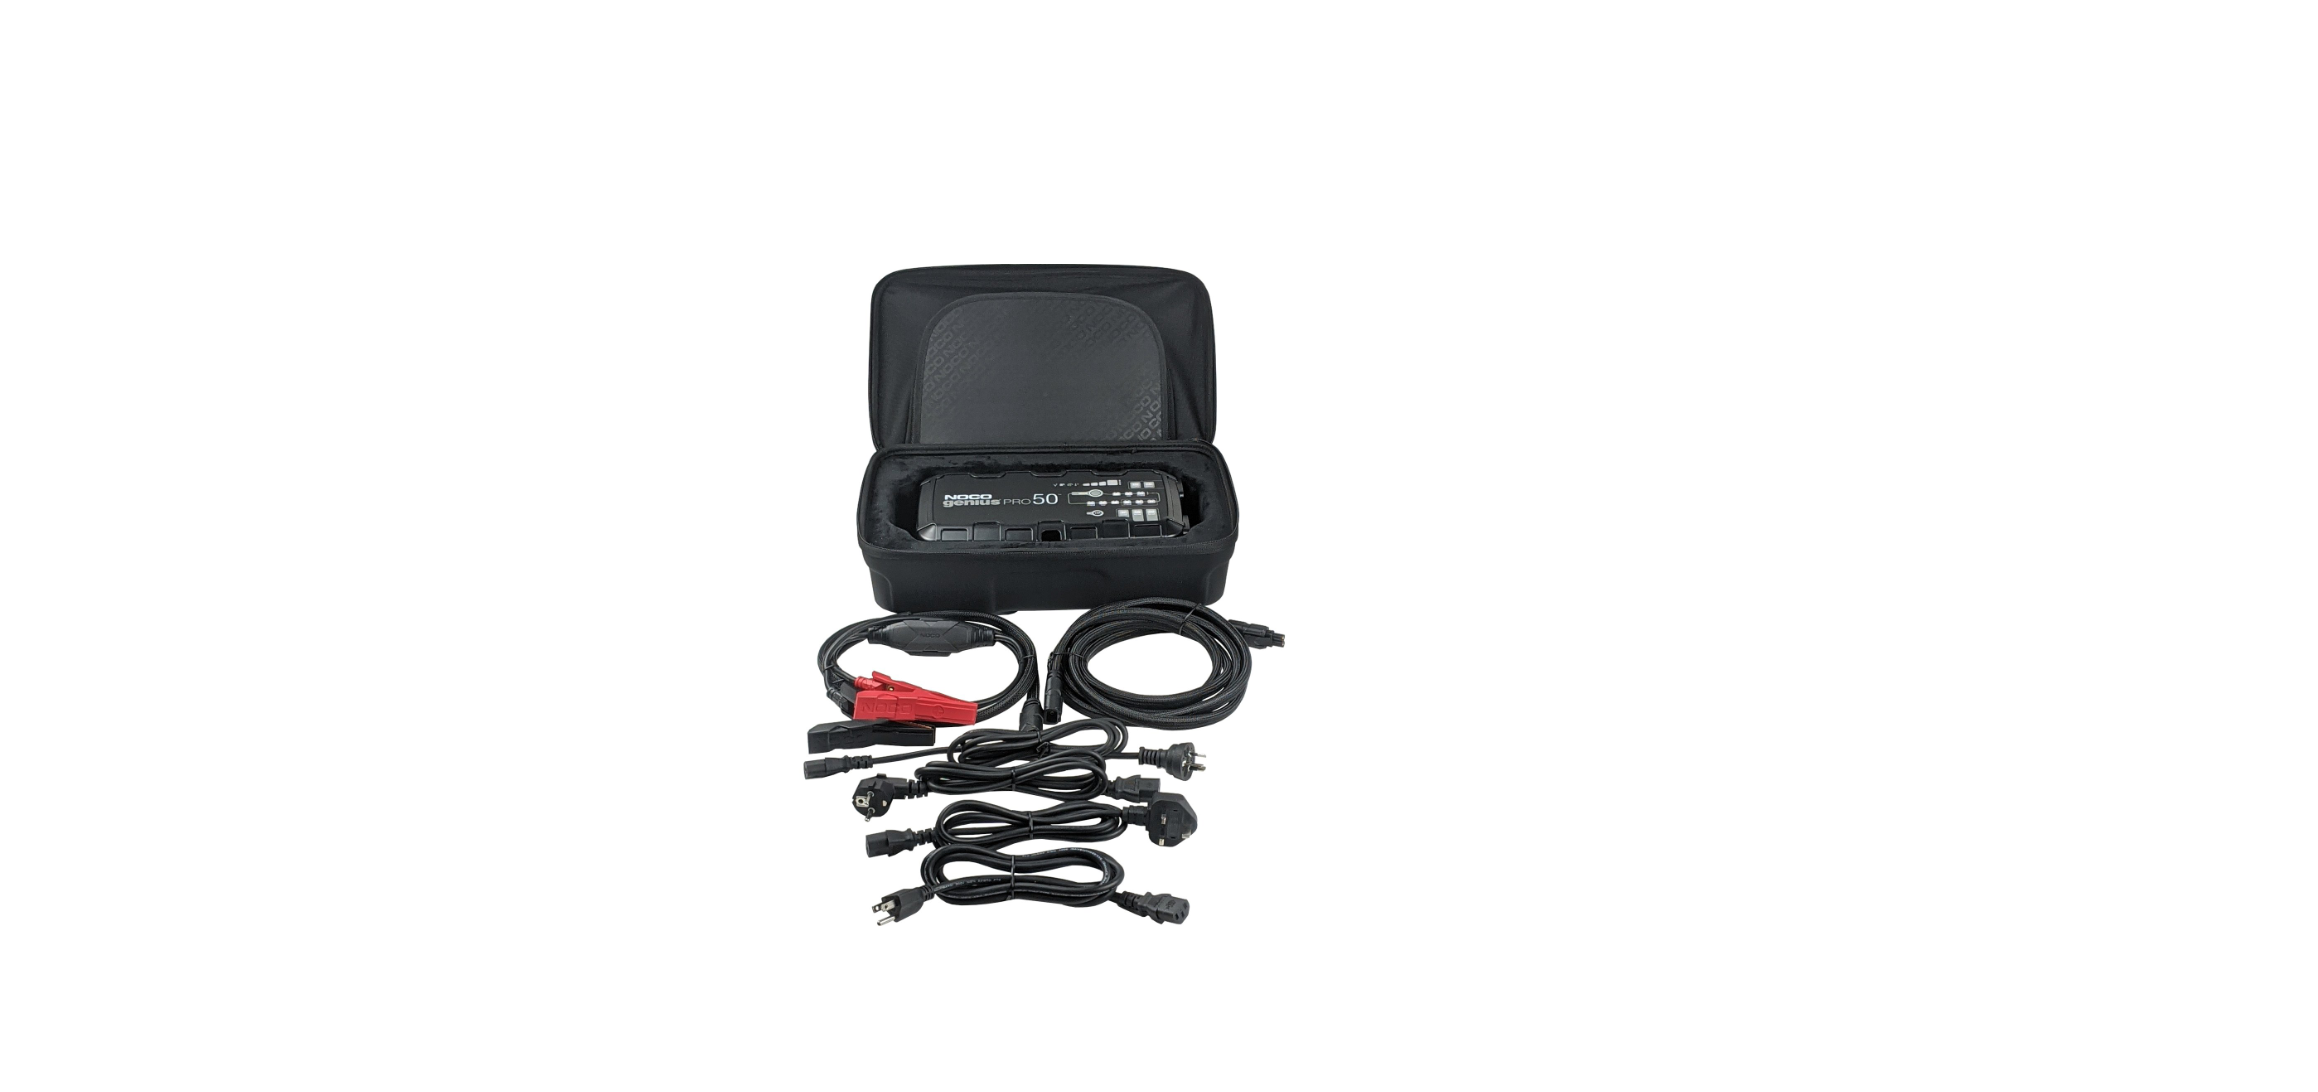
Noco GeniusPRO50 User Manual

DANGER
Electrical Shock.
The product is an electrical device that can shock and cause serious injury. Do not cut power cords. Do not submerge in water or get wet.
Explosion.
Unmonitored, incompatible, or damaged batteries can explode if used with the product. Do not leave the product unattended while in use. Do not attempt to jump-start a damaged or frozen battery. Use products only with batteries of recommended voltage. Operate products in well-ventilated areas.
Fire.
The product is an electrical device that emits heat and is capable of causing burns. Do not cover the product. Do not smoke or use any source of electrical spark or fire when operating the product. Keep product away from combustible materials.
Eye Injury.
Wear eye protection when operating the product. Batteries can explode and cause flying debris. Battery acid can cause eye and skin irritation. In the case of contamination of eyes or skin, flush the affected area with running clean water and contact poison control immediately.
Explosive Gases.
Working in the vicinity of lead-acid is dangerous. Batteries generate explosive gases during normal battery operation. To reduce the risk of battery explosion, follow all safety information instructions and those published by the battery manufacturer and manufacturer of any equipment intended to be used in the vicinity of the battery. Review cautionary markings on these products and on the engine.
Important Safety Warnings
About GENIUS2.
The NOCO GENIUS2 represents some of the most innovative and advanced technology on the market, making each charge simple and easy. It is quite possibly the safest and most efficient charger you will ever use. The GENIUS2 is designed for charging all types of 6V & 12V lead-acid batteries, including Lithium (LiFePO4), Wet (Flooded), Gel, MF (Maintenance-Free), CA (Calcium), EFB (Enhanced Flooded Battery), and AGM (Absorption Glass Mat) batteries. It is suitable for charging battery capacities up to 40 Amp-Hours and maintaining all battery sizes.
Getting Started.
Before using the charger, carefully read the battery manufacturer’s specific precautions and recommended rates of charge for the battery. Make sure to determine the voltage and chemistry of the battery by referring to your battery owner’s manual prior to charging.
Mounting.
It is important to keep in mind the distance to the battery. The DC cable length from the charger, with either the battery clamp or eyelet terminal connectors, is approximately 77.7 inches (1973.6mm). Allow for 12 inches (304mm) of slack between connections.
Personal Precaution.
Only use the product as intended. Someone should be within range of your voice or close enough to come to your aid in case of emergency. Have a supply of clean water and soap nearby in the case of battery acid contamination. Wear complete eye protection and protective clothing while working near a battery. Always wash your hands after handling batteries and related materials. Do not handle or wear any metal objects when working with batteries including; tools, watches, or jewelry. If metal is dropped onto the battery, it may spark or create a short circuit resulting in electrical shock, fire, or explosion which may result in injury, death, or property damage.
How To Use
Charging Modes.
The GENIUSPRO50 has seventeen (17) modes: Standby, 12V, 12V AGM, 12V LITHIUM, 6V, 6V AGM, 6V LITHIUM, 24V, 24V AGM, 24V LITHIUM, 6V REPAIR, 12V REPAIR, 24V REPAIR, 12V SUPPLY, 24V SUPPLY, 10A Mode and Force Mode. Some charge modes must be pressed and held for three (3) to five (5) seconds to enter the mode. These “Press and Hold” modes are advanced charging modes that require your full attention before selecting. It is important to understand the differences and purpose of each charge mode. Do not operate the charger until you confirm the appropriate charge mode for your battery. Below is a brief description


Using Lithium Charge Modes.
Lithium charge modes are designed for 6-volt, 12-volt, and 24-volt lithium iron phosphate (LiFePO4).
Using Supply Modes. [Press and Hold for 3 Seconds While Not Connected To The Battery]
Supply Mode converts the charger to a constant voltage DC power supply. It can be used to power 12VDC devices, tire inflators, seat heaters, and more. As a power supply, it can also be used to retain a vehicle’s onboard computer settings during battery repair or replacement.
13.6V Supply (12V Supply)
provides 13.6-volts up to 50A. The charger output voltage will drop if the output load exceeds the 50A current limit.
27.2V Supply (24V Supply)
provides 27.2-volts up to 25A. The charger output voltage will drop if the output load exceeds the 25A current limit.
Using Repair Modes. [From Standby Press and Hold 3 Seconds While Connected to the Battery]
Repair is an advanced battery recovery mode for repairing and storing, old, idle, damaged, stratified, or sulfated batteries. Not all batteries can be recovered. Batteries tend to become damaged if kept at a low charge and/or never given the opportunity to receive a full charge. The most common battery problems are battery sulfation and stratification. Both battery sulfation and stratification will artificially raise the open circuit voltage of the battery, causing the battery to appear fully charged while providing low capacity. Use Repair in an attempt to reverse these problems.
For optimal results, take the battery through a full charge cycle, bringing the battery to full charge, before using this mode. Repair Mode can take up to four (4) hours to complete the recovery process and will return to Standby when completed. Repeated repair cycles may be needed depending on the size and condition of the battery, however, battery temperature must be closely monitored.
Force Mode. [Press & Hold for 5 seconds]
Force mode allows the charger to manually begin charging when the connected battery’s voltage is too low to be detected. If the battery voltage is too low for the charger to detect, press and hold the mode button for 5 seconds to activate Force Mode, then select the appropriate mode. All available modes will flash. Once a charge mode is selected, the Charge LEDs and the selected mode LED will alternate between each other, indicating Force Mode is active. After five (5) minutes the charger will return to the normal charge operation and low voltage detection will be reactivated.
Connecting to the Battery.
Do not connect the AC power plug until all other connections are made. Identify the correct polarity of the battery terminals on the battery. The positive battery terminal is typically marked by these letters or symbol (POS, P, +). The negative battery terminal is typically marked by these letters or symbol (NEG, N, -). Do not make any connections to the carburetor, fuel lines, or thin, sheet metal parts.
FOLLOW THESE STEPS WHEN THE BATTERY IS INSTALLED IN THE VEHICLE. WARNING: A SPARK NEAR THE BATTERY MAY CAUSE A BATTERY EXPLOSION. TO REDUCE THE RISK OF A SPARK NEAR THE BATTERY:
- Position AC and DC cords to reduce the risk of damage by the hood, door, or moving engine part.
- Stay clear of fan blades, belts, pulleys, and other parts that can cause injury to persons.
- Check the polarity of battery terminals. The POSITIVE (POS, P, +) battery terminal usually has a larger diameter than the NEGATIVE (NEG, N, -) battery terminal.
- Determine which battery terminal is grounded (connected) to the chassis. If the negative battery terminal is grounded to the chassis (as in most vehicles), see Step 5. If the positive battery terminal is grounded to the chassis,
- For negative-grounded vehicles only, connect the POSITIVE (RED) battery clamp or eyelet terminal connector from the battery charger to the POSITIVE (POS, P. +) ungrounded battery terminal. Connect a NEGATIVE (BLACK) battery clamp or eyelet terminal connector to the vehicle chassis or engine block away from the battery. Connect to a heavy gauge metal part of the frame or engine block.
Begin Charging.
- Verify the voltage and chemistry of the battery.
- Confirm that you have connected the battery clamps or eyelet terminal connectors properly and the AC power plug is plugged into an electrical outlet.
- [First-time use] The charger will begin in Standby mode, indicated by an orange LED. In Standby, the charger is not providing any power.
- Press the mode button to toggle to the appropriate charge mode (press and hold for three seconds to enter an advanced charge mode) for the voltage and chemistry of your battery.
- The mode LED will illuminate the selected charge mode and the Charge LEDs will illuminate (depending on the health of the battery) indicating the charging process has started.
- The charger can now be left connected to the battery at all times to provide maintenance charging.
Understanding Charge LEDs.

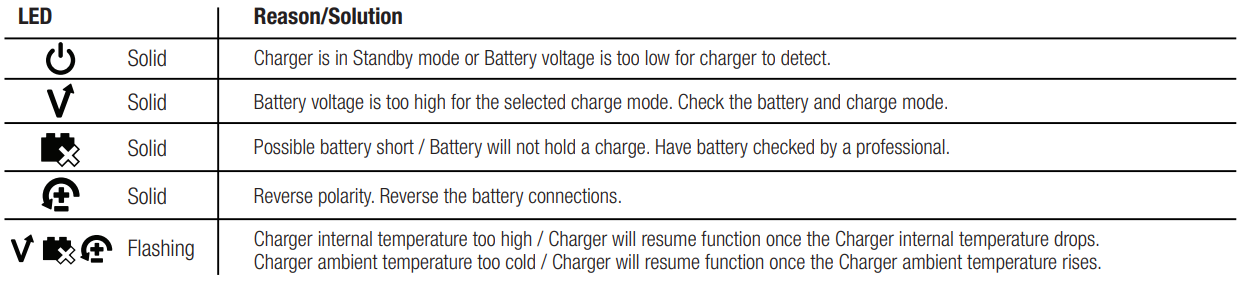
Understanding Error LEDs
Error Conditions will be indicated by the following LEDs
Charging Times

The estimated time to charge a battery is shown below. The size of the battery (Ah) and its depth of discharge (DOD) greatly affect its charging time. The charge time is based on an average depth of discharge to a fully charged battery and is for reference purposes only. Actual data may differ due to battery conditions. The time to charge a normally discharged battery is based on a 50% DOD. The temperature will also impact charging times. The GENIUS2 features thermal compensation that automatically adjusts charging profiles to maximize charging performance.
Overview

- Mode Button Push to cycle through charging Modes.
- Standby LED Illuminates when the charger is in Standby Mode, the charger is not charging or providing any power to the battery.
- Overvoltage Error LED Illuminates solid Red; Battery Voltage is above Protect voltage.
- Bad Battery Error LED Illuminates solid Red when the connected battery will not hold a charge.
- Reverse Polarity Error LED Illuminates solid Red when reverse polarity is detected.
- Hot LED Illuminates solid or flashes Red when the internal temperature is too high.
- Charge LED Indicates the connected battery(s) state of charge.
- Optimization Bar LED Slowly chases Green when the battery is fully charged and is in the optimization stage.
- 12V / 24V Supply Mode LED Illuminates solid Red when Supply mode is selected.
- Mode LED Indicates the Charge Mode the charger is currently in. Push the MODE button to cycle through charge Modes.
- «Press and Hold» Mode LED Mode button must be pressed and held for 3 seconds to enter the mode.
- 6V / 12V / 24V Repair Mode LED When selected, a red LED will illuminate and flash.
- 10A Mode Button Push to activate Reduced Charge Current Mode.
- 10A Mode LED “Reduced Charge Current Mode” Illuminates solid White when Reduced Charge Current Mode is active.
Technical Specifications
- Input Voltage AC: 100-240 VAC, 50-60Hz
- Working Voltage AC: 100-240 VAC, 50-60Hz
- Output Power: 750 W Max
- Charging Voltage: Various
- Charging Current: 50A (6V, 12V), 25A (24V)
- Low-Voltage Detection: 1V (6V, 12V, 24V)
- Back Current Drain: <0.5mA
- Ambient Temperature: -20°C to +50°C
- -20°C to +50°C: 6V, 12V, 24V
- Battery Chemistries: Wet, Gel, MF, CA, EFB, AGM, Calcium, Lithium (LiFePO4)
- Battery Capacity: (6V and 12V) Up to 2000Ah, (24V) Up To 1000Ah. Maintains All Battery Sizes
- Housing Protection: IP20
- Cooling: Forced Air: Forced Air
- Dimensions (L x W x H): 12.3 x 6.9 x 3.6 Inches
- Weight: 5.0 lbs
3-Year Hassle-Free Warranty
NOCO warrants that this product (the “Product”) will be free from defects in material and workmanship for a period of Three (3) years from the date of purchase (the “Warranty Period”). For defects reported during the Warranty Period, NOCO will, at its discretion, and subject to NOCO’s technical support analysis, either repair or replace defective products. Replacement parts and products will be new or serviceably used, comparable in function and performance to the original part, and warranted for the remainder of the original Warranty Period.
This Warranty is made solely for the benefit of the original purchaser of the Product from NOCO or from a NOCO-approved reseller or distributor and is not assignable or transferable. To assert a warranty claim, the purchaser must: (1) request and obtain a return merchandise authorization (“RMA”) number and return location information (the “Return Location”) from NOCO Support by emailing support@no.co or by calling 1.800.456.6626; and (2) send the Product, including RMA number, and receipt to the Return Location. DO NOT SEND IN THE PRODUCT WITHOUT FIRST OBTAINING AN RMA FROM NOCO SUPPORT. The original purchaser is responsible (and must prepay) for all packaging and transportation costs to ship products for warranty service.
HASSLE-FREE WARRANTY CONDITIONS
These conditions apply only to the Product during the Warranty Period. The Hassle-Free Warranty is void either by elapsed time from the date of purchase (elapsed time from serial number date if no proof of purchase) or from the conditions listed earlier in this document. Return the Product with the appropriate documentation.
NOTWITHSTANDING THE ABOVE, THIS HASSLE-FREE WARRANTY IS VOID AND DOES NOT APPLY TO PRODUCTS THAT: (a) are misused, mishandled, subjected to abuse or careless handling, accident, improperly stored, or operated under conditions of extreme voltage, temperature, shock, or vibration beyond NOCO’s recommendations for safe and effective use; (b) improperly installed, operated or maintained; (c) are/were modified without the express written consent of NOCO; (d) have been disassembled, altered or repaired by anyone other than NOCO; (e) the defects of which were reported after the Warranty Period. THIS HASSLE-FREE WARRANTY DOES NOT COVER: (1) normal wear and tear; (2) cosmetic damage that does not affect functionality; or (3) Products where the NOCO serial number is missing, altered, or defaced.


