PHILIPS HR2660 7000 series Pasta Maker User Manual
Overview
IMPORTANT SAFETY INSTRUCTIONS
DANGER
To reduce the risk of electric shock: – Do not reach for a corded product that has fallen into the water. Unplug immediately from the power outlet. – Keep the product and power cord dry (Fig. 2).
- Use the product only in dry condition. Do not use it while bathing or in a shower. – Remove the power cord from the power outlet and product before cleaning.
- Do not place or store the product where it can fall or be pulled into a tub or sink. Do not place or drop the product into water or other liquid.
- Always unplug this product from the power outlet immediately after use.
WARNING
To reduce the risk of burns, fire, electric shock, or injury to persons:
- Close supervision is required when this product is used by, on, or near children, or persons with limited physical, sensory, or mental capabilities or invalids.
- Use this product only for its intended household use as described in this manual. Do not use attachments not recommended by Philips North America LLC.
- Never operate this product if it has a damaged power cord, if it is not working properly, after it has been dropped or damaged, or after the product or power cord has been dropped into water. For assistance call 1-800-243-7884. – Keep the power cord away from heated surfaces.
- Never drop or insert any object into any opening.
- Do not use the power cord in or near a power outlet that contains an electric air freshener to prevent damage to the power cord.
- Do not use products outdoors or operate where aerosol (spray) products are being used or where oxygen is being administered.
- Always check rotating discs, foil, and attachments before using the product. Do not use the product if rotating discs, foil, and attachments are damaged, as injury may occur.
- Always attach the power cord to the product first, then to a power outlet. To disconnect, set all controls to the off position. Then remove the power cord from the power outlet. – Plug the power cord directly into a power outlet. Do not use an extension cord.
- Unplug the power cord before plugging in or unplugging the product. – Only use the power cord and other accessories supplied with the product.
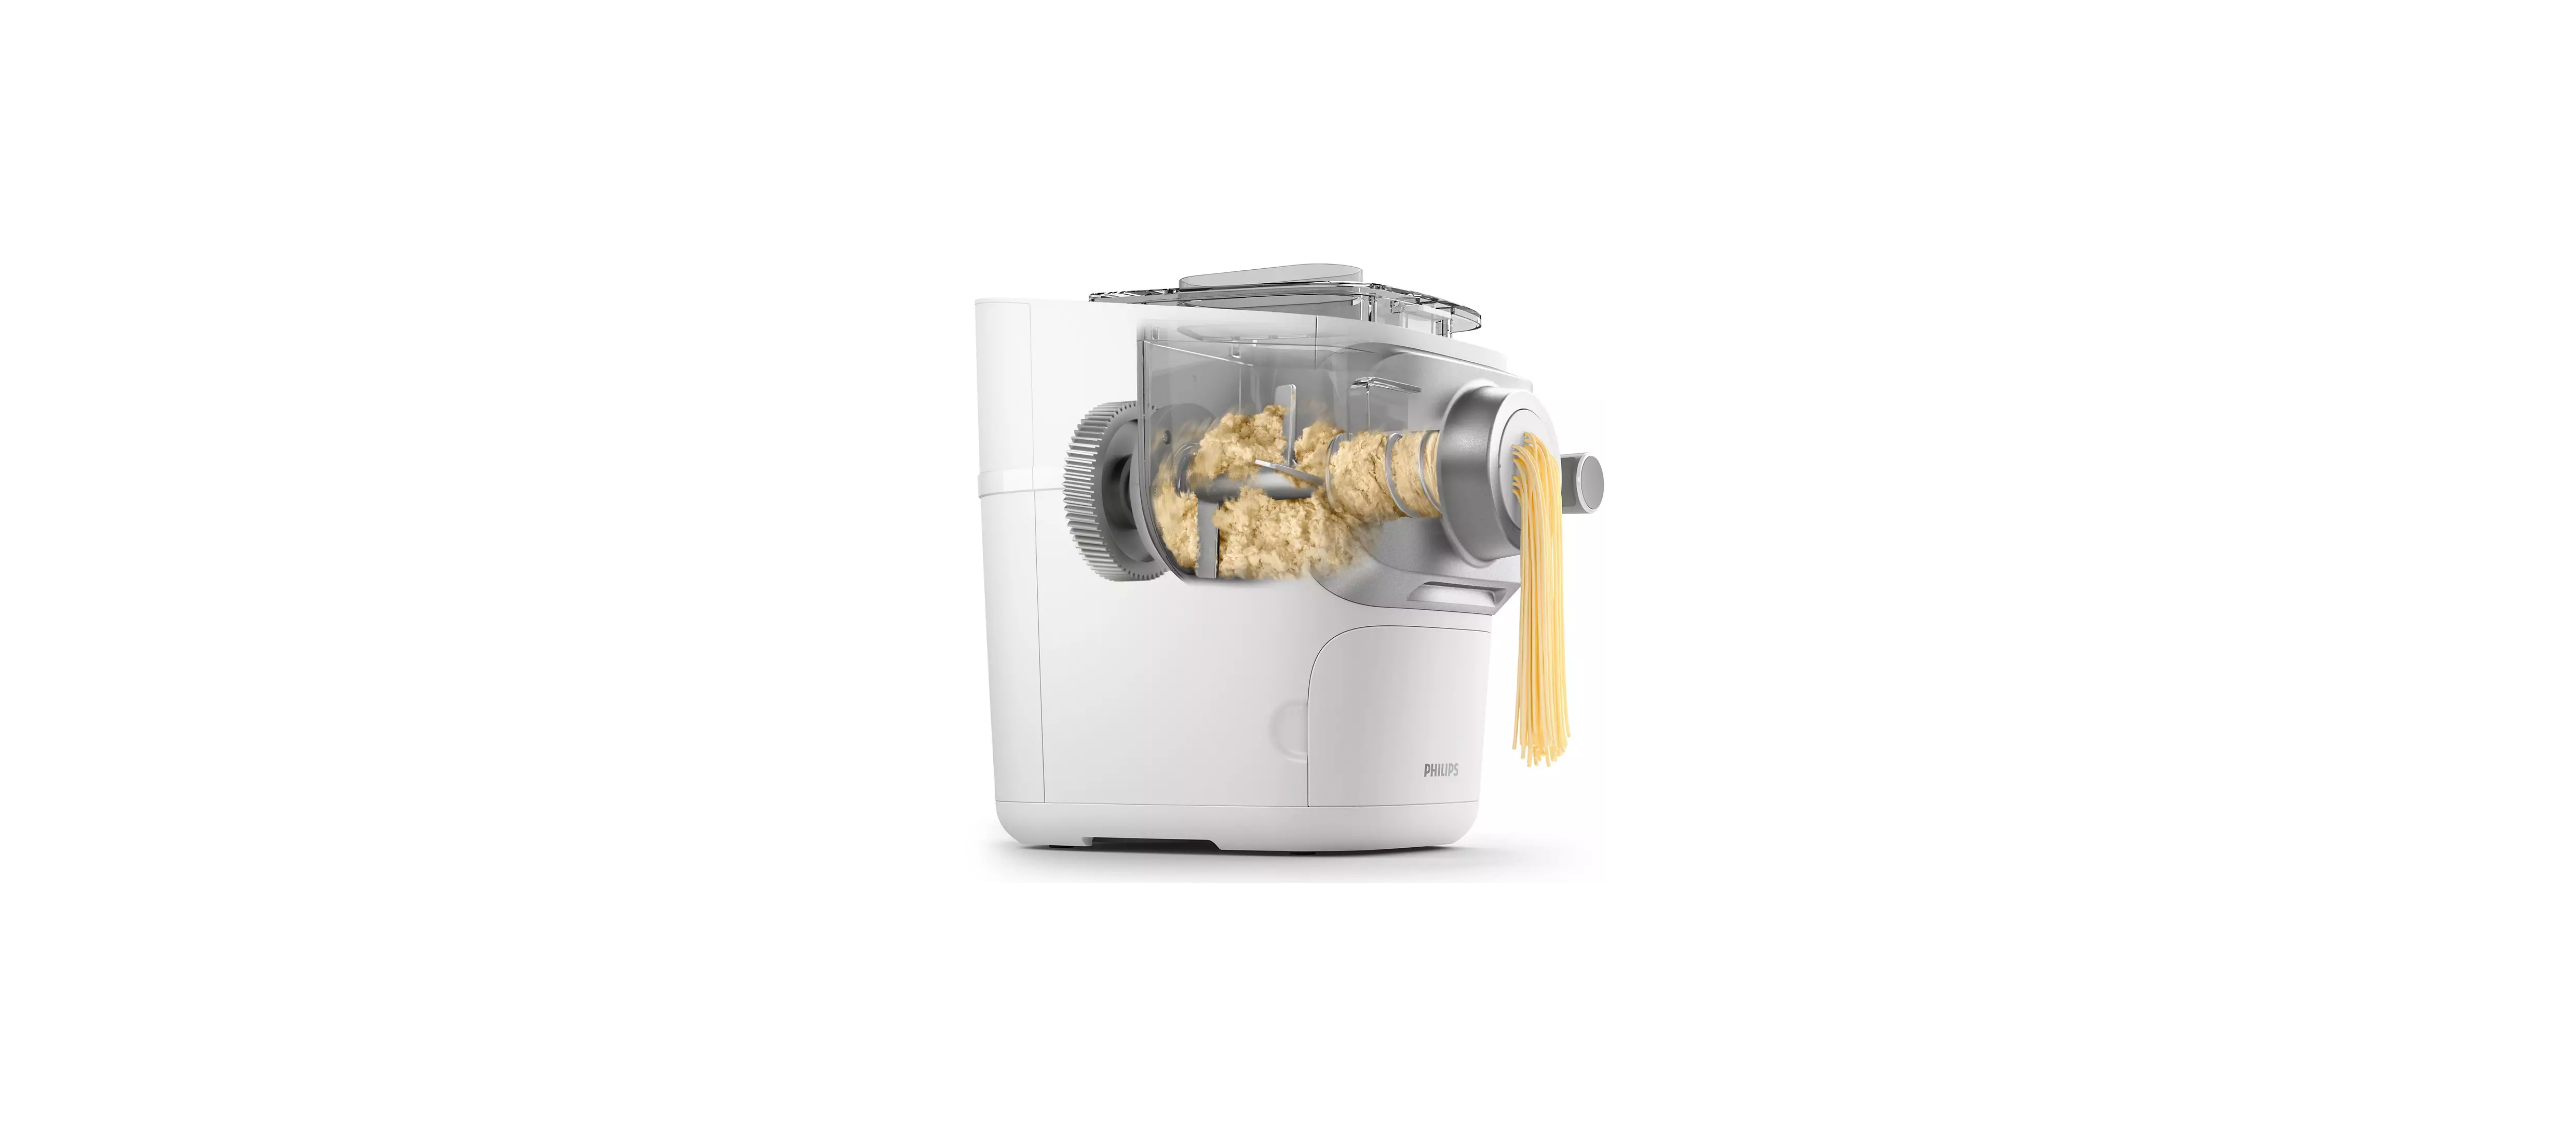
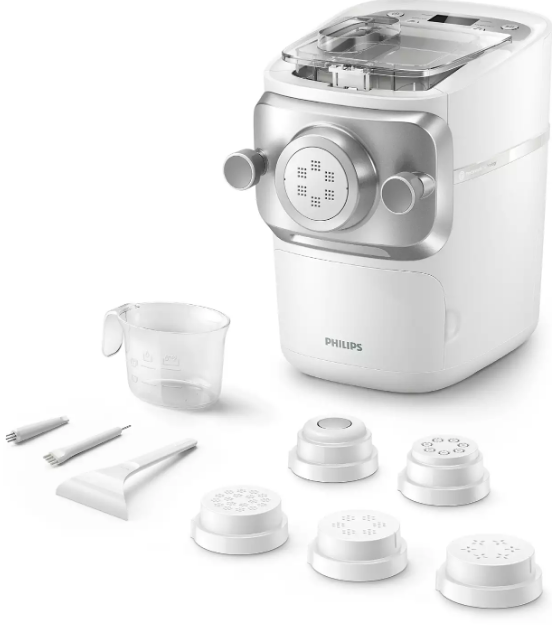
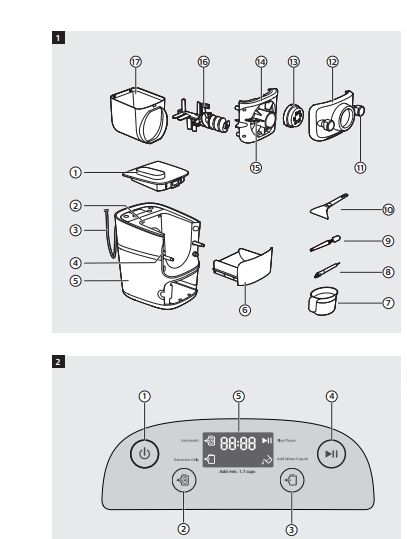
Product overview (Fig. 1)
| a | Mixing chamber lid | j | Pasta cutter |
|
b |
Safety switch hole of the mixing chamber lid |
k |
Front panel knobs |
| c | Power cord | l | Front panel |
| Ⓓ | Disc holder safety switch | m | Shaping disc |
| e | Main unit | n | Disc holder |
| f | Shaping disc storage | o | Disc holder safety switch lever |
| g | Water/flour cup | p | Mixing paddle |
| h | Cleaning brush | q | Mixing chamber |
| i | Angle hair shaping disc cleaning brush |
Control panel overview (Fig. 2)
| a | On/off button | Ⓓ | Start/pause button |
| b | Automatic button | e | Display |
| c | Extrusion only button |
Disassembling and cleaning before first use
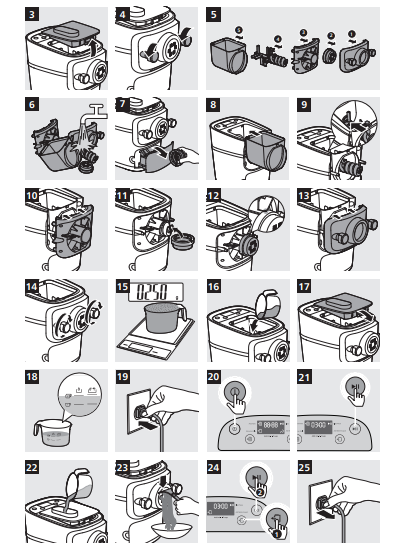
- Remove the mixing chamber lid. (Fig. 3)
- Loosen the front panel control knobs. (Fig. 4)
Note: The front panel is heavy. Take extra caution when removing it. - Disassemble the front panel, the shaping disc, the shaping disc holder, the mixing paddle, and the mixing chamber in order. (Fig. 5)
- Clean all detachable parts, and wipe them dry. (Fig. 6)
- Pull out the shaping disc storage drawer, and clean all discs and cleaning tools. (Fig. 7)
Assembling
- Push the mixing chamber into the appliance. (Fig. 8
- Point the mixing paddle to the hole in the main unit. Insert the mixing paddle all the way into the main unit. (Fig. 9)
- Attach the disc holder to the appliance. (Fig. 10)
- Put the shaping disc onto the disc holder, and make sure it is firmly fixed on the disc holder. (Fig. 11)
Using the Pasta maker
- Use a kitchen scale for the correct amount of flour and liquid. (Fig. 15)
Note: Refer to chapter “Recipe” for the correct ratios. - Remove the mixing chamber lid. (Fig. 3)
- Pour the flour into the chamber. (Fig. 16)
Note: Refer to chapter “Recipe” for the correct ratios. - Close the mixing chamber lid. (Fig. 17)
Note: If the mixing chamber lid is not properly installed, the safety switch will prevent the appliance from working. - Measure the required amount of liquid according to the flour you have used. (Fig. 18)
Note: Refer to chapter “Recipe” for the correct ratios. - Put the plug in the power socket. The appliance sounds once, and all indicators flash once. (Fig. 19)
- Press the On/off button to switch on the appliance. (Fig. 20)
- Press the Start/pause button to start the automatic pasta-making program. (Fig. 21)
Note: If the appliance is not in the automatic mode, press the Automatic button before pressing the Start/pause button. - After the mixing starts, slowly pour in the liquid along the entire length of the slot in the lid. (Fig. 22)
Note: During dough mixing, do not add other ingredients after you have poured in the liquid. Otherwise, it will affect the result of the pasta texture.
Cleaning
- Disconnect the plug from the power outlet. (Fig. 25)
- Remove the mixing chamber lid. (Fig. 3)
- Loosen the front panel control knobs. (Fig. 4)
Note: The front panel is heavy. Take extra caution when removing it. - Disassemble the front panel, the shaping disc, the shaping disc holder, the mixing paddle, and the mixing chamber in order. (Fig. 5)
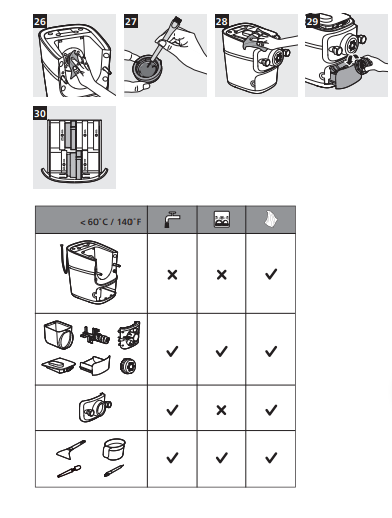
- Use a dry cloth to clean flour residue on the main unit. (Fig. 26)
- Clean the shaping disc with the supplied cleaning tool to remove the dough residues. After that, you can clean it with water. (Fig. 27)
Note: Let the discs air-dry for 2 to 4 hours, then use the corresponding cleaning tool to poke out the dough in the holes. - Clean all detachable parts, and wipe them dry. (Fig. 6)
- Use a dry cloth to clean the control panel and the exterior of the pasta maker. (Fig. 28)
Storage
- Unplug the appliance and let it cool down. (Fig. 25)
Note: Make sure all parts are clean and dry before storing. - You can store the shaping discs in the storage drawer. (Fig. 29)
Disposal
Your product is designed and manufactured with high-quality materials and components, which can be recycled and reused. For recycling information, please contact your local waste management facilities or visit www.recycle.philips.com.
Troubleshooting
This chapter summarises the most common problems you could encounter with the appliance. If you are unable to solve the problem with the information below, visit www.philips.com/support for a list of frequently asked questions or contact the Consumer Care Center in your country.
| Problem | Cause | Solution |
| The indicators do not light up. | The power plug is not connected correctly. | Check whether the power plug is plugged correctly and the outlet is working properly. |
| After pressing the On/off button the appliance sounds but does not work. | The mixing chamber, the shaping disc, or the front panel is assembled incorrectly. | Make sure you follow the user manual to assemble all parts correctly. |
| Problem | Cause | Solution |
| The safety switch is triggered and the appliance suddenly stops or suddenly restarts during the processing. | The front panel knob is loose. | Make sure the front panel is securely assembled. |
|
Excessive ingredients in the pasta maker. |
The maximum amount of flour used for each batch is 500 g /17.6 oz. If more than 500 g /17.6 oz is added, reduce the amount of flour before next batch. | |
| During processing, the appliance stops working when you open the lid. | For safety reasons, the appliance always stops working when the
lid is opened during processing. |
If you need to resume the previous operation, close the lid properly, and press the Start/pause button. |
|
During processing, the appliance stops. There is no alarm sound or flashes. |
The pasta maker has overheated due to long continuous working time. |
Disconnect from the power source, and allow the pasta maker to cool down. To better protect the lifetime of the appliance, the continuous working time should be less than 45 minutes. You can restart using the appliance after 15 minutes of rest. |
| A small amount of water is leaking out from the appliance. | Water is added before the program starts. | Follow the user manual instructions to add water right after the program starts. |
|
E1 displays on the screen. |
The shaping disc is not attached. | Attach the disc holder to the main unit, attach the shaping disc properly and fix the front panel properly to the device. |
| The lid is not in place or not properly attached. | Attach the lid properly. | |
| The appliance stops during processing, E2 displays on the screen, the indicators are flashing quickly, and the alarm sounds. | The mixing paddle may be blocked by some foreign objects. |
Disconnect from the power source, clean the pasta maker, and follow the user manual again to restart the pasta making. |
| The dough may be too dry. | ||
| The wrong program is selected. | ||
|
E4 displays on the screen. |
The appliance malfunctions. |
1 Switch off and unplug your Pasta Maker. Plug in and restart the device.
2 If the appliance is still not working, contact the service center. |
REFERENCE LINK
https://www.usa.philips.com/c-p/HR2660_00/7000-series-pasta-maker
DOWNLOAD PDF LINK