Philips SM7686/00 Xelsis Super-automatic espresso machine User Manual

IMPORTANT SAFEGUARDS
When using electrical appliances, basic safety precautions should always be followed, including the following:
- Read all
- Donot touch hot Use handles or knobs.
- To protect against fire, electric shock and injury to persons do not immerse cord, plugs, or appliance in water or other liquid.
- is necessary when the appliance is used by or near
- Unplug from outlet when not in use and before Allow to cool before putting on or taking off parts, and before cleaning the appliance.
- Do not operate any appliance with a damaged cord or plug or after the appliance malfunctions, or has been damaged in any Return appliance to the nearest authorized service facility for examination, repair or adjustment.
- The use of accessory attachments not recommended by the appliance manufacturer may result in fire, electric shock or injury to persons.
Introduction
Congratulations on your purchase of a Saeco full-automatic coffee machine! To fully benefit from the support that Saeco offers, please register your product at www.saeco.com/care.
Read this user manual carefully before you use the machine for the first time and save it for future reference.
To help you get the best out of your coffee machine, Saeco offers full support in 3 different ways:
- Theseparate quick start guide for first installation and first
This user manual for more detailed information.
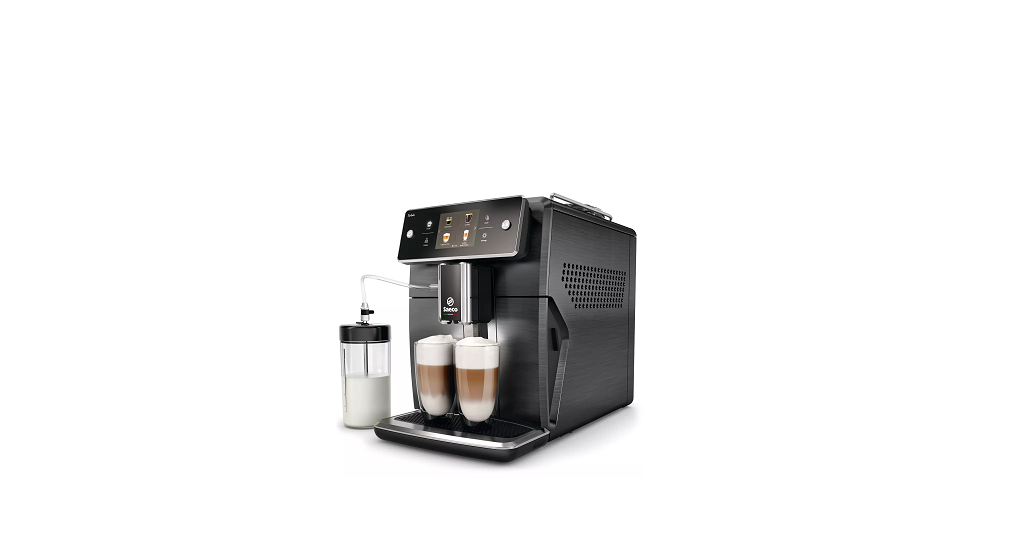
Machine overview
| 1 Control panel and touchscreen | 12 | Drip tray release grip |
| 2 Cup holder | 13 | Mains cord with plug |
| 3 Lid of bean hopper | 14 | Grind setting knob |
| 4 Lid of pre-ground coffee compartment | 15 | Bean hopper |
| 5 Internal cappuccinatore | 16 | Brew group |
| 6 Adjustable coffee and milk dispensing spout | 17 | Coffee funnel |
| 7 Milk tube holder | 18 | Coffee residues drawer |
| 8 Main switch | 19 | Coffee grounds container |
| 9 Socket for cord | 20 | Drip tray |
| 10 Service door | 21 | Drip tray cover |
| 11 ‘Drip tray full’ indicator | 22 | Water tank |
| Accessories | ||
| 23 Grease tube | 26 | Measuring scoop |
| 24 Cleaning brush | 27 | Water hardness test strip |
| 25 AquaClean filter | ||
| Milk frothing parts | ||
| 28 Lid of milk container | 30 | Metal milk tube |
| 29 Milk container | 31 | Flexible milk tube |
Cleaning and maintenance
Regular cleaning and maintenance keeps your machine in top condition and ensures good- tasting coffee for a long time, a steady coffee flow and a perfect milk froth.
Consult the table on when and how to clean all detachable parts of the machine. You can find more detailed information and video instructions on www.saeco.com/care.
Cleaning table
| Part description | When to clean | How to clean |
| Brew group | Weekly | Remove the brew group and rinse it under |
| the tap and let it air-dry. | ||
| Monthly | Perform the ‘Brew group clean’ procedure | |
| with the Philips coffee oil remover tablet. | ||
| Select ‘Brew group clean’ in the cleaning | ||
| menu and follow the instructions on the | ||
| screen. Go to www.saeco.com/care for | ||
| detailed video instructions. | ||
| Lubrication of | Depending on the type of | Lubricate the brew group with the Philips |
| the brew group | usage. Consult the | grease. Go to www.saeco.com/care for |
| lubrication table (see | detailed video instructions. | |
| ‘Lubricating the brew | ||
| group’). | ||
| Milk | After every day of use | Perform the HYGIESTEAM program in the |
| system/internal | cleaning menu. Select HYGIESTEAM in the | |
| cappuccinatore | cleaning menu and follow the instructions on | |
| the screen. Wipe the outside of the metal | ||
| milk tube with a damp cloth before placing it | ||
| into the milk tube holder. | ||
| Weekly | Remove and disassemble the internal | |
| cappuccinatore (see ‘Cleaning the internal | ||
| cappuccinatore under the tap’). Rinse all | ||
| parts under the tap with some washing-up | ||
| liquid. | ||
| Monthly | Perform the ‘DEEP MILK CLEAN’ procedure | |
| with the Philips milk circuit cleaner. Select | ||
| ‘DEEP MILK CLEAN’ in the cleaning menu and | ||
| follow the instructions on the screen. Go to | ||
| www.saeco.com/care for detailed video | ||
| instructions. | ||
| Milk container | Weekly | Disassemble the milk container (Fig. 28) and |
| push the ball out with the measuring scoop | ||
| (Fig. 29). Rinse all parts under the tap or in | ||
| the dishwasher |
| Part description | When to clean | How to clean |
| Drip tray | Empty the drip tray every | Remove the drip tray and rinse it under the |
| day or as soon as the red | tap with some washing-up liquid. | |
| ‘drip tray full’ indicator | ||
| pops up through the drip | ||
| tray (Fig. 30). | ||
| Coffee grounds | Empty the coffee grounds | Remove the coffee grounds container while |
| container | container when prompted | the machine is switched on and rinse it under |
| by the machine. Clean it | the tap with some washing-up liquid. | |
| weekly. | ||
| Water tank | Weekly | Rinse the water tank under the tap |
| Coffee funnel | Check the coffee funnel | Unplug the machine and remove the brew |
| weekly to see if it is | group. Open the lid of the pre-ground coffee | |
| clogged. | compartment and insert the spoon handle | |
| into the coffee funnel. Move the handle up | ||
| and down until the clogged ground coffee | ||
| falls down (Fig. 31). Go to | ||
| www.saeco.com.care for detailed video | ||
| instructions. | ||
Troubleshooting
This chapter summarizes the most common problems you could encounter with the machine. Support videos and a complete list of frequently asked questions are available on www.saeco.com/care. If you are unable to solve the problem, contact the Consumer Care Center in your country. For contact details, see the warranty leaflet.
| English 23 | ||
| Problem | Cause | Solution |
| The machine is in | You pressed the standby | Switch the machine off and then on |
| DEMO mode. | button for more than 8 | again with the main switch on the |
| seconds. | back of the machine. | |
| The ‘coffee grounds | You emptied the coffee | Always empty the coffee grounds |
| container full’ icon | grounds container while the | container while the machine is |
| remains displayed. | machine was switched off. | switched on. If you empty the coffee |
| grounds container when the | ||
| machine is switched off, the coffee | ||
| cycle counter is not reset. | ||
| You placed back the coffee | Do not place back the coffee | |
| grounds container too fast. | grounds container until the screen | |
| prompts you to put it back. | ||
| The ‘coffee grounds | The machine did not reset | Always wait approx. 5 seconds when |
| container full’ icon is | the counter the last time you | you place back the coffee grounds |
| displayed even though | emptied the coffee grounds | container. In this way the coffee |
| the container is not | container. | grounds counter will be reset to zero. |
| full. | ||
| Always empty the coffee grounds | ||
| container while the machine is | ||
| switched on. If you empty the coffee | ||
| grounds container when the | ||
| machine is switched off, the coffee | ||
| grounds counter will not be reset. | ||
| I cannot remove the | The brew group is not in the | Reset the machine in the following |
| brew group. | correct position. | way: place back the drip tray and the |
| coffee grounds container. Then close | ||
| the service door and switch the | ||
| machine off and back on again. Try | ||
| again to remove the brew group. | ||
| You have not removed the | Remove the coffee grounds | |
| coffee grounds container. | container before you remove the | |
| brew group. | ||
| I cannot insert the | The brew group is not in the | Reset the machine in the following |
| brew group. | correct position. | way: place back the drip tray and the |
| coffee grounds container. Leave the | ||
| brew group out. Close the service | ||
| door and switch the machine on and | ||
| off. Then put the brew group in the | ||
| correct position and reinsert it into in | ||
| the machine (see ‘Reinserting the | ||
| brew group’). | ||
| The coffee is watery. | The brew group is dirty or | Clean and lubricate the brew group. |
| needs to be lubricated. | ||
| 24 English | ||
| Problem | Cause | Solution |
| The grinder is set to a too | Set the grinder to a finer (lower) | |
| coarse setting. | setting. | |
| The coffee settings have | Select your coffee drink and adjust | |
| been adjusted. | the settings to a stronger coffee. | |
| The machine is performing | Brew a few cups of coffee. | |
| its self-adjustment | ||
| procedure after a change in | ||
| grinder settings or bean | ||
| types. | ||
| The coffee is not hot | The cups you use are cold. | Preheat the cups by rinsing them |
| enough. | with hot water. | |
| The temperature is set too | Set the temperature to ‘high’ in the | |
| low. Check the menu | menu. | |
| settings. | ||
| You added milk. | Whether the milk you add is warm or | |
| cold, it always decreases the | ||
| temperature of the coffee to some | ||
| extent. | ||
| Coffee does not come | The AquaClean filter was not | Remove the AquaClean filter and try |
| out or coffee comes | prepared properly for | to brew a coffee again. If this works, |
| out slowly. | installation or it is clogged. | make sure the AquaClean filter is |
| prepared properly before you place | ||
| it back. Place back the prepared | ||
| filter. If this still does not work, the | ||
| filter might be clogged and needs to | ||
| be replaced. | ||
| The grinder is set to a too | Set the grinder to a coarser (higher) | |
| fine setting. | setting. | |
| The brew group is dirty. | Clean the brew group. | |
| The coffee dispensing spout | Clean the coffee dispensing spout | |
| is dirty. | and its holes with a needle. | |
| The machine circuit is | Descale the machine. | |
| blocked by limescale. | ||
| The milk does not | The internal cappuccinatore | Clean the internal cappuccinatore |
| froth. | is dirty or not inserted | and make sure that you position and |
| correctly. | insert it correctly (see ‘Cleaning the | |
| internal cappuccinatore under the | ||
| tap’). |
| English 25 | ||
| Problem | Cause | Solution |
| The type of milk used is not | Different types of milk result in | |
| suitable for frothing. | different amounts of froth and | |
| different froth qualities. We have | ||
| tested the following milk types which | ||
| proved to deliver a good milk froth | ||
| result: semi-skimmed or full-fat | ||
| cow’s milk, soy milk and lactose-free | ||
| milk. | ||
| The milk is splashing. | The milk you use is not cold | Make sure you use cold milk coming |
| enough. | directly from the fridge. | |
| The flexible milk tube is not | Open the door of the coffee | |
| connected properly. | dispensing spout (Fig. 10) and check | |
| if the flexible milk tube is fully | ||
| connected to the cappuccinatore | ||
| (Fig. 11). Note that the | ||
| cappuccinatore and milk tubes may | ||
| be hot. Let the cappuccinatore and | ||
| the tubes cool down before you | ||
| touch them. | ||
| The cappuccinatore and milk | Remove and disassemble the | |
| tubes are not clean. | internal cappuccinatore (see | |
| ‘Cleaning the internal | ||
| cappuccinatore under the tap’). | ||
| Rinse all parts under the tap. For a | ||
| thorough cleaning, use the Philips | ||
| milk circuit cleaner and perform the | ||
| DEEP MILK CLEAN procedure via the | ||
| cleaning ( ) menu. Note that if the | ||
| parts have been cleaned in the | ||
| dishwasher, they may have become | ||
| clogged by food particles or | ||
| detergent residues. A visual check | ||
| that they are not obstructed is also | ||
| recommended. | ||
| We advise you to perform the | ||
| HygieSteam program every day: 1) | ||
| Press ‘Clean’ on the control panel. | ||
| 2) Select ‘HygieSteam’. 3) Press the | ||
| start button to start the process, | ||
| then confirm all steps on the display. |
| 26 English | ||
| Problem | Cause | Solution |
| The milk tubes are clogged. | Always store the milk container | |
| without the milk tubes in the | ||
| refrigerator. Leftover milk could | ||
| accumulate within the milk tubes | ||
| and block the flow of milk going | ||
| through the tubes. Rinse the milk | ||
| tubes before storage. | ||
| The machine seems to | The machine uses water to | Empty the drip tray every day or as |
| be leaking. | rinse the internal circuit and | soon as the ‘drip tray full’ indicator |
| brew group. Some water | pops up through the drip tray cover | |
| flows through the internal | (Fig. 30). Place a cup under the | |
| system directly into the drip | dispensing spout to collect rinsing | |
| tray. | water. | |
| The drip tray is too full and | Empty the drip tray every day or as | |
| has overflowed which makes | soon as the ‘drip tray full’ indicator | |
| it look like the machine is | pops up through the drip tray cover | |
| leaking. | (Fig. 30). Place a cup under the | |
| dispensing spout to collect rinsing | ||
| water. | ||
| The machine is not placed | Place the machine on a horizontal | |
| on a horizontal surface. | surface so that the ‘drip tray full’ | |
| indicator works properly. | ||
| I cannot activate the | The filter has not been | Descale your machine first and then |
| AquaClean filter and | replaced in time after the | install the AquaClean filter. |
| the machine asks for | AquaClean filter icon flashed | |
| descaling. | and the capacity dropped to | |
| 0%. | ||
| You did not install the | First descale the machine and then | |
| AquaClean filter during first | install a new AquaClean filter. After | |
| installation, but after having | descaling, the filter counter is reset | |
| brewed approx. 25 coffees | to 0/8. Always confirm filter | |
| (based on 100ml/3oz cups). | activation in the machine menu. Also | |
| The machine has to be | do this after filter replacement. | |
| completely limescale-free | ||
| before you install the | ||
| AquaClean filter. | ||
| The new water filter | You are trying to install | Only the AquaClean filter fits into the |
| does not fit. | another filter than the | machine. |
| AquaClean filter. | ||
| The machine is making | It is normal that your | If the machine starts to make a |
| a noise. | machine makes noise during | different kind of noise, clean the |
| use. | brew group and lubricate it (see | |
| ‘Lubricating the brew group’). |
Technical specifications
The manufacturer reserves the right to improve the technical specifications of the product. All the preset quantities are approximate.
- Description Value
- Size (w x h x d) 283 x 393 x 489 mm (11.2 x 15.5 x 19.3 in)
- Weight 10.8 – 12.2 kg (23.8 – 26.9 lbs)
- Power cord length 1200 mm (473 in)
- Water tank 1.7 litres (57 oz), removable
- Coffee bean hopper capacity 450 g (16 oz)
- Coffee grounds container
- capacity
- 14 pucks
- Milk container capacity 600 ml (20 oz)
- Adjustable spout height 75-148 mm (2.9 – 5.9 in)
- Nominal voltage – Power rating –
- Power supply
- See data plate on inside of service door


