Table of contents
show
Rugged Radios Radio & Intercom Configuration User Manual

Radio & Intercom Configuration
This is a universal wiring diagram. Your exact configuration might vary depending on the system purchased.
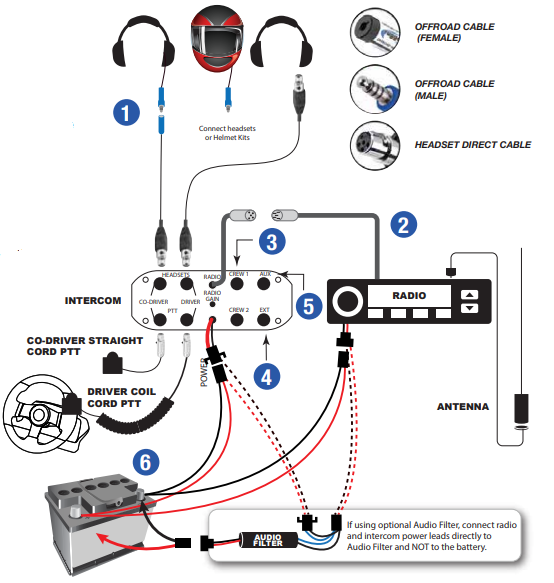
- Your particular setup may or may not use the OFFROAD cables for headset/helmet connections shown here. If you are not using these style cables, simply plug your HEADSET DIRECT cables straight from the intercom into the headset.
- Your particular radio may have a built-in radio jumper cable or you may have a completely separate cable to link the intercom and radio together.
- Use CREW 1 & CREW 2 ports on the back of the intercom to connect additional passenger headsets.
- Intercoms equipped with an EXT port allow for an intercom expansion module (2 or 4 places) allowing your intercom to connect up to 8 people. Passengers cannot transmit on the radio. This feature is for Driver and co-driver only.
- Intercoms equipped with an AUX port allows connectivity to cell phones, video record cables, and other devices.
- Directly connect to a 12V battery.
Radio & Intercom Mounting
- Find a good location to mount the intercom and radio close together, keeping in mind the cable length.
- Both the intercom and radio come with universal mounting brackets. Vehicle-specific mounting options are sold separately.
- DO NOT mount the radio or intercom near an ignition box to avoid RF interference.
Connect Power
- Route all power cables directly to the battery.
- DO NOT connect in line with other components. If power is tied to ignition, lights, or other power sources, a ground loop problem may occur, causing noise in the system.
- DO NOT remove any fuses that are in line with factory cables, or modify the cables in any way. This will void the warranty.
Push-To-Talk (PTT) Buttons

- Push-to-Talk Buttons are used to transmit over the radio. They do not need to talk on the intercom.
- Hole Mount PTT: Drill a ¾” hole to mount the PTT.
- Velcro Mount PTT: Mount on the steering wheel, grab bar, or shifter. If mounting on the steering wheel, use the coil cord PTT to wrap around the steering column. Turn the steering wheel lock to lock and make sure the cable does not bind. Damage can occur if the cable binds while turning.
- Add strain relief to your cables so they don’t get damaged if pulled on.
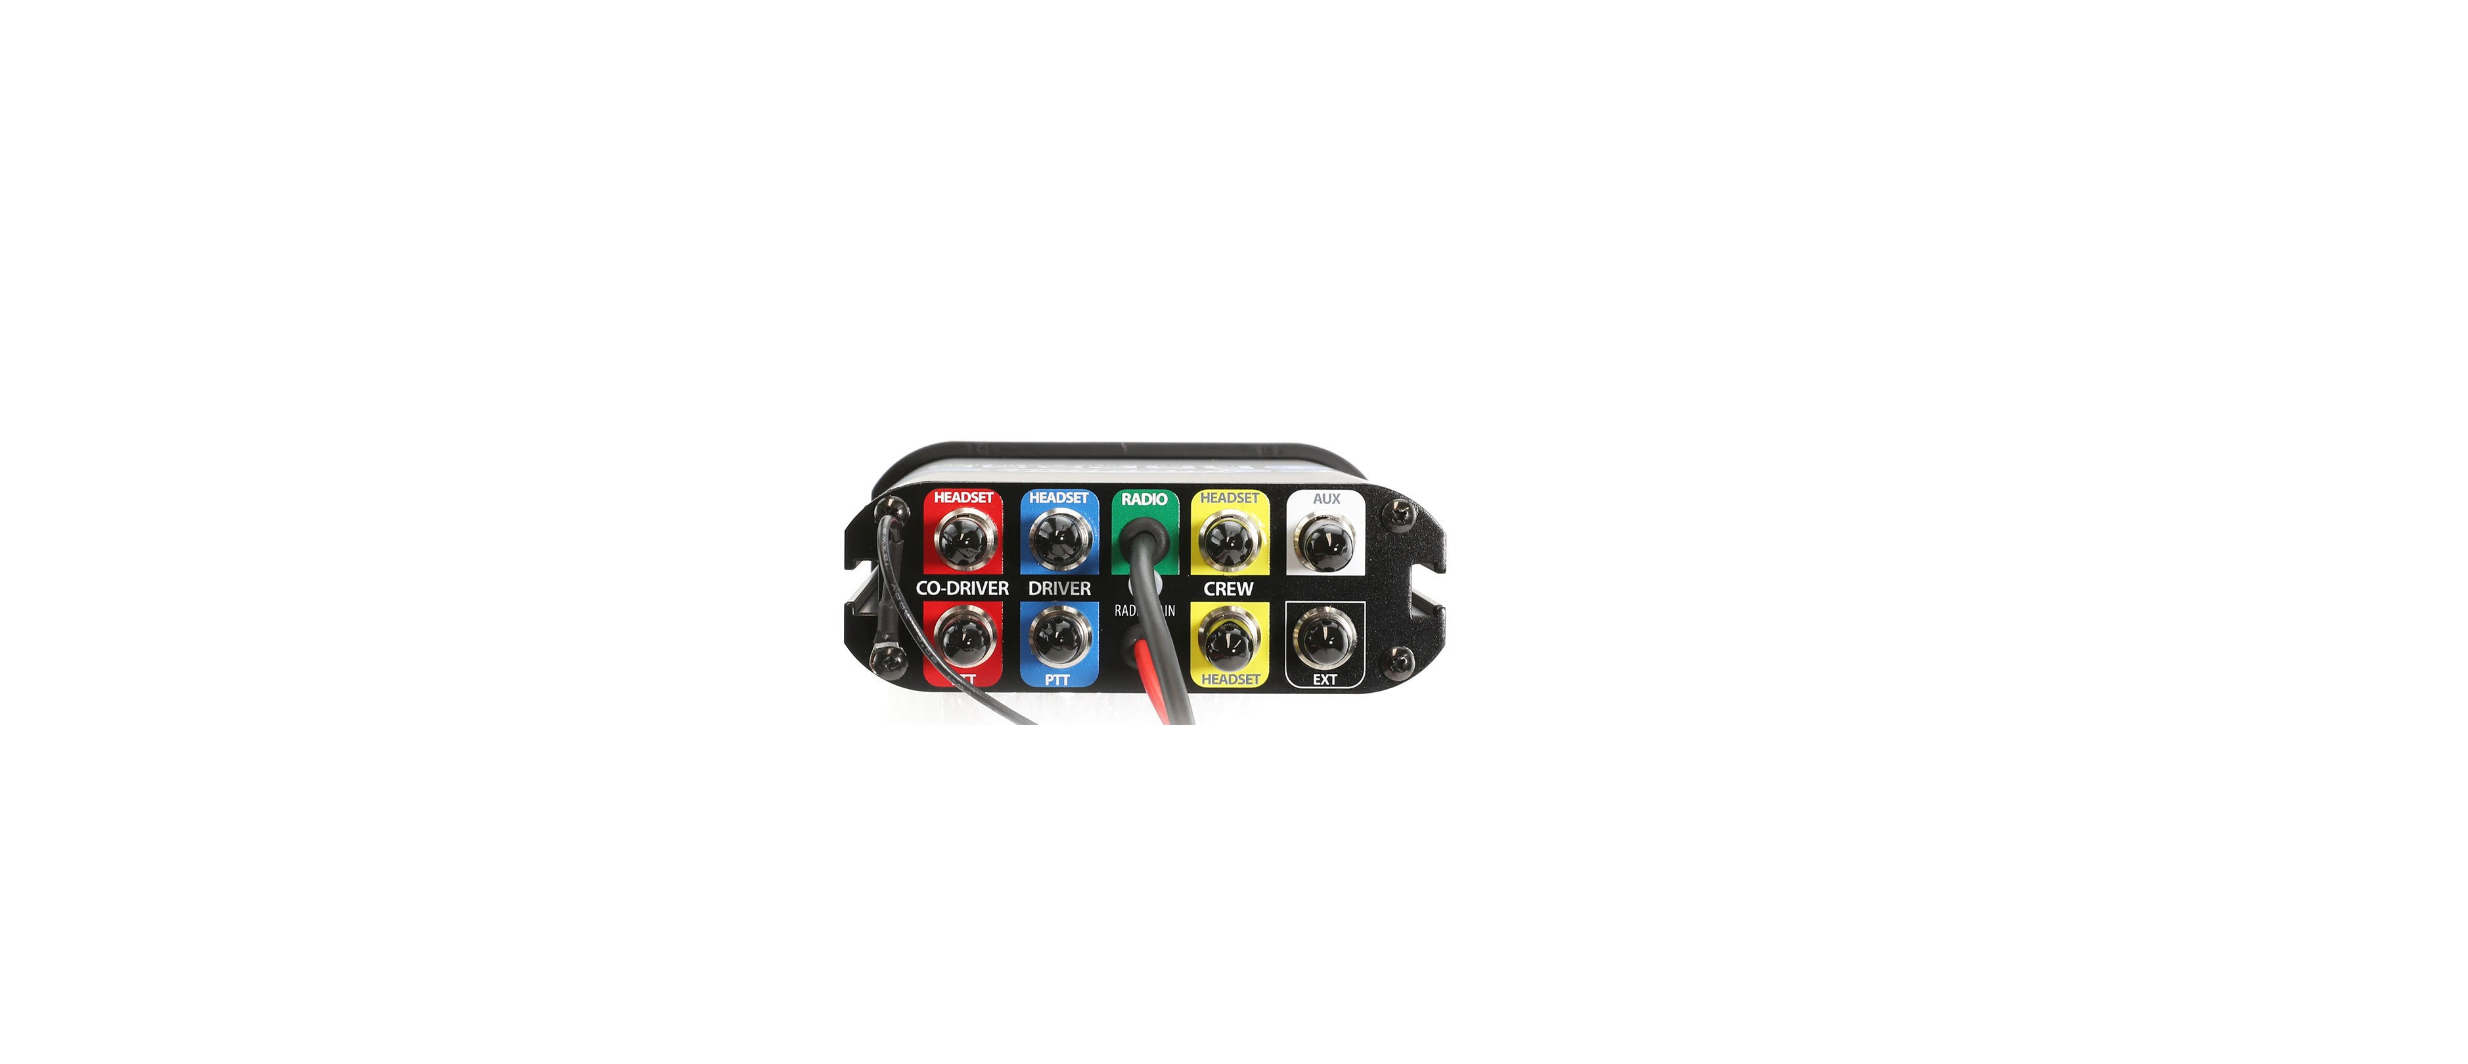
- • Be sure to plug in the Driver PTT into the PTT port just below the driver headset jack and plug in the Co-Driver PTT right below the Co-Driver headset jack.
- PTT buttons will only activate one mic at a time.
Antenna/Coax Cable
- Rugged Radios’ antennas come pre-tuned for the channels programmed in the radio so all you have to do is mount the antenna and route the coax cable.
- Some antennas require a ground plane or metal surface, and some do not. All Rugged antennas will work without a metal surface but for best performance, mount the antenna on a metal or aluminum roof in the center.
- Mount NMO connectors through a 3/8” hole. Be sure to scrape away any paint on the underside so the brass NMO mount gets good metal contact.
- Route the coax cable away from intercom power cables, ignition boxes, coils, HID ballasts, amps, headset cables, and other components that carry power or emit RF interference.
- IMPORTANT! If there is any excess coax cable after installation DO NOT COIL THE CABLE! Coiling coax cables will cause transmission problems and limit radio range. Ideally, the coax should be cut to exact length and re-crimped with connectors. However, if that is not an option, route the cable further around the car.
- Visit our HELP section at www.ruggedradios.com for a video that offers detailed information about cutting coax, proper antenna installation, and antenna tuning.

Intercom Operation

- Power on the intercom by rotating the volume control clockwise or pressing the power button. Put the headset on and move the microphone so it’s pressed against the lips. You can now talk freely with all passengers in the vehicle.
- For VOX-equipped intercoms, rotate VOLUME and VOX all the way clockwise. Listen for the ambient sound picked up by the now-open mic. Slowly back off the VOX until this ambient noise is silenced. Now adjust VOLUME for comfort.
- When the intercom is on, there will be a steady glowing BLUE LED light on the front of the intercom. When you press a PTT button to transmit, the LED will change color to RED.
Radio Operation
- Turn on the mobile radio and select the channel you wish to transmit on. The incoming volume of other cars is controlled by the radio, not the intercom volume control.
- To transmit to another vehicle, push the push-to-talk on the steering wheel or headset.
- Refer to the owner’s manual for complete radio operation and functions.
- The included hand mic is incompatible with intercom systems.
Music Input
- Depending on your intercom’s capabilities, there are 3 different ways to play a music device through the intercom; a 3.5mm port on the front, a 6-pin aux port on the back, or wirelessly using bluetooth.
- Intercoms with VOX operation will automatically mute the music when talking over the intercom or during radio transmission. If the music is always muted, adjust the VOX (Squelch) control on the intercom until the mics turn off.
- The volume of the music is only controlled by the music device.


