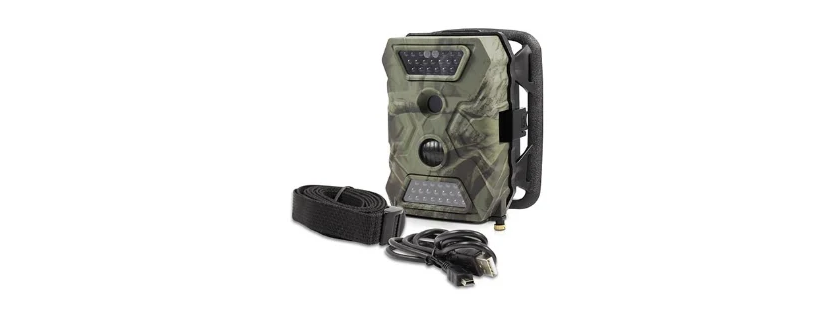
SWANN Outback Cam Portable 5MP Digital Video Camera User Guide
Overview
Front

Bottom

Back

Battery Pack

Batteries and Storage Media
Let’s learn how to install batteries and storage media in your Outback Cam. First, release the bottom cover of the Outback Cam by twisting the locking screw anti-clockwise, and then follow the instructions below. Always switch off the Outback Cam before inserting or removing batteries or memory cards.
Install batteries
For optimal battery life in cold weather climates, we recommend using lithium batteries. Do not use rechargeable batteries.
- Push the battery compartment cover to open it.
- Insert 2 fresh “AA” alkaline or lithium batteries into each battery slot. Follow the polarity (+ and -) markings shown on the metal backing under the battery compartment cover.
- Close the battery compartment cover by firmly pushing it down until it clicks shut. Batteries and Storage Media
Install storage media
The Outback Cam has no internal memory; instead photos and videos are stored on a SD memory card (up to 32GB supported). To ensure smooth performance and plenty of space for recording important moments, we recommend using a fast memory card (class 4 or higher), with at least 8 GB of capacity, from a well known manufacturer.
- Insert an SD memory card into the SD card slot, with the gold-coloured contacts facing up towards the front of the Outback Cam until it clicks into place. The SD card only fits into the slot one way.
Battery Pack
Enclosed in an integrated cradle, the Battery Pack provides your Outback Cam the extra juice to help it stay powered for even longer – great for long-term observations in the field.
Install batteries
- Release the latch on the sides of the Battery Pack, and then gently separate the battery pack from the Outback Cam.
- Open the battery cover, and then insert four fresh “AA” alkaline or lithium batteries into the battery compartment by following the polarity (+ and -) markings shown inside.
- Close the battery compartment cover.
- Reattach the Battery Pack to the Outback Cam via the connector socket, and then engage and lock side latches to secure them together.
Mounting Strap
The included mounting strap allows you to the strap the Outback Cam to a tree or timber post.
- Simply thread the strap through the slots on the back of the Battery Pack cradle, then around a suitable object
like a tree, and through the strap buckle. Pull the strap to tighten

Basics
Let’s learn how to use your Outback Cam.
Turning on the Outback Cam for the first time
- Set the ON/OFF switch to ON. The status light blinks five times to indicate the Outback Cam is ready to monitor and capture motion triggered events.
- The LCD screen only turns on when the Outback Cam is in preview mode. Press the OK button to go into preview mode. The status light illuminates to indicate the Outback Cam is in preview mode.
Preview mode
- When you first enter preview mode, the screen momentarily displays information about the capacity and amount of available storage on your SD card.
- You can access the menu to configure Outback Cam settings, browse and review captured photos and videos via the playback screen, and take quick snapshots or videos manually.
- To exit preview mode and start monitoring immediately, press the OK button for 5 seconds.
- The Outback Cam automatically exits preview mode if there is no button press for 60 seconds۔
- If a recording is in progress, you have to wait until the Outback Cam has stopped recording before you can enter preview mode.
Video/Photo mode
- Set the Video/Photo switch to the desired mode for capturing motion events.
- You can configure settings such as the quality and amount of video recorded, and the size and number of photos taken for a motion event, via the menu.
- The Outback Cam can also capture pictures while it is recording a video, and vice-versa. To do this, turn on the
Camera + Video setting in the menu. - In preview mode, you can manually take a snapshot or record what’s on the camera screen. Press the OK button to take a quick snapshot or to begin recording. To stop recording, just press the OK button again.
Playback screen
- In preview mode, you can view photos, play videos and delete files on the SD card by pressing the Up button to
display the Playback screen. - Review your collection of captured photos and videos by pressing the Left or Right button.
- Playback a selected video by pressing the OK button. To stop playback, press the Menu button.
- Delete a single file, or the entire collection of photos and videos by pressing the Menu button, and then selecting Delete. You can also format the SD card by selecting Format.
Connect to a computer
- Using the included USB cable, you can copy videos and photos on your SD memory card in the Outback Cam to
your computer. - To connect, make sure the Outback Cam is switched off, then plug one end of the USB cable into the USB port on the Outback Cam and the other end into an available USB port on your computer.
Connect to a television
- Using the included AV cable, you can connect the Outback Cam to your television to watch video recordings and show off photos directly on a large screen.
- To connect, plug the yellow and red connectors on the AV cable into the corresponding video and audio inputs on your television and the black AV connector end into the TV Out port on the Outback Cam.
- The Outback screen turns off when connected to the television.
- Be sure to switch the correct Video input source on your television to display the Outback Cam.
Menu
| Option | To do this… |
| Camera ID | Assign a 4-digit numerical ID for the Outback Cam, which will appear on your photos. This setting is useful if you own more than one Outback Cam and placed them in different locations. |
| Camera + Video | Select whether also to capture photos or videos when the camera is in Video or Photo mode. (i.e., combination mode) |
| Multi-Shot | Select how many consecutive shots (commonly known as continuous or burst shooting) to take when an event occurs. |
| Image Size | Select the photo resolution in megapixels. If you print large photos and want to maintain fine detail, set this option to the highest megapixel. |
| Video Size | Select the video quality of your recordings. Higher resolution settings produce better quality videos but will consume more memory storage. |
| Video Frame | Adjust the video frame rate of recordings. The higher the frame rate, the smoother the motion in the video, but will consume more memory storage. |
FCC Statement
This equipment has been tested and found to comply with the limits for Class B digital device, pursuant to part 15 of the FCC Rules. These limits are designed to provide reasonable protection against harmful interference in a residential installation. This equipment generates, uses and can radiate radio frequency energy and, if not installed
and used in accordance with the instructions, may cause harmful interference to radio or television reception, which can be determined by turning the equipment off and on, the user is encouraged to try to correct the interference by one or more of the following measures:
- Reorient or relocate the receiving antenna
- Increase the separation between the equipment and the receiver
- Connect the equipment into an outlet on a circuit different from that to which the receiver is connected


