Viewsonic VA2261-2 22″ 1080p Home & Office Monitor User Guide

Important Safety Instructions
- Read these instructions completely before using the equipment.
- Keep these instructions in a safe place.
- Heed all warnings and follow all instructions.
- Sit at least 18” / 45 cm from the display.
- Always handle the display with care when moving it.
- Never remove the rear cover. This display contains high-voltage parts. You may be seriously injured if you touch them.
- Do not use this equipment near water. Warning: To reduce the risk of fire or electric shock, do not expose this apparatus to rain or moisture.
- Avoid exposing the display to direct sunlight or another heat source. Orient the display away from direct sunlight to reduce glare.
- Clean with a soft, dry cloth. If further cleaning is required, see “Cleaning the Display” in this guide for further instructions.
- Avoid touching the screen. Skin oils are difficult to remove
Getting Started
Thank you for purchasing your monitor from ViewSonic. At ViewSonic, we aim to provide the most stunning visual experience possible.
Package Contents
Your display package includes:
- Display
- Power cord
- Video cable
- Quick Start Guide
Wall Mounting (Optional)
NOTE: For use only with UL Listed Wall Mount Bracket. To obtain a wall-mounting kit or height adjustment base, contact ViewSonic or ® your local dealer. Refer to the instructions that come with the base mounting kit. To convert your display from a desk-mounted to a wall-mounted display, do the following:
- Find VESA compatible wall-mounting kit which meets the quaternions below.
- Verify that the power button is turned Off, then disconnect the power cord.
- Lay the display face down on a towel or blanket.
- Remove the base. (Screws removal might be required.)
- Attach the mounting bracket from the wall mounting kit using screws of the appropriate length.
- Attach the display to the wall, following the instructions in the wall-mounting kit.
Quick Installation
- Connect video cable
- Make sure both the display and computer are turned OFF.
- Remove rear panel covers if necessary.
- Connect the video cable from the display to the computer.
- Macintosh users: Models older than G 3 require a Macintosh adapter. Attach the adapter to the computer and plug the video cable into the adapter.
- To order a ViewSonic® Macintosh adapter, contact ViewSonic Customer Support.
- Connect power cord (and AC/DC adapter if required)

- Turn ON the display and computer
- Turn ON the display, then turn ON the computer. This sequence (display before computer) is important.
Using the Display
Setting the Timing Mode
Setting the timing mode is important for maximizing the quality of the screen image and minimizing eye strain. The timing mode consists of the resolution (example 1024 x 768) and refresh rate (or vertical frequency; example 60 Hz). After setting the timing mode, use the OSD (On-screen Display) controls to adjust the screen image. For optimal picture quality, please use the recommended timing mode specific to your display listed on the “Specification” page. To set the Timing Mode:
- Setting the resolution: Access “Appearance and Personalization” from the Control Panel via the Start Menu, and set the resolution.
- Setting the refresh rate: See your graphics card’s user guide for instructions.
OSD and Power Lock Settings
- OSD Lock: Press and hold [AUTO] and the up arrow for 10 seconds.
- OSD Unlock: Press and hold [AUTO] and the up arrow again for 10 seconds.
- Power Button Lock: Press and hold [AUTO] and the down arrow for 10 seconds. If the power button is pressed the message Power Button Locked will display for 3 seconds. With or without this setting, after a power failure, your display’s power will automatically turn ON when power is restored.
- Power Button Unlock: Press and hold [AUTO] and the down arrow again for 10 seconds.
Main Menu Controls
Navigate through menu items by using the up/down ▲/▼ buttons.
NOTE: Check the Main Menu items on your display OSD and refer to Main Menu Explanation below.
Adjusting the Screen Image
Use the buttons on the front control panel to display and adjust the on-screen OSD control settings.
- Standby Power On/Off
- Power light
- Blue = ON
- Amber = Power Saving
- Displays the Main Menu or exits the control screen and saves adjustments.
- Displays the control screen for the highlighted control. Also a shortcut to Auto Input toggle (D-Sub or HDMI). ▲/▼
- Scrolls through menu options and adjusts the displayed control settings. Blue Light Filter (▼) / View Mode (▲).
Do the following to adjust the display setting:
- To display the Main Menu, press button [MENU].
- To select a control to adjust, press or to scroll up or down in the Main Menu.
- After the desired control is selected, press button [AUTO].
- To save setting adjustments and exit the menu, press button [MENU] until the OSD disappears.
The following tips may help you optimize your display:
- Adjust the computer’s graphics card to support a recommended timing mode To find instructions on “changing the refresh rate”, please refer to the graphics card’s user guide.
- If necessary, make small adjustments using H. POSITION and V. POSITION until the screen image is completely visible.
Main Menu Controls
Navigate through menu items by using the up/down ▲/▼ buttons.
NOTE: Check the Main Menu items on your display OSD and refer to Main Menu Explanation below.
Main Menu Explanation
NOTE: The Main Menu items listed in this section indicate whole Main Menu items on all models. For the actual Main Menu details corresponding to your product refer to the items on your display’s OSD Main Menu.
- Audio Adjust: adjusts volume, mutes sound, or toggles between inputs if you have more than one source.
- Brightness: adjusts the background black level of the screen image.
- Color Adjust: provides several color adjustment modes, including preset color temperatures and a User Color mode which allows independent adjustment of red (R), green (G), and blue (B). The factory setting for this product is native.
- Memory Recall: returns screen settings back to factory settings if the display is operating in a factory Preset Timing Mode listed in the Specifications section of this user guide.
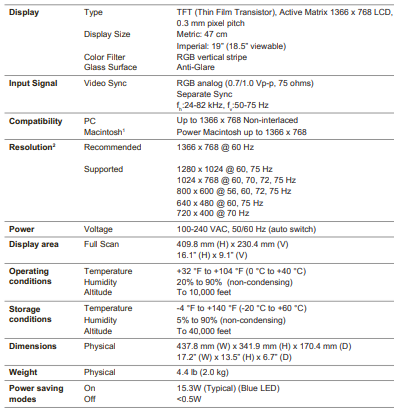
SPECIFICATION
Cleaning the Display
- MAKE SURE THE DISPLAY IS TURNED OFF.
- NEVER SPRAY OR POUR ANY LIQUIDS DIRECTLY ONTO THE SCREEN OR HOUSING.
To clean the screen:
- Wipe the screen with a clean, soft, lint-free cloth. This removes dust and other particles.
- If the screen is still not clean, apply a small amount of non-ammonia, non-alcohol based glass cleaner onto a clean, soft, lint-free cloth, and wipe the screen.
To clean the casing:
- Use a soft, dry cloth.
- If the casing is still not clean, apply a small amount of a non-ammonia, non-alcohol based, mild non-abrasive detergent onto a clean, soft, lint-free cloth, then wipe the surface.
Troubleshooting
No power
- Make sure the power button (or switch) is ON.
- Make sure A/C power cord is securely connected to the display.
- Plug another electrical device into the power outlet to verify that the outlet is supplying proper voltage.
Power is ON but no screen image
- Make sure the video cable supplied with the display is properly secured to the video output port on the back of the computer. If the other end of the video cable is not attached permanently to the display, properly secure it to the display.
- Adjust brightness and contrast.
- If you are using an Macintosh older than G3, you need a Macintosh adapter.
Wrong or abnormal colors
- If any colors (red, green, or blue) are missing, check the video cable to make sure it is securely connected. Loose or broken pins in the cable connector could
cause an improper connection. - Connect the display to another computer.
- If you have an older graphics card, contact ViewSonic® for a non-DDC adapter.
Control buttons do not work
- Try pressing only one button at a time.
Copyright Information
Copyright © ViewSonic Corporation, 2017. All rights reserved. ® Corporation in the United States and other countries. ViewSonic, the three birds logo, On View, View Match, and View Meter are registered trademarks of ViewSonic Corporation. VESA is a registered trademark of the Video Electronics Standards Association. DPMS, Display Port, and DDC are trademarks of VESA. ENERGY STAR® is a registered trademark of the U.S. Environmental Protection Agency (EPA).
FCC Compliance Statement
This device complies with part 15 of FCC Rules. Operation is subject to the following two conditions:
- This device may not cause harmful interference
- This device must accept any interference received, including interference that may cause undesired operation.
This equipment generates, uses, and can radiate radio frequency energy, and if not installed and used in accordance with the instructions, may cause harmful interference to radio communications. However, there is no guarantee that interference will not occur in a particular installation.
- Reorient or relocate the receiving antenna.
- Increase the separation between the equipment and receiver