Yealink ROOMPANEL Room Scheduling Panel User Manual
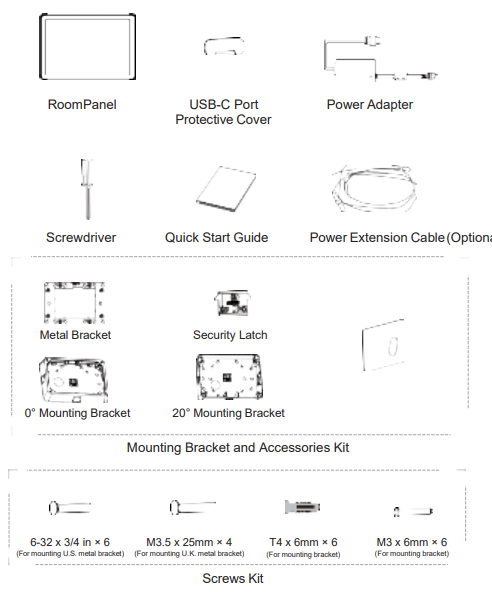
Package Contents
Power on the RoomPanel
AC Power Option

Installation
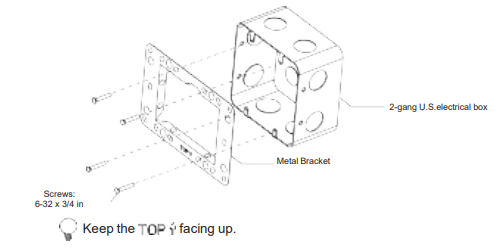
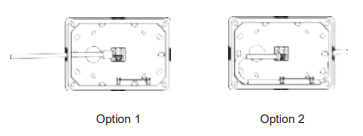
Mount on the Electrical Box The RoomPanel installs over a standard 2-gang U.S.electrical box.
The Metal Bracket
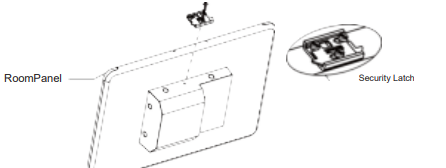
Install the Security Latch (Optional)
The security latch to the RoomPanel so that it cannot be easily removed from the mounting bracket after installation.
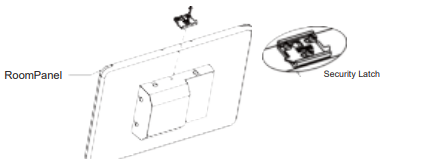
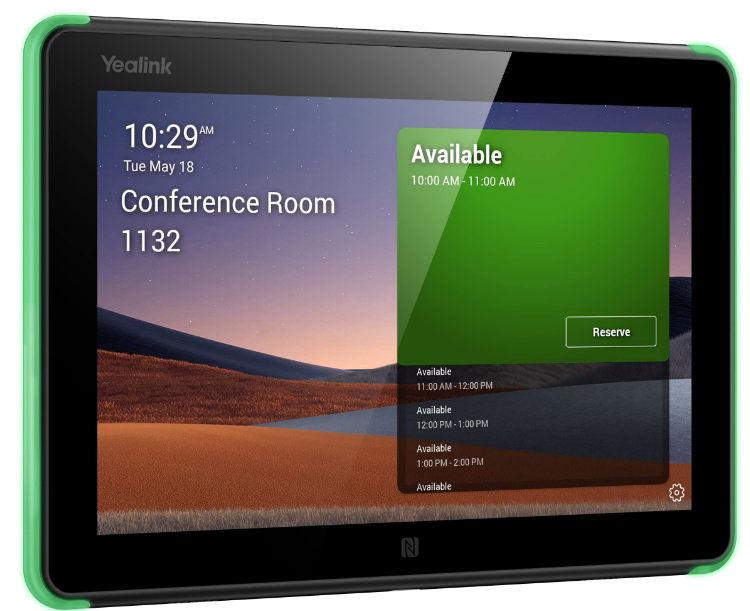
The RoomPanel
Mount on the Wall
This guide mainly takes the 0° Mounting Bracket as an example for reference.
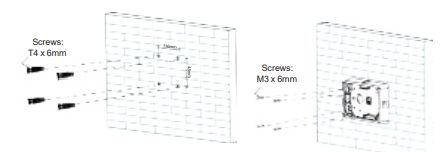
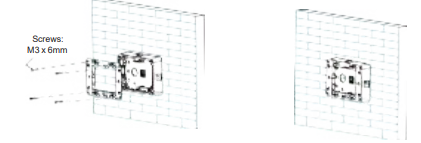
Install the Mounting Bracket to the Wall
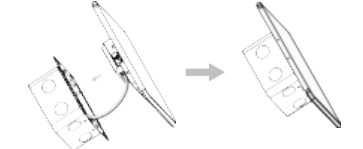
Route the Ethernet Cable
The Metal Bracket to the Mounting Bracket
Install the Security Latch (Optional)
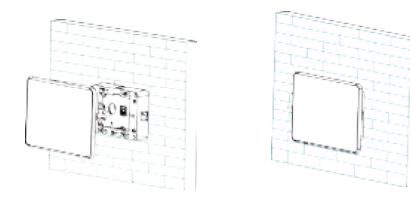
Connect the Cable and Install the RoomPanel
Mount on the Glass
- Glue the Mounting Bracket to the Glass.
- Route the Ethernet Cable.
- The Metal Bracket to the Mounting Bracket.
- Install the Security Latch (Optional). The security latch to the RoomPanel so that it cannot be easily removed from the mounting bracket after installation.
- Connect the Cable and Install the RoomPanel.
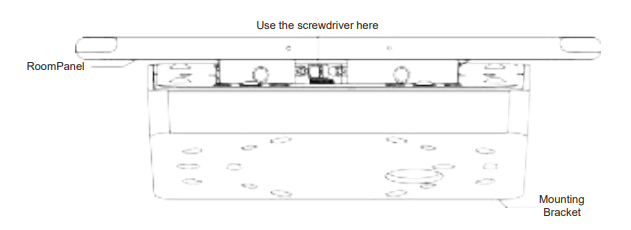
Remove the RoomPanel
- You can directly pull the RoomPanel to disengage the mounting bracket if the security latch has not been installed.
- If the security latch has been installed:
- Pull the RoomPanel away from the wall until it stops.
- Use the screwdriver to rotate the latch to the opening position which retracts the security latch arms.
- Pull the RoomPanel to disengage it from the mounting bracket with the arms retracted.
Statement
This device contains license-exempt transmitter(s)/receiver(s) that comply with Innovation, Science and Economic Development Canada’s license-exempt RSS(s). Operation is subject to the following two conditions
- This device may not cause interference.
- This device must accept any interference, including interference that may cause undesired operation of
the device.
The device for operation in the band 5150–5250 MHz is only for indoor use to reduce the potential for harmful interference to co-channel mobile satellite systems. This device complies with part 15 of the FCC Rules. Operation is subject to the following two conditions: (1) This device may not cause harmful interference, and (2) this device must accept any interference received, including interference that may cause undesired operation. Caution to the user that changes or modifications not expressly approved by the party responsible for compliance could void the user’s authority to operate the equipment.
Continued
This equipment has been tested and found to comply with the limits for a Class B digital device, pursuant to part 15 of the FCC Rules. These limits are designed to provide reasonable protection against harmful interference in a residential installation. This equipment generates, uses, and can radiate radio frequency energy and, if not installed and used in accordance with the instructions, may cause harmful interference to radio communications.
However, there is no guarantee that interference will not occur in a particular installation. If this equipment does cause harmful 9 interference to radio or television reception, which can be determined by turning the equipment off and on, the user is encouraged to try to correct the interference by one or more of the following measures:
- Reorient or relocate the receiving antenna.
- Increase the separation between the equipment and the receiver.
- Connect the equipment to an outlet on a circuit different from that to which the receiver is connected.
- Consult the dealer or an experienced radio/TV technician for help.
This transmitter must not be co-located or operating in conjunction with any other antenna or transmitter. This equipment should be installed and operated with a minimum distance of 20 centimeters between the radiator and your body.
Warranty
Our product warranty is limited only to the unit itself when used normally in accordance with the operating instructions and the system environment. We are not liable for damage or loss resulting from the use of this product or for any claim from a third party. We are not liable for problems with the Yealink device arising from the use of this product; we are not liable for financial damages, lost profits, claims from third parties, etc., arising from the use of this product.
Regulatory Notices
Operating Ambient Temperatures
- Operating temperature: +14 to 122°F (-10 to 50°C)
- Relative humidity: 5% to 90%, non-condensing
- Storage temperature: -22 to +160°F (-30 to +70°C)
Safety Instructions
Save these instructions. Read these safety instructions before use! The following basic safety precautions should always be followed to reduce the risk of fire, electrical shock, and other personal injury.
General Requirements
- Before you install and use the device, read the safety instructions carefully and observe the situation during operation.
- During the process of storage, transportation, and operation, please always keep the device dry and clean.
- During the process of storage, transportation, and operation, please avoid collision and crash of the device.
- Please attempt not to dismantle the device by yourself. In case of any discrepancy, please contact the appointed maintenance center for repair.
- Without prior written consent, no organization or individual is permitted to make any change to the structure or the safety design of the device. Yealink is under no circumstance liable to consequences or legal issues caused by such changes.
- Please refer to the relevant laws and statutes while using the device. The legal rights of others should be respected as well.
Troubleshooting
The unit cannot supply power to the Yealink device. There is a bad connection with the plug.
Clean the plug with a dry cloth. Connect it to another wall outlet. The usage environment is out of the operating temperature range.
Use in the operating temperature range. Connect the cable correctly. You cannot connect the cable properly. Use the correct power supply. Clean the port Contact your dealer or authorized service facility for any further questions
About Yealink
Yealink (Stock Code: 300628) is a global brand that specializes in video conferencing, voice communications, and collaboration solutions with best-in-class quality, innovative technology, and user-friendly experience. As one of the best providers in more than 140 countries and regions, Yealink ranks No.1 in the global market share of SIP phone shipments (Global IP Desktop Phone Growth Excellence Leadership Award Report, Frost & Sullivan, 2019).
Technical Support
Visit Yealink WIKI (http://support.yealink.com/) for firmware downloads, product documents, FAQs, and more. For better service, we sincerely recommend you use the Yealink Ticketing system (https://ticket.yealink.com) to submit all your technical issues.
REFERENCE LINK