

Farberware WM-CS6004W Pressure Cooker User Guide
PARTS & DESCRIPTION


- a. Exhaust valve handle
- b. Exhaust valve
- Float valve
- Seal ring retainer
- Seal ring
- Valve protector
- Float valve silicone cap
- Inner exhaust valve
- Spill over protection
- Soup ladle
- Rice scoop
- Cooking stand
- Measuring cup
- Power cord with plug
- Air vent
- Heating element
- Cooker housing
- Control panel
- Lid position mark
- Appliance handles
- Inner housing
- Removable container
- Lid
- Lid position indicator
- Lid handle
- Delay timer symbol

- Menu symbol M
- Time cook symbol

- START button
- Display
- MENU button
- +/- button
- TIME COOK button
- Menu references
- DELAY TIMER button
- KEEP WARM button
- STOP button
How to Use Farberware Pressure Cooker
Initial Setup:
- Place the cooker on a flat, stable surface.
- Insert the removable non-stick inner pot.
Add Ingredients:
- Ensure not to exceed the “Max” fill line.
- Add required liquids for pressure cooking.
Close the Lid:
- Align the lid properly and rotate until it locks securely.
Set Cooking Mode:
- Use the digital display to select desired mode (Pressure, Slow Cook, etc.).
Adjust Time & Pressure:
- Customize pressure levels and cooking times based on recipe.
Cooking Process:
- Press “Start.” The cooker will pressurize and begin cooking.
Releasing Pressure:
- After cooking, press the steam release valve or allow natural pressure release.
Serving & Cleaning:
- Unplug, allow the cooker to cool, and clean using a damp cloth. Avoid metal scouring pads.
ILLUSTRATIONS


OPERATION
Before first use
- Remove all accessories from appliance.
- Remove all packaging materials, labels and/or stickers from your appliance.
- Check package contents for completeness and damage. Do not operate the appliance if package content is incomplete or appears damaged. Return the appliance to Walmart immediately.
Danger of suffocation
- Packaging materials are not toys. Always keep plastic bags, foils and Styrofoam parts away from babies and children. Packaging material could block nose and mouth and prevent breathing.
Protection features
Follow instructions for safe use. Do not attempt to defeat any of the protection features.
| Parts | Functions | Safety |
| Exhaust valve (1) | Mechanical feature that allows pressure built up inside the appliance | Automatically releases pressure in case of excessive pressure build-up |
| Float valve (2) | Comes out once enough pressure builds up inside the appliance. Valve drops down once pressure drops below required levels | Once it comes out, the valve does not allow the lid to be opened; Once the valve drops down, wait a while before opening the lid |
| Seal ring (4) | Creates an air tight seal to maintain pressure inside the appliance | If pressure levels exceed required levels, the seal ring expands to release pressure on the sides of the lid |
| Valve protector (5) | Sits on top of the inner exhaust valve Can be removed for cleaning purpose | Prevents food from entering and clogging the exhaust valve |
| Spill over protection (8) | Collects spillage and condensation from the cooking process | Prevents spillage and condensation to interfere with protection features |
| Lid (22) | Mechanical safety feature that locks the lid in place with the inner ring, once enough pressure builds up in the appliance | Lid can only be removed once pressure level lowers to required levels |
| Overheat protection | Electronic feature that prevents risks of fire and injuries | Switches off the appliance if the temperature exceeds the required level. Heating element, display and indicator lights will switch off at once |
Assembly
- Attach float valve silicone cap (6) on bottom side of lid (22).
- Place valve protector (5) over inner exhaust valve (7) (ill. c ).
- Install seal ring (4) on bottom of lid (22) between seal ring retainer (3) and lid (22) inside (ill. a ).
- Ensure surface of removable container (21) and heating element (15) are clean, dry and free of any foreign objects (ill. d ).
- Ensure spill over protection (8) is attached properly to back of cooker housing (16) (ill. b ).
- Place appliance on clean, flat and heat resistant surface (ill. e ).
- Ensure air vent (14) on bottom of appliance is free of foreign objects.
- To prevent accidents, do not place appliance on carpets, tablecloths or paper to avoid blocking the air vent (14)
Using the appliance
Use appliance to prepare soups and stews, rice, steamed fish or vegetables or to prepare chicken, steak or other meats in a healthy way, while saving energy at the same time. The appliance can also be used for slow cooking, warming food or for browning or searing ( Cooking programs P01 to P09).
Danger of burns!
- Escaping steam can burn.
- Always keep clear from exhaust valve (1b) when appliance is in use.
Opening and closing lid
- To close, place lid (22) on cooker housing (16) (ill. g ). Ensure lid position indicator (23) is aligned with lid position mark (18) on cooker housing (16). Ensure no food residue is stuck between lid (22) and cooker housing (16) (ill. h )
- Turn lid (22) clockwise to lock lid (22) with lid handle (24). Lid position indicator (23) on lid (22) is aligned with lid position mark (18) on cooker housing (16) (ill. i ).
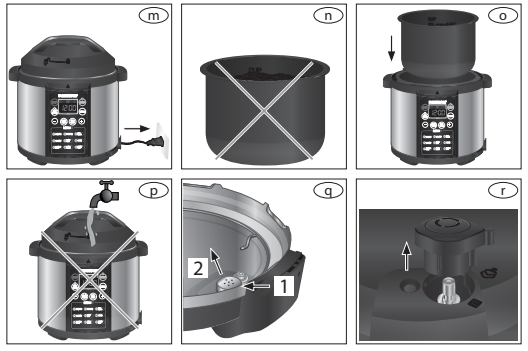
- To open, switch off appliance by pressing STOP button (36) and remove plug (13) from mains. Turn lid handle (24) counter clock-wise to unlock lid (22).
Filling with food
- Fill the removable container (21) with the desired ingredients. Do not overfill the removable container (21). Do not exceed the MAX level. It applies to both food and liquids, once combined. Do not fill the removable container (11) below the 2 cup marking. Take into account that some food might expand during the cooking process. Overfilling may cause a risk of clogging valves and developing excess pressure.
- Only use the removable container (21) provided with the appliance. Missing or use of another removable container may cause injuries and/or damage to the appliance!
- Fill the removable container (21) with at least 1 cup of liquid (water, juice…) as it is necessary to build up pressure inside the appliance. Use the measuring cup (12) for easy volume measurement. Follow the instructions from your recipe for details.
- Insert the removable container (21) into the appliance (ill. o ).
- Dry the outside surface of the removable container (21) before inserting it into the appliance. Liquids may damage the heating element (15) during use.
- Ensure the removable container (21) is levelled with the cooker housing (16) and that
no object remains between the removable container (21) and the inner housing (20). - Place the lid (22) onto the cooker housing (16) and rotate it counter clockwise all the way. Ensure it locks in place.
- Insert the plug (13) into a wall outlet (ill. m ). The display (29) will switch on to the stand-by mode.
HINTS AND TIPS
- This appliance can be used to have your breakfast, lunch or dinner ready and warm by the time you wake up, return from work or from outside activity with the help of delay timer function. Do not use DELAY TIMER and KEEP WARM functions for recipes which contain foods that can turn bad easily (e.g. raw eggs or raw fish).
- To avoid scratching of your appliance remove hard shells of crustaceans or shellfish before cooking.
- P09 does not allow selection of keep warm or delay timer function.
- P03 and P09 do not allow adjusting default cooking time.
- Smaller food normally requires less cooking time than larger food.
- It is recommended to cook defrosted food and cook from a refrigerated temperature to shorten the cooking time.
- It is recommended to only use nylon, heat-proof plastic or wooden cooking utensils. Metal utensils may become hot and damage the non-stick surface. Always remove utensils from the appliance. Do not leave them in the appliance during use.
- It is recommended to clean all accessories used after each use.
- Do not use the appliance with canned products.
- You can also use the appliance to reheat food. Place food into the appliance, and then select the KEEP WARM program. To create pressure and avoid burned food, add a small amount of liquid to the removable container (21) before closing the lid (22), if required.
- Always ensure to add at least 1 cup of liquid into the removable container (21). It creates steam that is necessary to build up pressure. Do not use oil or oil-based liquids under pressure. When using wine, add an equivalent amount of water as it evaporates too quickly.
- The cooking time countdown only starts when inner pressure / temperature reaches suitable levels.
- When cooking under pressure, the food continues to be cooked after the cooking time has elapsed. In case of uncertainty about the time needed to cook the food, reduce the cooking time and use the quick release method to shorten the cooking process and waiting time. Remove the lid (22) and check for doneness. Cook for longer, if required.
- When cooking beans, add a teaspoon of oil to the water to reduce the amount of foam.
- Meat cuts of lesser quality are tougher but better suited for cooking under pressure as it breaks down fibers and allows more tenderness.
CLEANING AND MAINTENANCE
Proper maintenance will ensure many years of service from your appliance. Clean the appliance after every use. The appliance contains no user serviceable parts and requires little maintenance. Leave any servicing or repairs to qualified personnel.
- Remove removable container (21) from inner housing (20).
- Wipe cooker housing (16), control panel (17), inner housing (20) and heating element (15) of appliance with damp sponge, cloth or nylon scouring pad and some mild detergent if needed. Remove food residue with damp cloth or toothpicks.
- Soak removable container (21) and seal ring (4), spill over protection (8), measuring cup (12), soup ladle (9) and rice scoop (10) in hot soapy water and clean with sponge. The removable container (21) is dishwasher safe.
- To remove float valve (2) for cleaning, take off float valve silicone cap (6) from bottom of lid (22) and turn lid upside down so the lid handle (24) is facing down. Float valve (2) should fall out without requiring force.
- Soak float valve (2) and float valve silicone cap (6) with soapy water and clean with sponge. Remove food residue with damp cloth or toothpicks.
- Replace float valve (2) into the lid (22).
Cleaning exhaust valve
- Detach valve protector (5). Hold with three fingers on upper side and gently pull away from seal ring retainer (3) towards middle of lid (22) (ill. q ).
- Detach exhaust valve (1b) (ill. r ).
- Inspect valve protector (5), exhaust valve handle (1a), float valve (2) and inner exhaust valve (7), clean and remove any residue.
- Attach valve protector (5). Place over float valve (2) and inner exhaust valve (7) and gently push down. If placed in position correctly, it should not be easily removable.
- Replace exhaust valve (1b).
Storage
- Before storage, always make sure the appliance is completely cool, clean and dry.
- It is recommended to store the appliance in a dry place.
- Store the appliance on a stable shelf or in a cupboard. To avoid accidents, ensure that both the appliance and its power cord (13) are beyond reach of children or pets.
Key Features
- 7-in-1 Versatility: Replaces multiple kitchen appliances.
- Programmable Timer: Set precise cooking times.
- Digital Display: Easy-to-read control panel.
- Safety Lock Lid: Ensures the lid stays securely in place.
- Non-Stick Inner Pot: Easy to clean.
- Automatic Keep Warm Function: Keeps food warm post-cooking.
- Pressure & Steam Release Valve: Controls pressure safely.
Specifications
- Model Number: WM-CS6004W
- Functions: 7-in-1 Programmable
- Pressure Cooker
- Slow Cooker
- Rice Cooker
- Sauté/Browning
- Steamer
- Yogurt Maker
- Warmer
- Power: 1000 Watts
- Capacity: 6-Quart
- UPC: 839724011821
TROUBLESHOOTING
| Problem | Cause | Solution |
| Appliance not working | Appliance not plugged in Wall outlet not energized Lid is not in place | Insert plug into wall outlet. Check fuses and circuit breaker Position lid correctly |
| Food not fully cooked | Cooking time too short Incorrect program used | Extend cooking time Change cooking program to suitable program |
| Food overcooked or burnt | Cooking time too long Incorrect program used | Reduce cooking time Change cooking program to suitable program |
| Rice too hard or too soft | Too little or too much water added to rice | Ensure correct amount of water is added according to recipe |
| Float valve does not rise | Not enough food in removable container Residue on float valve | Add food/water to removable container Clean float valve |
| The display and buttons light up but the appliance does not heat up | Malfunctioning appliance | Press the STOP button, then disconnect the appliance from the wall outlet and contact qualified personnel to check and repair the appliance | |||
| The appliance produces an odor and emits smoke | Residues from the production process are eliminated during first use | Operate the appliance, with inner pot in place and filled with at least 2 cups of water, for at least 10 minutes, with no lid nor food, until no odor or smoke is present | |||
| Error code | Error | Sound | Display | ||
| E1 | Bottom sensor open circuit | continuous beeps |
flashing | ||
| E2 | Bottom sensor short circuit | ||||
| C1 | Overheat protection | ||||
| E8 | Pressure protection not working | ||||
FAQS
What does oh mean on a Farberware pressure cooker?
How do you start a Farberware pressure cooker?
How does my pressure cooker work?
What is the slow cook mode on a Farberware pressure cooker?
What is the pressure limit on a pressure cooker?
What temperature is a Farberware pressure cooker?
How to reset farberware pressure cooker?
What is the principle of pressure cooker?
How to start a Farberware pressure cooker?
How do you maintain a pressure cooker?
 Afrikaans
 Albanian
 Amharic
 Arabic
 Armenian
 Azerbaijani
 Basque
 Belarusian
 Bengali
 Bosnian
 Bulgarian
 Catalan
 Cebuano
 Chichewa
 Chinese (Simplified)
 Chinese (Traditional)
 Corsican
 Croatian
 Czech
Czech Danish
 Dutch
Dutch English
 Esperanto
 Estonian
 Filipino
 Finnish
 French
 Frisian
 Galician
 Georgian
 German
 Greek
Greek Gujarati
 Haitian Creole
 Hausa
Hausa Hawaiian
 Hebrew
 Hindi
Hindi Hmong
Hmong Hungarian
 Icelandic
 Igbo
Igbo Indonesian
 Irish
Irish Italian
 Japanese
 Javanese
 Kannada
 Kazakh
 Khmer
Khmer Korean
 Kurdish (Kurmanji)
 Kyrgyz
 Lao
Lao Latin
Latin Latvian
 Lithuanian
 Luxembourgish
 Macedonian
 Malagasy
 Malay
Malay Malayalam
 Maltese
 Maori
Maori Marathi
 Mongolian
 Myanmar (Burmese)
 Nepali
 Norwegian
 Pashto
 Persian
 Polish
 Portuguese
 Punjabi
 Romanian
 Russian
 Samoan
 Scottish Gaelic
 Serbian
 Sesotho
 Shona
Shona Sindhi
 Sinhala
 Slovak
 Slovenian
 Somali
 Spanish
 Sundanese
 Swahili
 Swedish
 Tajik
Tajik Tamil
Tamil Telugu
 Thai
Thai Turkish
 Ukrainian
 Urdu
Urdu Uzbek
Uzbek Vietnamese
 Welsh
Welsh Xhosa
Xhosa Yiddish
 Yoruba
 Zulu
Zulu