Forever Flex FPV Drone with Camera User Manual
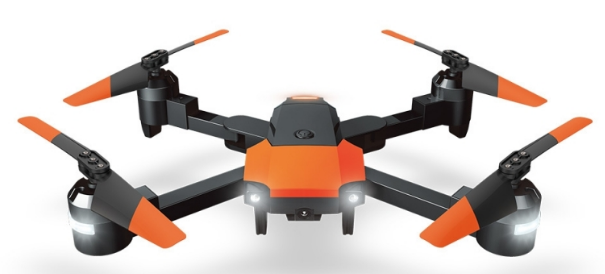
Thank you for purchasing the Forever Flex drone with a modern and foldable design. A built-in Wi-Fi FPV camera allows one to shoot photos and record videos in HD 720p resolution. A modernized gyroscope and barometer allow for stable flight on a demanded height and in all directions, as well as 360° rotation. Flex includes all functions necessary to ensure a smooth flight, such as: change of control sensitivity, Headless mode, and Autostart/Auto-landing. A dedicated Forever Flex mobile application expands the capabilities of the Flex drone, adding an option to transmit images from the camera to a smartphone screen in real time
Specification
- Transmission: 2.4 GHZ
- Image transmission: Wi-Fi
- Camera: 720p HD
- 6-axle gyroscope with adjustment
- Control: remote, smartphone
- Control distance: up to 80 m
- Flight time: up to 8 min (on a single battery charge)
- Drone power supply: 3.7 V 800 mAh lithium and ion battery
- Remote power supply: 3x 1.5 V AAA (not included in the set)
- Drone battery charge time: up to 90 min
- Number of propellers 8 (4 double)
- Drone weight: 155 g
- Application compatibility: iOS/Android
Functions
- Automatic start/landing
- Maintaining constant flight height
- Shooting photos
- Video recording
- Live image transmission (FPV)
- Change of control sensitivity
- 360° stunts system
- Automatic/manual calibration
- Headless mode
- Emergency landing
- Fold-up design
Set contents
- Forever Flex foldable drone
- A remote with a smartphone holder
- Modular drone battery (2 units)
- Set of spare propellers (4 units)
- USB charging cable
- Drone and accessories case
- Screwdriver
- User manual
Flex Drone Design

Double foldable propellers of various torsions:
- a) Clockwise
- b) Counterclockwise
Warning! When replacing propellers, mount them only on appropriate torsions. Incorrectly installed propellers will prevent use of the drone!
- Drone on/off button
- Built-in Wi-Fi FPV camera
- Motor
- Modular battery
Remote functions description
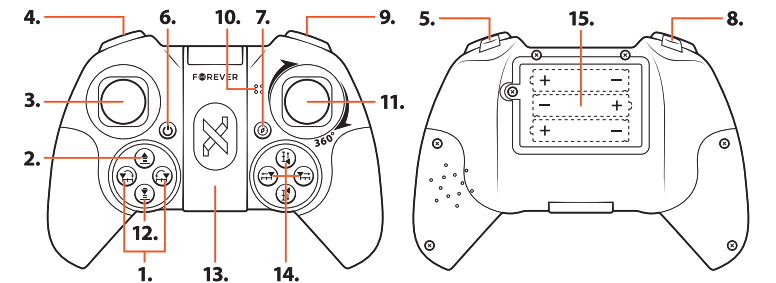
- Drone rotations calibration: left – right
- Automatic start
- A lever is used to control the height (up-down) and rotation of the drone (left-right)
- Change of speed mode
- Shooting photos
- Remote on/off switch
- Self-calibration
- Video recording
- Headless mode
- LED
- Lever used to control flight direction (forward-backward, left-right), 360 stunts
- Automatic landing
- Smartphone holder
- Drone flight calibration (left-right, forward-backward)
- Remote battery socket
After turning the remote on, the power LED lights up red. Slow flashing of the LED means a weak battery. Fast flashing means searching for frequency (connecting with the drone)
Remote controller batteries
- Use only AAA batteries;
- Batteries must be installed under markings in the socket;
- Remove batteries from the remote when it is not used.
- The flight time will be shortened when the remote is not sufficiently supplied.
- Do not throw the batteries into fire. Protect batteries against overheating.
- Protect the batteries against mechanical damage.
- Hand overused batteries to battery collection points. Do not dispose of batteries and electronics with municipal solid waste.
The insufficient power supply may also cause difficulties with the start, control, or flight altitude of the device.
Installation of batteries in the remote controller
- Unscrew the battery cover locking screw;
- Open the battery socket cover;
- Install 3 AAA alkaline batteries per markings in the socket;
- Close the battery cover;
- Secure the battery cover with a screw;
Warning!
The batteries must be of the same type and the same charge level. If the drone is unused for a longer period, remove the batteries from the remote.
Drone batteries charging

- Charging cable
- Flex drone battery
- USB 5 V DC power supply source
- Before charging a battery, remove it from the drone.
- If the battery is hot, before charging, wait until it cools down.
- Do not charge the battery if it is installed in the drone.
- Connect the battery charger to a USB power source of 5 V DC voltage. As a power source, you may use a wall charger with a USB output or a USB port in a running computer. Connect the battery to the charger.
- After fully charging, you may install the battery in the drone.
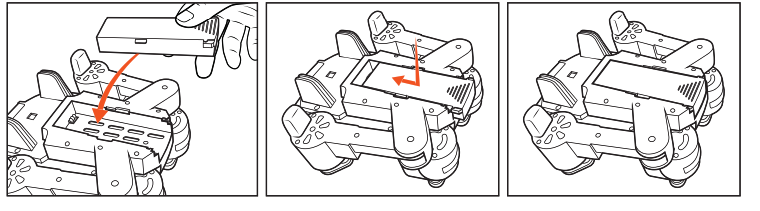
Installation of the battery in the drone
Insert a charged battery into the battery socket in the drone, as shown in the figure
Drone battery
- Do not connect batteries other than the one included in the set.
- Do not short-circuit the poles of the charger.
- Lithium and ion batteries may ignite spontaneously if they are not used according to recommendations.
- The flight time will be shortened when the drone does not have a sufficient power supply.
- Do not leave lithium-ion batteries unattended when they are charged.
- In case of problems associated with the battery (overheating, swelling, mechanical damage), immediately disconnect it from a charger.
- Do not throw the batteries into fire. Protect batteries against overheating.
- Protect the batteries against mechanical damage.
- Hand overused batteries to battery collection points. Do not dispose of batteries and electronics with municipal solid waste.
An insufficient power supply may also cause difficulties with the start, control, or flight height of the device.
Mounting a smartphone in the holder
- Open up the smartphone holder
- Separate the arms of the holder
- Place a smartphone between the arms of the holder
- Release the arms pressure, so they could reliably grip the phone.
Preparation for flight
Before flight, make sure that the drone and the remote are ready for use:
- Make sure that the drone battery is fully charged and properly installed
- Make sure that the batteries in the remote are charged and properly installed
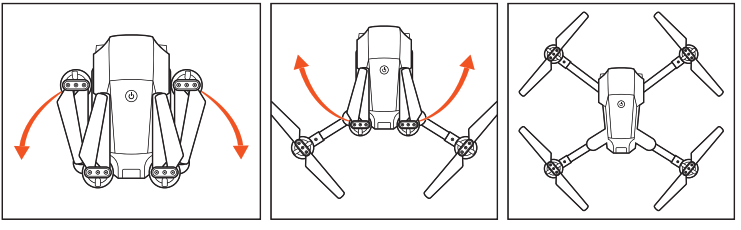
- Remove protections from the propellers and unfold the drone, as shown in the figure.
- Check if weather conditions allow flight
Warning!
Do not use the drone on extremely hot, cold, or rainy days! Do not use the drone during wind with a speed higher than 2.5 m/s, in urban areas, near parking lots and water tanks!
Drone start
Warning!
The drone may be activated or calibrated only on a straight, flat surface. Placing the drone on an inclined surface may prevent correct calibration.
Activation of motors and start
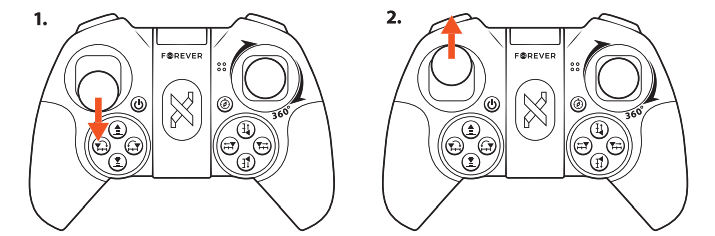
To activate the motors, move both levers on the remote as shown in the picture
Manual start
- Activate motors – press and hold joysticks for a moment as shown in the picture.
- Move the height control lever up and hold it to start.
Automatic start
- Activate motors – press and hold joysticks for a moment as shown in the picture.
- Click the auto-start button. The drone will start automatically and maintain an altitude of approximately one meter.
Regardless of the start method, the drone will automatically switch to altitude hold mode, therefore, there is no need to constantly control the throttle.
Drone control
The left lever controls the drone’s flight altitude (up-down)
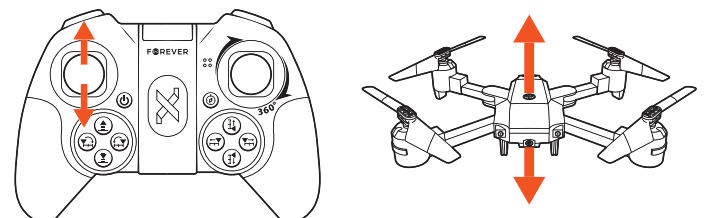
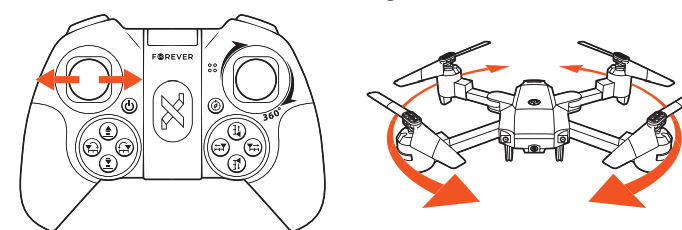
The left lever controls the rotation of the drone (left-right)
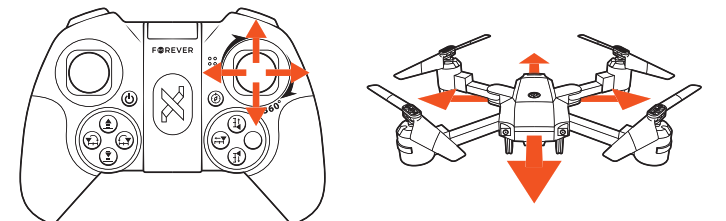
The right lever controls flight forward-backward, (left-right)
Drone landing
During the flight, the user has two landing options.
Manual landing:
Using the altitude control lever, lower the drone’s altitude. Hold the altitude control lever in an extreme bottom position – the drone will land and turn off the motors.
Automatic landing:
Click the auto-landing button. The drone will automatically lower the flight altitude, and then land and turn off the motors
Headless mode
A standard drone control consists of moving following the design of the drone, that is by pressing the control lever up, the drone will fl y in the direction pointed by its front side. In the headless mode, control is based on the position of the drone about the remote in the moment of activation of the mode. This means that if we activate the headless mode when the drone is turned sideways to us, moving the control lever up will make the drone move away from us instead of fl ying sideways like in the case of standard control. This mode facilitates control, as the user does not have to worry about the position of the front side of the device.
Mode activation: During the drone’s flight, press and hold the headless button. Warning! Before activating the headless, calibrate the drone using the automatic calibration button. When controlling the drone in the Headless mode, the user should remain in the place where the mode was activated. Moving when the Headless mode is activated may result in loss of control!
Drone flight speed change
The drone has 3 flight speeds:
- low (30% power)
- medium (60% power)
- high (100% power)
Together with the increase in the drone’s speed, its sensitivity to issued commands grows. Beginner users should use the lowest speed. The speed may be changed by pressing the Flight speed change button. By standard, after starting up the drone is set to the lowest speed. After pressing the button, the user hears a sound signal:
- a single signal – low speed is set;
- a double signal – medium speed is set;
- a triple signal – fast speed is set.
Stunt mode
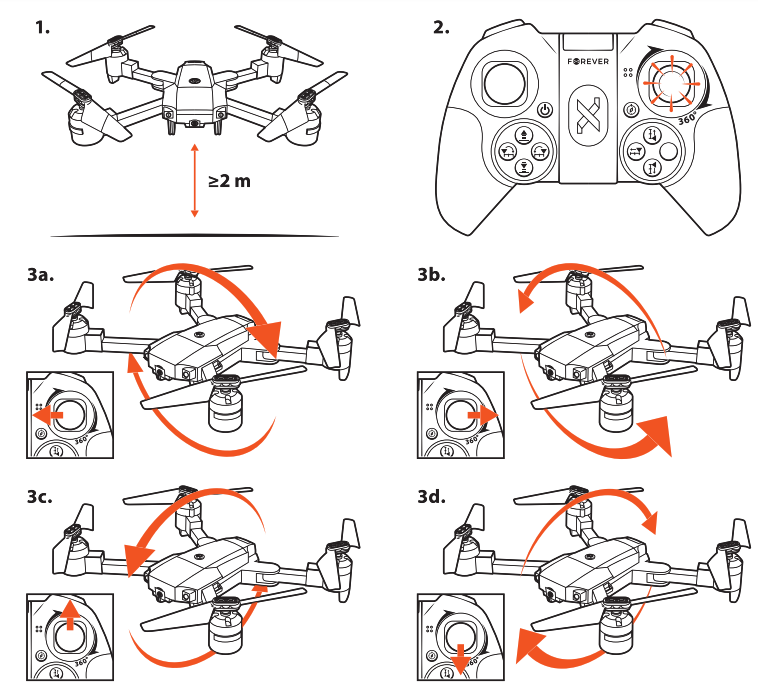
The drone offers a stunt mode, in which it can perform 360 degrees of rotation in four directions (forward/backward/left/right)
To rotate the drone:
- The drone must be at an altitude of at least 2 m.
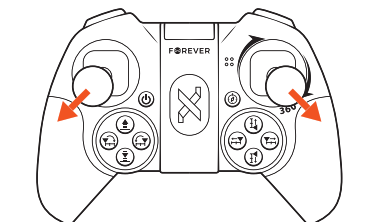
- Click the flight direction control lever (right lever).
- Point the flight direction lever in the desired direction of a stunt
Use of application
- Application settings
- Application instruction manual.
- Viewing recorder materials using the application in the phone’s memory
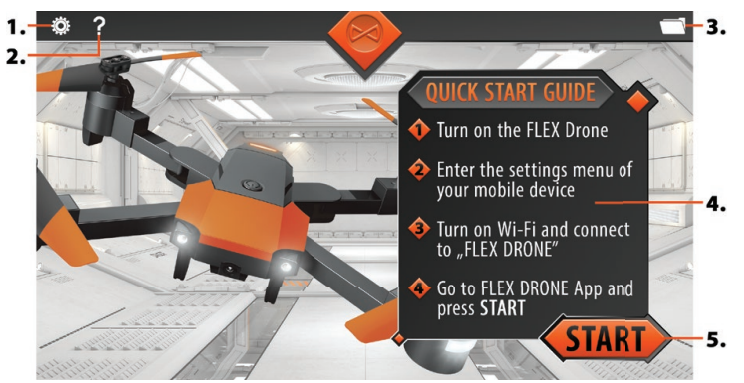
- Quick start instructions
- Drone control mode.
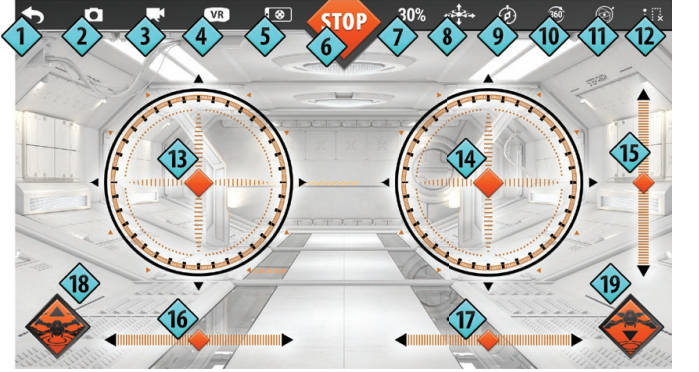
- Back
- Shooting a photo and saving it in the phone’s memory
- Recording a video and saving it in the phone’s memory
- VR mode
- Turn on / off the drone control interface
- Drone emergency shutdown.
- Change of speed mode 30%, 60%, 100%
- Headless mode
- Automatic calibration
- 360 degrees stunts
- Controlling the drone using a smartphone’s gyroscope
- Flight plan mode.
- Control up/down, rotation left/right
- Control left/right/forward/backward
- Manual calibration forward/backward
- Manual calibration of left/right rotations
- Manual calibration of left/right flight
- Automatic start
- Automatic landing.
Warning
- The device is intended for persons aged 14 and over. Adult supervision is recommended.
- The product contains small elements. Keep away from small children.
- Before starting, maintain a distance of a minimum of 5 m from the drone.
- Fold up and use the drone following the instructions included in the manual. Small elements should be folded up by adults.
- The producer and the supplier will not be held responsible for damage caused by improper use.
- Take special care during the operation of the propellers of the drone. Keep your hands, hair, or loose elements of clothing away from the propellers to avoid damage to the device or injury.
- Do not use the drone during a wind speed higher than 2.5 m/s or near water tanks.
- Do not leave a charging battery unattended.
- Do not charge the battery on a flammable surface.
- When cleaning, make sure that the drone is disconnected from a power supply.
- Do not let the drone fall off from significant heights – this may damage the device.
- The manual applies to several models, therefore, there may be slight differences in the description of functions and markings.
TelForceOne S.A. declares that the product is compatible with the requirements and other relevant provisions of the 2014/53/UE directive. You can download the declaration of product on the website https:// sklep.telforceone.pl/en-gb/
REFERENCE LINK
https://sklep.telforceone.pl/en-gb/product/2210429/2218023/drone-flex-forever?getpdf=1