
Honeywell T9 Smart Thermostat User Manual

Removing your old thermostat
Turn off power
To protect your equipment, turn off the power at the breaker box or switch that controls you heating and cooling equipment.
Note: The thermostat off switch will not turn off the power to the equipment.

Check that your system is off
Change the temperature on your old thermostat so that your system starts heating or cooling. If you don’t hear or feel the system turn on within 5 minutes, the power is off.
Note: If you have a digital thermostat that has a blank display, skip this step.

Remove your existing thermostat from the wall plate
On most thermostats, you can take off the thermostat by grasping and gently pulling. Some thermostats may have screws, buttons, or clasps.
Note: Do not remove any wires from your thermostat at this time!

Installing Your New Thermostat
Position wall plate
Pull open the wall plate that was included with your new thermostat. Insert the bundle of wires through the back of the wall plate. Make sure at least 1/4-inch of each wire is exposed for easy insertion into the wire terminals.

Insert recommended wall anchors
It is recommended that you use the wall anchors included in the box to mount your thermostat. You can use the wall plate to mark where you want to place the wall anchors.

Connect remaining wires from Step 8
Push down on the tabs to put the wires into the inner holes of their corresponding terminals on the wall plate (one wire per terminal) until it is firmly in
place. Gently tug on the wires to verify they are secure.
Tip: If you need to release the wires again, push down the terminal tabs on the sides of the wall plate.

Close the door and mount the wall plate
Mount the wall plate using the provided screws. Install all three screws for a secure fit on your wall.
Tip: Prior to tightening the screws, use a level to ensure the wall plate is level.

Complete setup on the thermostat
Remove the protective film and confirm that your thermostat reads “Welcome.” If you do not see this, visit HoneywellHome.com/support or call 1-855-733-5465 for more help.
Getting the most from the T9 Smart Thermostat
Prioritize Rooms
Prioritize a specific room or multiple rooms, or let comfort follow your move using built-in motion detection.
Control on the Go
Adjust your thermostat from anywhere using your tablet or smartphone.
Save Energy
With geofencing, you can save money on the most expensive part of your energy bill while you’re away.
Simple Installation
The thermostat automatically programs itself. Just answer a few simple questions and you’ll be up and running in no time.
Whole-Home Range
With up to a 200-foot* range, 20 sensors with temperature, humidity, and occupancy detection can connect to your thermostat from throughout your home.*Range can vary based on home construction, wireless interference, and other factors.
Know Your Home Is Safe
Get customizable alerts on your mobile device such as when the basement is so cold a pipe could burst, or if the baby’s room is getting too hot.
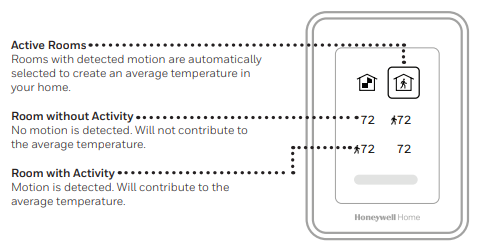
Using Priority
Priority creates an average temperature in your home based on specific rooms. This allows you to prioritize comfort where you want it. From the Home screen, select MENU, then Priority.

1-year limited warranty
Resideo warrants this product, excluding battery, to be free from defects in workmanship or materials, under normal use and service, for a period of one (1) year from the date of first purchase by the original purchaser. If the product is defective, (i) return it, with a bill of sale or other dated proof of purchase, to the place from which you purchased it; or (ii) call Resideo Customer Care at 1-800-633-3991.
Resideo’s sole responsibility shall be to repair or replace the product within the terms stated above. RESIDEO SHALL NOT BE LIABLE FOR ANY LOSS OR DAMAGE OF ANY KIND, INCLUDING ANY INCIDENTAL OR CONSEQUENTIAL DAMAGES RESULTING, DIRECTLY OR INDIRECTLY, FROM ANY BREACH OF ANY WARRANTY, EXPRESS OR IMPLIED, OR ANY OTHER FAILURE OF THIS PRODUCT.
Some states do not allow the exclusion or limitation of incidental or consequential damages, so this limitation may not apply to you. THIS WARRANTY IS THE ONLY EXPRESS WARRANTY RESIDEO MAKES ON THIS PRODUCT. THE DURATION OF ANY IMPLIED WARRANTIES, INCLUDING THE WARRANTIES OF MERCHANTABILITY AND FITNESS FOR A PARTICULAR PURPOSE, IS HEREBY LIMITED TO THE ONE-YEAR DURATION OF THIS WARRANTY. Some states do not allow limitations on how long an implied warranty lasts, so the above limitation may not apply to you. This warranty gives you specific legal rights, and you may have other rights which vary from state to state. If you have any questions concerning this warranty, please write Resideo Customer Care, 1985 Douglas Dr, Golden Valley, MN 55422, or call 1-800-633-3991.
FCC Regulations
This device complies with part 15 of the FCC Rules. Operation is subject to the following two conditions: (1) This device may not cause harmful interference, and (2) this device must accept any interference received, including interference that may cause undesired operation. The grantee is not responsible for any changes or modifications not expressly approved by the party responsible for compliance.
Such modifications could void the user’s authority to operate the equipment. This equipment has been tested and found to comply with the limits for a Class B digital device, pursuant to part 15 of the FCC Rules. These limits are designed to provide reasonable protection against harmful interference in a residential installation. This equipment generates, uses, and can radiate radio frequency energy and, if not installed and used in accordance with the instructions, may cause harmful interference to radio communications. However, there is no guarantee that interference will not occur in a particular installation.
If this equipment does cause harmful interference to radio or television reception, which can be determined by turning the equipment off and on, the user is encouraged to try to correct the interference by one or more of the following measures:
- Reorient or relocate the receiving antenna.
- Increase the separation between the equipment and the receiver.
- Connect the equipment to an outlet on a circuit different from that to which the receiver is connected.
- Consult the dealer or an experienced radio/TV technician for help.
This transmitter must not be co-located or operating in conjunction with any other antenna or transmitter. This equipment should be installed and operated with a minimum distance of 20 millimeters between the radiator and your body.


