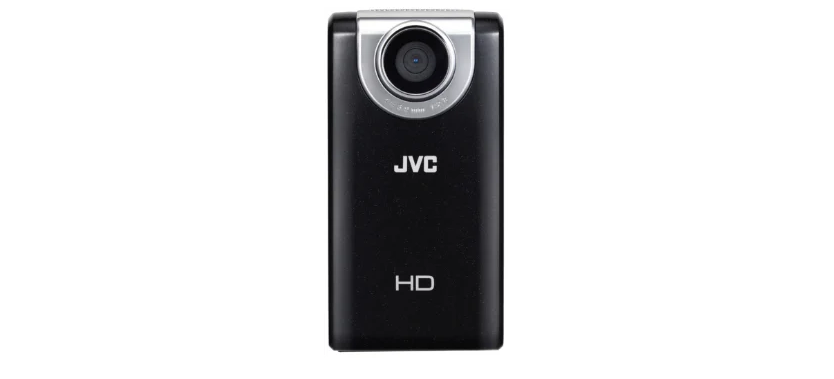

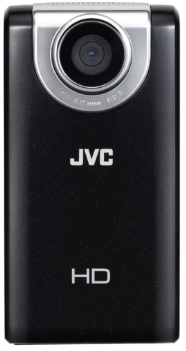
JVC GC-FM2 HD Memory Camera User Manual
IMPORTANT SAFETY INSTRUCTIONS
- Read these instructions.
- Keep these instructions.
- Heed all warnings.
- Follow all instructions.
- Do not use this apparatus near water. (GC-FM2 only)
- Clean only with dry cloth.
- Do not block any ventilation openings. Install in accordance with the manufacturer’s instructions.
- Do not install near any heat sources such as radiators, heat registers, stoves, or other apparatus (including amplifiers) that produce heat.
- Protect the power cord from being walked on or pinched particularly at plugs, convenience receptacles, and the point where they exit from the apparatus.
- Only use attachments/accessories specified by the manufacturer.
Key Features
- Full HD (1920 x 1080 / 30 fps) video recording
- 3 inch touch screen
- Electronic camera shake correction
- Easy uploading to YouTube with the supplied software LoiLoScope EX
- Eye-Fi card compatible: Uploading videos & still images via Wi-Fi network
- iFrame video format recording (ideal for video editing with iMovie)
- HDMI output connector
- Waterproof design within 3 m/10 ft, 30 minutes (GC-WP10 only)
- MP3 voice recorder (GC-WP10 only)
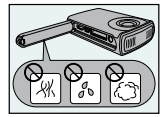
Daily Maintenance
Be sure to turn off the power and detach the cables before performing any maintenance.
- Wipe this unit with a dry, soft cloth to remove any dirt.
- When it is extremely dirty, soak the cloth in a solution of neutral detergent, wipe the body with it, and then use a clean cloth to remove the detergent.
CAUTION
- Do not use benzene or thinner. (Cause of damage to or malfunction of the unit)
- When using a chemical cloth or other products, be sure to observe the instructions of the product.
- Do not leave the device in contact with rubber or plastic products for a long time.
- Use a lens blower (commercially available) to remove any dust, and a cleaning cloth (commercially available) to wipe off any dirt. (Mold may form if the lens is left dirty.)
- Perform [TOUCH SCREEN ADJUST] (P.45) if the reactive area of the screen is misaligned with the touched area.
Names and Functions of Components
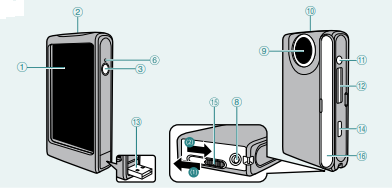
- LCD Monitor
- Speaker
- Power Button
- SCREEN LOCK Button (P.26) (GC-WP10 only)
- Video/Still Image Select Button (GC-WP10 only)
- POWER/CHARGE Lamp
- Recording Button (P.20)(GC-WP10 only)
- Tripod Mounting Socket
- Lens
- Microphone
- AV Connector (P.32)
- Connector
- SD Card Slot (P.12)
- USB Connector (P.14, 39)
- HDMI Mini Connector (P.32)
- USB Connector Lever (GC-FM2 only)
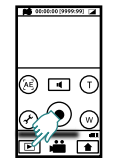
Indications on LCD Monitor
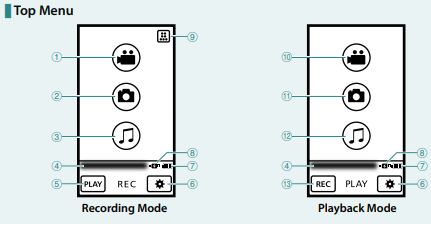
- Video Recording Button (P.20)
- Still Image Recording Button (P.20)
- Audio Recording Button (P.33) (GC-WP10 only)
- Time
- Play Select Button
- Basic Settings Button (P.44)
- Battery Indicator (P.15)
- Video Recording Mode Select Button (P.21)
- Top Menu
- Video Playback Button
- Still image Playback Button
- Audio Playback Button (GC-WP10 only)
- Recording Select Button
During Recording
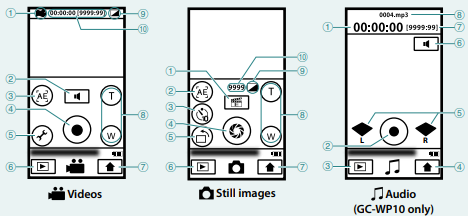 Videos
- WIND CUT [ON] (P.45)
- Headphones Volume Button (GC-WP10 only)
- AE Select Button (P.23) (GC-WP10 only)
- Recording Start/Stop Button
- Menu Settings Button (P.44)
- Play Select Button
- Top Menu Button
- Zoom Buttons
- EFFECT (P.45)
- Counter/Remaining Time
Audio (GC-WP10 only)
- Counter
- Audio Recording Start/Stop Button (P.33)
- Play Select Button
- Top Menu Button
- Microphone Input Level
- Headphones Volume Buttons
- Remaining Time
- Audio Recording File Name
Still images
- Menu Settings Button (P.44)
- AE Select Button (P.23) (GC-WP10 only)
- Self Timer (10 Seconds/OFF) Select Button
- Recording Button
- Recording Direction Select Button (P.22)
- Play Select Button
- Top Menu Button
- Zoom Buttons
- EFFECT (P.45)
- Remaining Number of Shots
Getting Started
Accessories

Attaching the Core Filter to the USB Cable
- GC-WP10: Attach the core filter to the USB cable.
- GC-FM2: Attach the core filter to the USB extension cable. The core filter reduces noise generated when connecting the camcorder to an external component. Connect the end of the cable with the core filter to the camcorder.

Attaching the Hand Strap (GC-WP10 only)
- When carrying the camcorder, please be careful not to drop it. Dropping it may cause injury or a malfunction of your camcorder.
- When a child uses the camcorder, there must be parental guidance.
Inserting an SD Card
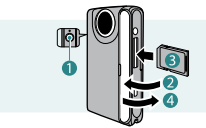
- Press the button for about 1 second to turn off the camcorder. The power lamp goes out.
- Open the cover( ).
- Insert an SD card( ). Turn off the power of this unit before inserting or removing a card.
- Close the terminal cover( ) firmly.
Charging the Battery
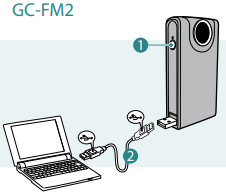
- Turn off the camcorder by pressing the button( ) for about 1 second. The power lamp goes out.
- Turn on the computer and connect to the camcorder( ).
NOTE
- The charging time is when the camcorder is charged at 25°C (77 °F). If the battery is charged outside the room temperature range of 10 °C (50 °F) to 35 °C (95 °F), charging may take a longer time or it may not start. The recordable and playable time may also be shortened under some usage conditions such as at low temperature.
- Charging is not possible while the camcorder is turned on.
- The battery is not charged at the time of purchase. Charge before starting to use the camcorder.
- When the battery level is extremely low, the camcorder does not turn on until it is charged even if it is connected to the computer or AC adapter.
- Do not turn the computer off or into the sleep mode during charging (the charging will stop).
Recording
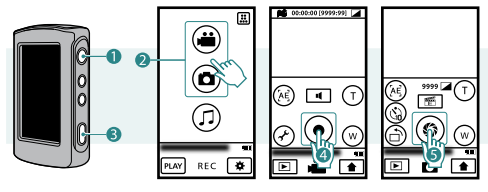
Recording Video/Still Images
Before recording an important scene, it is recommended to conduct a trial recording.
- Press the button( ) for about 1 second to turn on the camcorder.
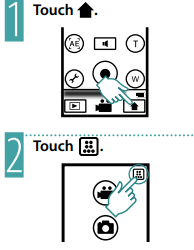
- Select video or still image mode( ) from the Top Menu. When you turn on the power, the Top Menu appears only for the first time after purchasing the camcorder. To return to the Top Menu, touch during video or still image recording.
- Touch the Recording START/STOP button( ). Touch it again to stop recording.
Change the Recording Quality ( video only)
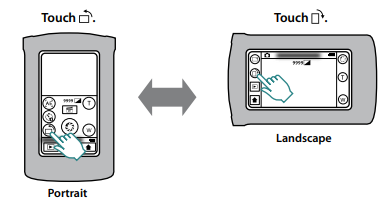
Switching the Image Orientation ( Still Image Recording only):
NOTE
- The size of still images differs between the portrait and the landscape modes. Portrait mode: 2592 × 1944 (5M)
Landscape mode: 1440 × 1920 (2.7 M) - The image orientation do not switch automatically. Switch it according to the actual orientation of the camcorder.
- Video is not output through the AV cable when the Image Orientation is set to Portrait.
- Video is not output at 480i or 480p through the HDMI cable when the Image Orientation is set to Portrait.
Using the Camcorder in Water (GC-WP10 only)
Confirm that there is no foreign material inside the terminal cover. (Foreign material causes ingress of water.)
- Make sure that there is no damage to and no foreign material (hair, lint, sand, dust, fluid etc.) adhered to the packing inside the cover, the SD card slot, or the parts around the connectors.
- If you find damage, do Not use the unit. Consult your JVC dealer or the nearest JVC service center.
CAUTION
- This camcorder is equipped with a waterproof function corresponding to JIS (Japanese Industrial Standards) IPX8. This camcorder can make recordings in marine water and fresh water not deeper than 3 m (10 ft) or for not more than 30 minutes.
- Do not soak the camera in hot springs or water of 40 °C (104 °F) or higher.
- Do not subject the camcorder to high water pressure such as in torrent or fall, or to excessive pressure or impact such as by diving with the camcorder in hand.
- The waterproof capability cannot be guaranteed if the camcorder is subject to impact such as dropping. Consult with the dealer if the camcorder is subject to impact.
- The camcorder sinks in water. Use the strap to prevent it from falling.
Playback
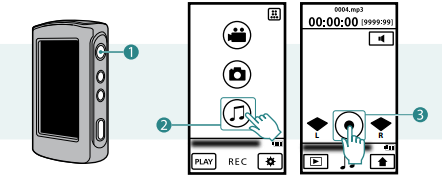
Select a video or still image to play back from the index screen.
- Preparation: Video recording/ Still image recording.
- Touch
 Select a file: If you touch , the thumbnail images will enlarge. Touch and drag the thumbnail display left and right or touch to move to another page. If a shooting duration of still images is within 2 seconds, they are displayed as one thumbnail (group).
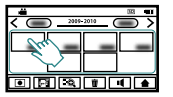 Play back a file: Touch the screen to display screen messages and operation buttons ( ). (They will disappear if touched again.)
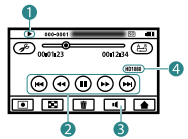
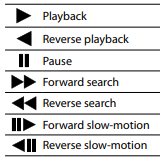
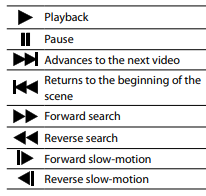
Operation Buttons (during Video Playback):
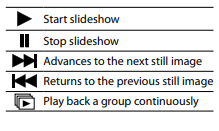
Operation Buttons (during Still Image Playback):
Audio Recording
Recording Audio
- Press the button( ) for about 1 second to turn on the camcorder.
- Touch Audio mode( ) on the Top Menu. To return to the Top Menu, touch in the audio recording screen.
- Touch the Recording START/STOP button( ).
- Audio recording starts. Touch again to stop audio recording.
Specifications
- Power consumption: 2.2 W
Dimensions (W × H × D)
- GC-WP10: 60 mm × 101 mm × 25 mm (2-3/8″ × 4″ ×1″)
- GC-FM2 : 53 mm × 102 mm × 22 mm (2-1/8″ × 4-1/16″ × 7/8″)
Weight
- GC-WP10: 147 g (0.33 lbs)
- GC-FM2: 113 g (0.25 lbs)
Operating environment
- Operating temperature: 0 °C to 40 °C (32 °F to 104 °F)
- Storage temperature: –20 °C to 50 °C (–4 °F to 122 °F)
- Operating humidity: 35 % to 80 %
- LCD monitor: 3.0″ diagonally measured
Zoom
- Digital zoom: Up to 4x
USB
- GC-WP10: Mini USB Type B, USB 2.0 compliant
- GC-FM2 : USB Type A, USB 2.0 compliant
Troubleshooting
Before requesting service, consult the following chart. If the solutions indicated in the chart do not solve the problem, consult your nearest JVC dealer or JVC service center for instructions. Refer also to the FAQ section on JVC’s website (http://www.jvc.com). The following phenomena are not malfunctions.
- LCD monitor momentarily becomes red or black when sunlight is recorded.
- Black spots, or red, green, or blue spots appear on the LCD monitor. (The LCD monitor contains 99.99% effective pixels, but 0.01% or fewer pixels may be ineffective.)
The camera is a microcomputer-controlled device. Electrostatic discharge, external noise and interference (from a TV, a radio, etc.) might prevent it from functioning properly. In such a case, reset the camcorder by pressing and holding the Power button for more than 10 seconds. If you reset the camcorder, reset the clock. (P.18)