
About
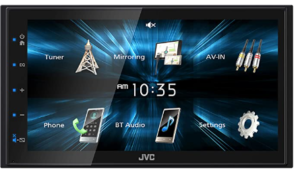
General features: 6.75-inch capacitive touchscreen, AM/FM tuner, plays media loaded with MP3, WMA, FLAC and AAC music files, double DIN dash open is compatible with Bluetooth and smartphone, hands-free calls and music streaming, on iPhone Control via built-in USB Port and Android Fast Charging, Android Screen Mirroring via USB Audio/Video Features: Playback from USB Storage Devices, 13-Band Equalizer with Digital Timer, High and Low Pass Filter, — No-CD—- Inputs: rear USB Input; Reversing camera input; rear A/V in (RCA) –
Outputs: rear Video Out; 5-Channel Preamp Output (2V Front, Rear, Mono Sub Cannon) Installation Dimensions (W x H x D) ): 7-3/16″ x 4-7/16″ x 3″ (182 x 112 x 75 mm) Remarks Note: Products with power plugs are designed for use in the United States (Sockets) and voltages are different all over the world, this product will need an adapter or converter to operate at your destination, please check compatibility before purchasing.
Precautions
WARNINGS
- To prevent a short circuit, never put or leave any metallic objects (such as coins or metal tools) inside the unit.
- Do not watch or fix your eyes on the unit’s display when you are driving for any extended period.
- If you experience problems during installation, consult your JVC dealer.
Precautions on using this unit
- When you purchase optional accessories, check with your JVC dealer to make sure that they work with your model and in your area.
- You can select the language to display menus, audio file tags, etc. See Instruction Manual.
- The Radio Data System or Radio Broadcast Data System feature won’t work where the service is not supported by any broadcasting station.
Cleaning the unit
If the faceplate of this unit is stained, wipe it with a dry soft cloth such as a silicon cloth. If the faceplate is stained badly, wipe the stain off with a cloth moistened with a neutral cleaner, then wipe it again with a clean soft dry cloth.
NOTE
Applying spray cleaner directly to the unit may affect its mechanical parts. Wiping the faceplate with a hard cloth or using a volatile liquid such as thinner or alcohol may scratch the surface or erase screened print.
Basic Operations
NOTE
The panels shown in this guide are examples used to provide clear explanations of the operations. For this reason, they may be different from the actual panels.
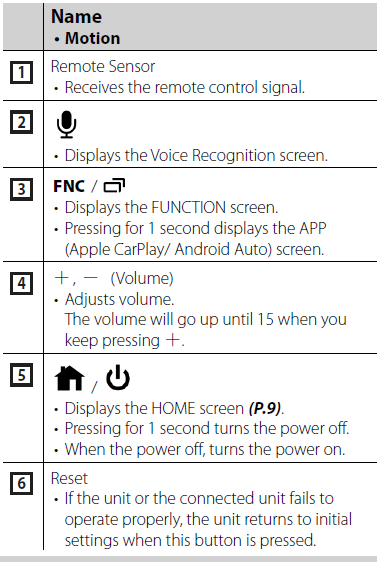
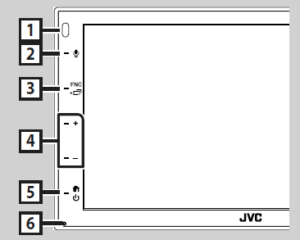
Adjusting the volume
To adjust the volume (0 to 40), Press [+] to increase, and press [-] to decrease. Holding [+] increases the volume and continues to level 15.
Touch screen operations
To perform operations on the screen, you need to touch, touch and hold, flick or swipe to select an item, display the setting menu screen or change the page, etc.
- Touch the screen gently to select an item on the screen.
- Touch and hold Touch the screen and keep your finger in place until the display changes or a message is displayed.
- Flick Slide your finger quickly to the left or right on the screen to change the page. You can scroll the list screen by flicking the screen up/ down.
- Swipe Slide your finger up or down on the screen to scroll the screen.
Gesture Touch Control:
You can also control playback by moving your finger on the touch panel as follows (for some sources, gesture control is not available).
- Sliding the finger up/down:
- Functions the same as pressing [+] / [-] (Media) on the USB Control screen.
- For the Tuner, tuner preset broadcast stations are switched.
- Sliding the finger towards left/right: Functions same as pressing [E] / [F].
- Moving your finger clockwise or counterclockwise: increases/decreases the volume.
SiriusXM® Basic Operation
Only SiriusXM® brings you more of what you love to listen to, all in one place. Get over 140 channels, including commercial-free music plus the best sports, news, talk, comedy, and entertainment. Welcome to the world of satellite radio. A SiriusXM Vehicle Tuner and Subscription are required. For more information, visit www.siriusxm.com.
Activating subscription
- Check your Radio ID. The SiriusXM Satellite Radio ID is required for activation and can be found by tuning in Channel 0 as well as on the label found on the SiriusXM Connect tuner and its package. The Radio ID does not include the letters I, O, S, or F.
- Activate the SiriusXM Connect Vehicle Tuner using either one of the two methods below:
- For users in the U.S.A. Online: Visit www.siriusxm.com/activatenow Phone: Call SiriusXM Listener Care at 1-866-635-2349
- For users in Canada: Online: Visit https://www.siriusxm.ca/help/activation-help/ Phone: Call XM customer Care at 1-877-438-9677
NOTE
To use SiriusXM® Satellite Radio, the optional accessory is necessary.
- The units supporting the Bluetooth function have been certified for conformity with the Bluetooth Standard following the procedure prescribed by Bluetooth SIG.
- However, it may be impossible for such units to communicate with your cell phone depending on its type.
Connection/Installation
Before Installation
Before installation of this unit, please note the following precautions.
WARNINGS
- If you connect the ignition wire (red) and the battery wire (yellow) to the car chassis (ground), you may cause a short circuit, that in turn may start a fire. Always connect those wires to the power source running through the fuse box.
- Do not cut out the fuse from the ignition wire (red) and the battery wire (yellow). The power supply must be connected to the wires via the fuse.
CAUTION
Install this unit in the console of your vehicle. Do not touch the metal part of this unit during and shortly after the use of the unit. Metal parts such as the heat sink and enclosure become hot.
NOTE
- Mounting and wiring this product requires skills and experience. For best safety, leave the mounting and wiring work to professionals.
- Make sure to ground the unit to a negative 12V DC power supply.
- Do not install the unit in a spot exposed to direct sunlight or excessive heat or humidity. Also, avoid places with too much dust or the possibility of water splashing.
- Do not use your own screws. Use only the screws provided. If you use the wrong screws, you could damage the unit.
- If the power is not turned ON (“There is an error in the speaker wiring. Please check the connections.” is displayed), the speaker wire may have a short-circuit or touch the chassis of the vehicle and the protection function may have been activated. Therefore, the speaker wire should be checked.
- • If your car’s ignition does not have an ACC position, connect the ignition wires to a power source that can be turned on and off with the ignition key. If you connect the ignition wire to a power source with a constant voltage supply, such as with battery wires, the battery may be drained.
- If the console has a lid, make sure to install the unit so that the front panel will not hit the lid when closing and opening.
- If the fuse blows, first make sure the wires aren’t touching to cause a short circuit, then replace the old fuse with one with the same rating.
- Insulate unconnected wires with vinyl tape or other similar material. To prevent a short circuit, do not remove the caps on the ends of the unconnected wires or the terminals.
REFERENCE LINK
https://www.us.jvc.com/car/multimedia/kw_m150bt/
Download PDF
JVC KW-M150BT Multimedia Receiver