
Maxxter ACT-BCAM-01 HD body cam User Manual
OVERVIEW
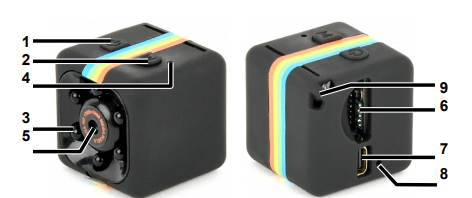
- ON/Off key
- MODE key
- Infrared lamp
- LED indicator
- Ultra-wide lens
- TF card port
- Mini USB port
- Reset hole
Operation Instruction
Charging Attention!
Please charge the mini camera battery fully before using it for the first time! This mini video camera has a built-in lithium-ion battery. You can charge it in any of the following ways:
- Connect the mini video camera to the USB port of your pc after you stop recording.
- Connect the mini camera to a charger on a 220V network or a portable 5V charger. By using this method, you can keep using the mini camera during the charging process. The blue and red LEDs will constantly blink during the charging process. Once the mini camera has fully charged, the LEDs will turn off.
- If the built-in battery is empty or if the memory card has insufficient memory to keep recording, the blue and red LEDs on the mini camcorder will blink simultaneously for 5 seconds. The mini camcorder will then automatically save the recorded video and turn off.
- If the memory card is not installed properly, the blue LED on the mini camcorder will blink simultaneously for 5 seconds. The mini camcorder will then automatically turn off.
- If the camcorder is in stand-by mode and none of its functions are used, the camcorder will turn off automatically after 1 minute to save the charge of the built-in battery.
Video recording
Record video in HD 720p resolution
Press the «On / Off» button and keep it pressed for 3 seconds to turn on the mini camera. The red LED will blink 3 times and then then blue LED will stay on continuously. The mini camera is currently in the HD 720p video stand-by mode. Short press the «On / Off» button to start recording. The blue LED blinks 3 times and turns off. The camera is now recording video inHD 720p resolution. The video is saved automatically every 5 minutes. Press the «On / Off» button again to stop the recording.
Record video FHD 1080p resolution
Press the «On / Off» button and keep it pressed for 3 seconds to turn on the mini camera. The red LED will blink 3 times and then then blue LED will stay on continuously. To set the video recording mode to a resolution of 1080p, press and hold the «Mode» button for five seconds. When the button is released, the red LED flashes 3 times.Short press the «On / Off» button to start recording. The blue LED blinks 3 times and turns off. The camera is now recording video in HD 1080p resolution. The video is saved automatically every 5 minutes. Press the «On / Off» button again to stop the recording
Motion sensor video recording
Make sure the camera is in standby mode. To enter themotion sensor mode, press and hold the «Mode» button for 3 seconds. The blue LED flashes 3 times and the camera is now in motion sensor video recording mode. It will now automatically start the video recording if it detects movement. When motion is detected, the blue LEDs blink 3 times and then turn off while the camera is recording. The camera will keep recording for 20 seconds longer as the motion event that was detected.Press «Mode» button again for 3 seconds to stop the motion sensor mode. The blue LED flashes3 times
Photo
Press the «On / Off» button and keep it pressed for 3 seconds to turn on the mini camera. Short press the «Mode» one time, the red LED will light up. The camera is now in photo mode. Short press the «On / Off» button to take photos – the red LED blinks once. The photo is saved automatically. The resolution of the photos is 1280×720
Night vision
Hold the «On / Off» button for 2 seconds – The night vision is now turned on. Hold the «On / Off» button again for 2 seconds to turn the night vision off.
Turn off
In order to turn off the camera, hold the «On / Off» button for 6 seconds. If the mini camera is in stand-by mode and is not being used, it will turn off automatically after 1 minute to save battery.
View files
Turn the camera off and connect it to the computer with the included USB cable. It will be automatically recognized as a removable drive after a few seconds. The blue indicator indicates the transfer of data and the red indicator indicates the charge of the built-in battery.
Set date and time
Connect the mini camera to the computer. The time is set by creating a text file named «TIMERSET.txt» in the main folder of the memory card of the device with the following content: «YYYYMMDDHHMMSS» «Y» (or «N» if you do not wish to display the date and time stamp on the video files) For example, «20170625140003 Y» Save the file and disconnect the video camera from the computer.Now turn it on to make the camera start using the date on the SD card.
(ENG) Declaration of conformity
This product is tested and complies with the essential requirements of the laws of member states concerning EMC(2014/30/EU), RoHS (2011/65/EU). The CE declaration can be found under www.maxxter.biz
SPECIFICATIONS
- Interface: USB 2.0
- Image sensor: color 1.3 MP HD Sensor
- Video resolution: 1080p @ 30fps (interpolated), 720p @ 30fps (real native)
- Video format: 4:3
- Photo resolution: 1280*720 (JPG)
- Video file format: AVI
- Data rate: 2.5 MB/s
- Memory: TF/Micro SDHCCards (Speed class 10, max. 32 GB)
- Battery: internal rechargeable battery, 200 mAh
- Power input: DC 5 V / 800 mA
- Dimensions: 22 x 22 x 22 mm (L x W x H)
- Length of USB cable: 80 cm
- Net weight: 10 g
Waste disposal:
The crossed out wheelie bin symbol means that this product shall not be disposed of with normal household waste. Electronic and Electrical Equipment not included in the selective sorting process are potentially dangerous for theenvironment and human health due to the presence of hazardous substances. Please dispose of responsibly at an approved waste or recycling facility.