Maxxter ACT-VLCAM-01 Vlog Camera Set User Manual
Features
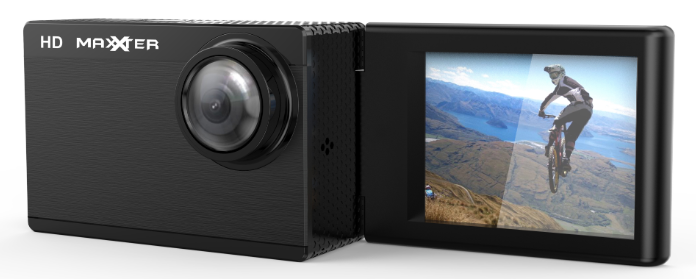
- HD vlog camera with built-in microphone
- 100 degrees wide angle lens
- Stores hours of video material on a removable Micro-SD card (not included)
- Practical 2.0” color LCD flip-screen
- Supports uninterrupted seamless cycle recording
- Complete set with essential vlog-accessories
Specifications
- Interface: USB 2.0
- Image sensor: Color 1.3 MP HD Sensor
- Video resolution: 1080p @ 15fps (interpolated), 720p @ 30fps (real native), WVGA (30fps)
- Photo resolution: 1M – 12M (JPG)
- Video file format: AVI
- Memory: TF/Micro SDHC Cards (Speed class 10, max. 32 GB)
- Battery: internal rechargeable battery, 3.7 V / 450 mAh
- Power input: DC 5 V / 460 mA
- Dimensions: 65 x 42 x 31 mm (L x W x H)
- Length of USB cable: 60 cm
- Net weight: 45 g
OVERVIEW
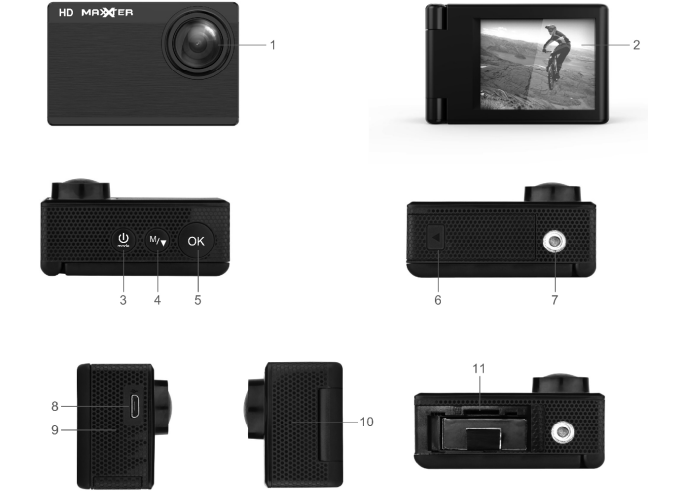
- . Lens.
- 2” inch screen.
- Power/Mode button.
- Menu/Select button.
- Confirm/OK button.
- Battery cover. Tripod socket.
- Micro USB port,
- Speaker,
- Microphone,
- Micro SD card slot
Inserting a Memory Card Into Your Camera
Before using your camera, insert a Micro SD Memory Card into the memory card slot (not included). We recommend using speed class 10 cards (or higher), with a minimal 8 GB storage capacity. Your camera supports Micro SD Memory Cards of up to 32GB in capacity. Only use good quality Micro SD cards from reliable brands.
It is recommended to format the Micro SD card in the camera before the first use. Formatting permanently deletes all data on the memory card, so be sure to copy the data you want to keep to another storage device before formatting. The memory card slot is spring-loaded. To remove a Micro SD card from the memory card slot, push the edge of the card until it pops out and then pull it from the slot.
Powering On & Charging Your Dashcam
Keep the power button pressed for 2 seconds to manually turn on or turn off your camera. Before the first use, please charge the battery for at least 5 hours. Make sure the battery is never fully discharged for a long time. When you store the camera, it is recommended to charge the battery to 60-80% capacity. Charge the battery directly via the Micro-USB port. Use the supplied USB charging cable and your computer or a 5V USB charger for charging. In general, the battery can be fully charged within 3-5 hours.
Exploring Your Camera’s Different Modes
Your camera has three separate modes. To switch between modes, short-press the Mode button repeatedly until you access the mode of your choice. Once you’ve reached the mode of your choosing, you can press the Menu button to open the settings menu of that specific mode. For a quick description of each of the modes, see below.
Video Capture Mode

The icon on the left appears on your camera’s display screen when you are in video capture mode. Use this mode to capture video with your camera.
Photo Capture Mode

The icon on the left appears on your camera’s display screen when you are in photo capture mode. Use this mode to take photos with your camera.
Playback Mode
![]()
The icon on the left appears on your camera’s display screen when you are in playback mode. Use this mode to view and manage photos and videos that you have already taken.
Video Capture Mode
To record video content, make sure that your camera is in video capture mode. This is the default mode when the camera is powered on.
Preparing your camera for Video Recording
To record video with your camera, you must first make sure that a Micro SD memory card is inserted into the memory card slot. Recording Video Content Once your camera is in video capture mode, and a Micro SD memory card is inserted in the memory card slot, you are ready to start recording video content. You can short press the OK button to start recording; short press the OK button again to stop recording.
Accessing the Video Capture Mode Settings Menu
To make adjustments to how your camera records video you can access the video capture mode’s settings menu. To do so, you must first make sure that you are in the video capture mode. Next, short press the Menu button once to access the video capture mode settings menu.
Then short press the OK button to access the general settings menu. Once you are in the settings menu, you can press the Select button to scroll through the various settings options. Press the OK button to confirm any settings options that you have selected. You can short-press the Power button to exit the menu.
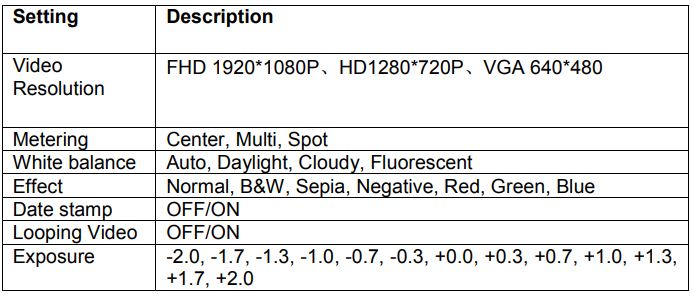
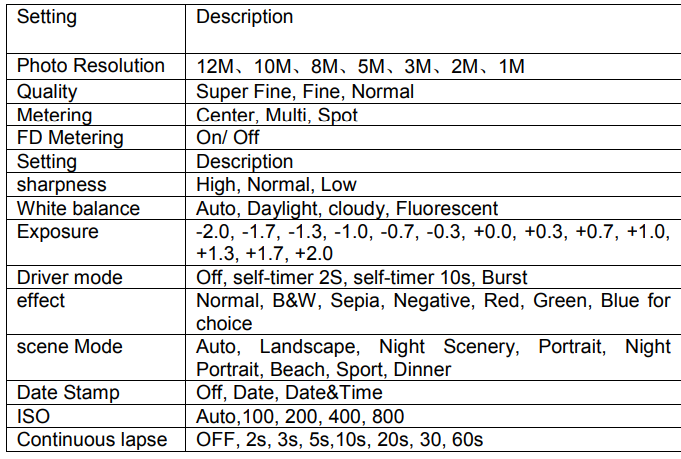
Photo Capture Mode
If your camera is powered on, and not recording video, then you can take photos by entering photo capture mode. To enter a photo capture mode, short-press the Mode button repeatedly until the ![]()
Accessing the Photo Capture Mode Settings Menu
To make adjustments on how your camera shoots photos you can access the photo capture mode’s settings menu. To do so, you must first make sure that you are in the photo capture mode. Next, short press the Menu button to access the photo capture mode settings menu.
Then short press the OK button to access the general settings menu. Once you are in the settings menu, you can short press the Select button to scroll through the various settings options. Short-press the OK button to confirm any settings options that you have selected, and short-press the Power button to exit the menu
Photo Capture Mode Settings
Buttons function
Power/mode button:
Keep this button pressed for 2 seconds to turn on the device and enter the Video capture mode. To turn OFF, press this button for 2 seconds again. Short press this button to switch between video capture/photo capture/ playback. When connected to MSDC mode, short press this button to enter PC CAMERA.
Menu/Select button:
In Video capture mode, short press this button to enter video capture mode settings menu, then short press this button again to scroll through the various settings options. In Photo capture mode, short press this button to enter the photo capture mode settings menu, then short press this button again to scroll through the various settings options. In playback mode, short press this button to scroll through the recorded video/photo files. When playing back the recorded video, short press this button to fast forward the video.
OK Button:
in Video Capture Mode, short press the OK button to start recording; short press the OK button again to stop recording. While in Photo Capture Mode, short press the OK button to take a photo. While in Playback Mode, short press the OK button to start/stop video playback. Works as a “save” function under the menu settings. While in the Video or photo setting menu, short press the OK button to access the general settings menu.
USB Port:
- for connecting your camera to the PC to transfer data. When connected to the PC, short press the mode button to switch between MSDC mode and PC CAMERA mode.
- for connecting a 5 V external power supply to charge the battery or provide power.