Veho VFS-014-SF Negative Slider Scanner Manual

What’s in the box?
- Veho Smartfix SF-1 Scanner
- 135 slider tray
- 135 negative tray
- 110 negative tray
- 126 negative tray
- Cleaning brush
- USB-A to Mini-B USB cable
- 3.5mm jack to yellow RCA cable
- Lithium-ion battery
- Multi-Lingual user manual
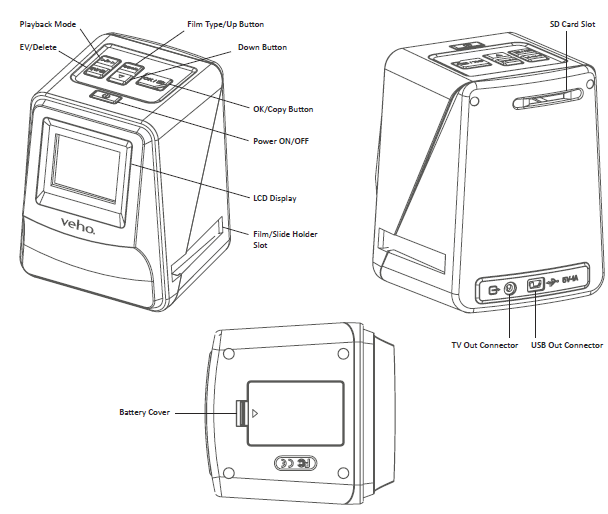
Controls
Installing the Veho VFS-014-SF Negative and charging the battery

- Insert the battery into the base of the scanner.
- Connect the Mini-B USB cable to the rear of the scanner, then plug the other end of the USB cable into a USB port on a computer or 5V/1A AC Adaptor.
- When charging, a red LED will light up. When the battery is fully charged, the red LED will turn off.
Status LED
- Red The Veho Scanner is turned off and the battery is charging.
- Purple The Veho Scanner is turned on and the battery is charging.
- Blue The Veho Scanner is turned on.
Inserting Slides or Negatives into the holder
- Place the holder so the glossy side faces up.
- Open the holder as illustrated.

Using the VFS-014-FS
- Insert an SD card into the scanner, following the illustration on the rear of the scanner.
 Press the power button to turn the power on.
- Press the Film Type button to select the correct mode for the slide/negative in the holder.
 Insert the slide/negative holder into the right-hand side of the scanner, as indicated by the p symbol on the scanner and the slide/negative holder.
 Align the slide/negative holder in the scanner using the LCD screen on the front.
- Press the copy button to scan the slide/negative into a digital image. To get the best result, wait for 3-4 seconds for the scanner to adjust the brightness for each slide/negative before pressing the copy button.
 After the brightness has automatically been set, you can manually adjust the exposure of the image before scanning. Press the EV/Delete Button to adjust the exposure Value (EV), then use the Up to Down button to adjust from +2EV to -2EV in increments of 0.5. The value of EV adjustment is shown at the bottom of the LCD screen.
- Once you have scanned the first image in the holder, move the holder to the next position and repeat until you need to put new slides/negatives into the holder.
 Press the power button to turn the power on.
 Insert the slide/negative holder into the right-hand side of the scanner, as indicated by the p symbol on the scanner and the slide/negative holder.
 Align the slide/negative holder in the scanner using the LCD screen on the front.
 After the brightness has automatically been set, you can manually adjust the exposure of the image before scanning. Press the EV/Delete Button to adjust the exposure Value (EV), then use the Up to Down button to adjust from +2EV to -2EV in increments of 0.5. The value of EV adjustment is shown at the bottom of the LCD screen.
Please note: To save power, the Veho Scanner will go to sleep mode after 3 minutes of being inactive. You can come out of sleep mode by pressing any button on the scanner.If the Veho Scanner is inactive for 6 minutes, it will turn off automatically.
Playback mode
- You can use Playback mode to view the images that you have scanned onto the SD card.
- Press the Playback button to enter playback mode:
 Press the Up or Down button to change the selected image.
- Press the playback button again to enter the slideshow mode.
 Press the Up or Down button to change the selected image.
Deleting images
- Enter Playback mode, then select the image you want to delete.
- Press the Delete button once, then Okay to delete the selected image.
- Press the Delete button twice, then Okay to delete all images.
- Press the Delete button three times then press the Okay button to format the SD card.
- Please note formatting the SD card will remove all files from the SD card, not just the images saved by the scanner.
Connecting the scanner to a computer.
- Plug the USB cable into the rear of the scanner and to a USB port on the computer.
- Press the Power button to turn the scanner on.
- Use the Up or Down button to select Yes or No and press Okay.
- Select Yes to view the files on your computer, the SD card will appear as a removable disc in “My Computer” or “This PC” for Windows users or on your desktop for Macintosh users.
- Select No to use the scanner to scan slides/negatives while charging from a USB port.
Viewing images on a TV
The scanner is compatible with Mac and Windows operating systems, allowing you to copy the files directly from the SD card in the scanner without using a USB card reader. There is no software included or required to use the scanner on either operating system.
- Set the TV to the correct input, and then connect the scanner to the TV using the 3.5mm jack to yellow RCA cable.
- Turn the scanner on.
- Press the Playback button.
- Use the Up or Down button then the Okay button to select PAL or NTSC to match your region.
- Press the Up or Down button to change the selected image.
- Press the Playback button again to start a slideshow. You can use the Up or Down button to pause a slideshow, then press the Playback button to resume the slideshow.
Safety information and specifications
Specifications
Image Sensor 1/2.33″ 14 Mega CMOS Sensor,
Preview and Review 2.4″ Color LCD Display
Lens Specification F=4.8, f=12.95mm
Color Balance Automatic
Exposure Control Automatic & Manual adjustment
REFERENCE
https://veho-world.com/product/


