
Viatom Checkme Pro Health Monitor User Manual
Introduction
Safety
Warnings and Cautionary Advices
- We recommend not to use this device if you have a pacemaker or other implanted devices. Follow the advice given by your doctor, if applicable.
- Do not use this device with a defibrillator.
- Do not use this device during MRI examination.
- Do not use the device in a combustible environment (i.e., oxygen-enriched environment).
- Do not place this device in pressure vessels or gas sterilization device.
- This device is not intended for use by people (including children) with restricted physical, sensory or mental skills or a lack of experience and/or a lack of knowledge, unless they are supervised by a person who has responsibility for their safety or they receive instructions from this person on how to use the device.
- Do not allow the electrodes of the device to come into contact with other conductive parts (including earth).
- Do not store the device in the following locations: locations in which the device is exposed to direct sunlight, high temperatures or levels of moisture, or heavy contamination; locations near to sources of water or fire; or locations that are subject to strong electromagnetic influences.
- Vital signs measurements, such as those taken with this device, cannot identify all diseases. Regardless of the measurement taken using this device, you should consult your doctor immediately if you experience symptoms that could indicate acute disease.
- Do not self-diagnose or self-medicate on the basis of this device without consulting your doctor. In particular, do not start taking any new medication or change the type and/or dosage of any existing medication without prior approval.
- The device has no alarms and will not sound if the measurement reading is too low or too high.
- Check the SpO2 sensor application site every 6-8 hours to determine the positioning of the sensor and the circulation and skin sensitivity of the patient.Patient sensitivity varies depending on medical status or skin condition. For patients with poor peripheral blood circulation or sensitive skin, inspect the
sensor site more frequently. - Do not use the Oximeter on the same hand/arm when using a blood pressure cuff or monitor.
About Checkme
Intended Use
The Checkme Lite health monitor is intended to be used for measuring,displaying, storing and reviewing of multiple physiological parameters including ECG, pulse oxygen saturation (SpO2) and systolic blood pressure (SBP) in home or healthcare facilities environment.
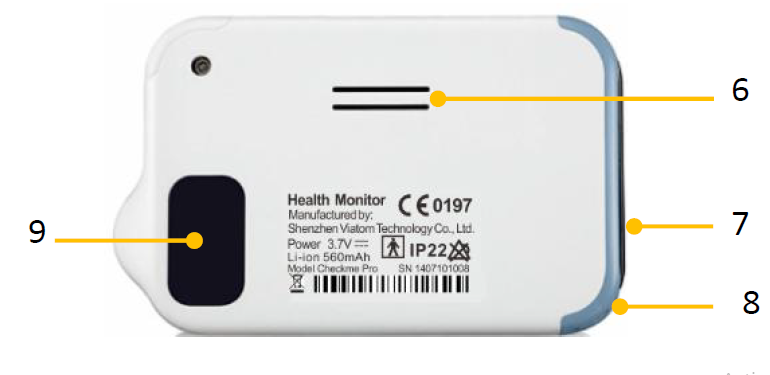
Outline
ECG and SBP are intended for use with adult.The data and results provided by this device are for pre -check screening purpose only and cannot be directly used for diagnostic or treatment.
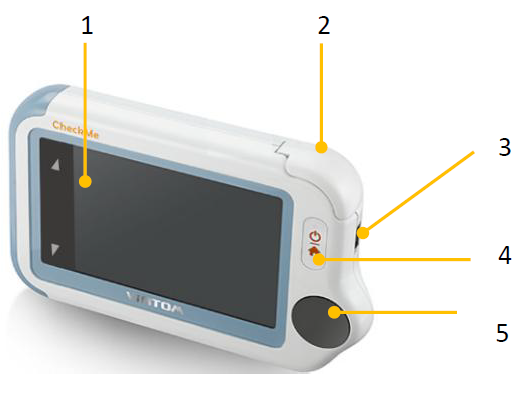
- Touch Screen
- Internal SpO2 sensor
- Micro-USB connector It connects with USB cable for charging.
- Home button
- When the monitor is off, press this button to power it on.
- When the monitor is on, press and hold it for 2 seconds to turn it off.
- During operation, press this button will switch to Main Screen or return to upper menu.
- ECG right electrode (Put right thumb on it.)
 Speaker
- ECG left electrode (Put it to your left palm, left abdomen or left knee.)
- Neck stripe hole
- ECG back electrode
 Speaker
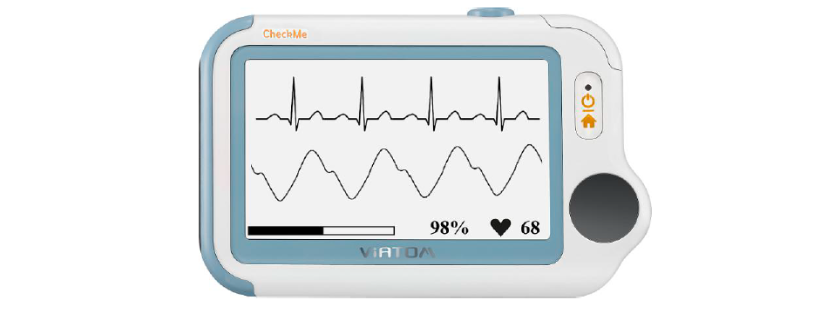
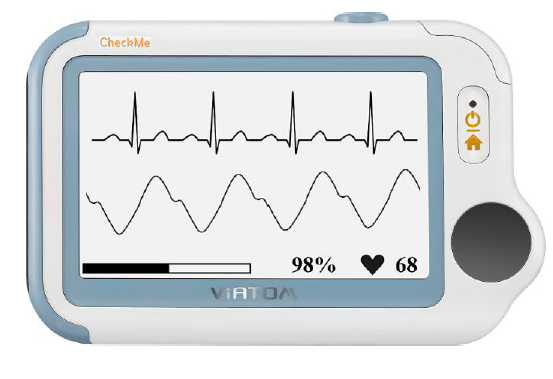
Main Screen
The Main Screen is shown as below. Slipping your finger from right to left can switch to the second page, and vice versa.
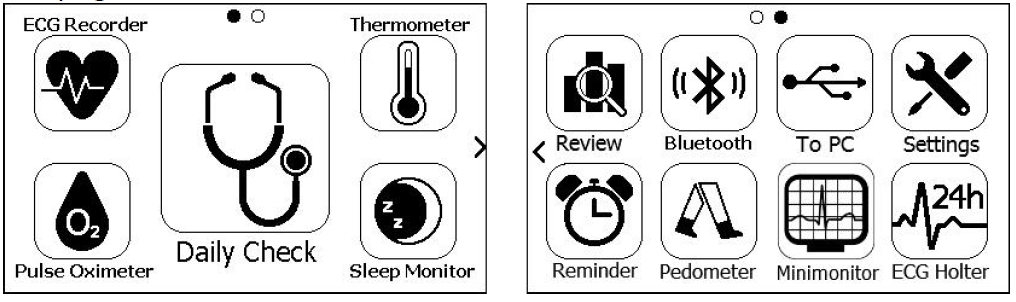
Mini monitor and ECG Holter are optional function.
Calendar Screen / Standby Mode
The device will enter Calendar Screen / Standby Mode when:
- No operation is detected for 120 seconds in other screen interface, the device will automatically switch to the Calendar Screen.
- Pressing the Home button in the Main Screen.

- Current time
- Current date When a reminder event happens, this area displays the event name, e.g. “Daily Check”.You are allowed to change the current time and date when the device is powered on at the first time. Or you can also go to the Setting menu to change it.
- This arrow indicates users to press the Home button to exit the Calendar Screen /Standby Mode.
- Battery indicator
- If you failed to respond to the previous reminder event, then that event will be shown in this area.
- This icon appears when <Quick ECG> is enabled.
- This icon appears if you have set reminder event.
Result Screen
For each measurement, a Result report will be provided after the measurement is finished. An example is shown as below.
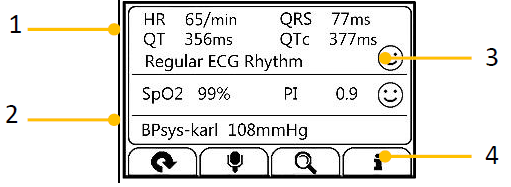
- Measured parameters and readings
- A summary of this measurement
- A graphic indicator about the health status.
- All measured parameters are within the reference range;
- One or more than one measured parameter(s) is (are) out of reference range. When the icon appears, it is suggested to test again, and consult your doctor for help.
- Buttons
- Select button to start a measurement again.
- Press and hold the button to add voice memo. Voice memo is only available for Daily Check and ECG Recorder measurements.
- Select button to review previous results.
- Press button to open the help information.
Symbols
| Symbol | Meaning |
 | Application part type BF |
 | Manufacturer |
| CE0197 | In conformity with Directive 93/42/EEC |
 | European Representative |
 | Symbol for “ENVIRONMENT PROTECTION – Waste electrical products should not be disposed of with household waste. Please recycle where facilities exist. Check with your local authority or retailer for recycling advice”. |
| IP22 | Against ingress of solid foreign objects ≥12.5mm diameter; Against dripping (15° tilted) |
 | Follow operating instructions |
Using Checkme
Prior to Use
Charge the Battery
To charge the battery,
- Connect the smaller end of the USB charging cable to the multi-functional connector
- Connect the other end of the USB charging cable to the USB charging port.
- When the LED turns to green, it means the battery is fully charged.
Warnings and Cautionary Advices
- The device cannot be used for any measurement during charging.
- Use charging adapter provided by manufacturer, or USB charging devices which comply with the standard of IEC 60950.
Power On/Off
Press the Power On/Off button to power on the device. Press and hold Power On/Off button for 2 seconds to power off the device.
Daily Check
About Daily Check
Daily Check measurement is a function that combines the measuring of ECG (Electrocardiograph), SpO2 (blood oxygenation) and systolic blood pressure. It takes only 20 seconds to collect your vital signs before giving you vital signs readings and your health evaluation.
Using Daily Check
To start a Daily Check, follow the steps as below.
- If you have not created user, then please follow the instruction in [Settings Section] to add your user account.
- Tap the <Daily Check> icon in the middle of the screen.
- choose the right user.
- Hold the device according to the instruction, keep the device at the same level as your heart, and keep stable posture and stay calm. Don’t exert too much pressure on the ECG electrode, which may result in EMG (electromyograph) interference.Just hold gently and ensure good contact with the ECG electrode. Do not exert
pressure on the finger that put. Put the right forefinger into the built-in SpO2 sensor. Use the finger nail to squeeze the edge of the SpO2 sensor cover, then move in upward to the left to raise it up as shown below.
- Press the right thumb on the right electrode.
- Press the right middle finger on the back electrode.
- Press the left electrode to the left palm.
- Once the device detects stable waveform, it will automatically start the measurement. The countdown bar moves from left to right.
- When the bar is fully filled, the device will analysis your data, and then show the measurement result.
 Put the right forefinger into the built-in SpO2 sensor. Use the finger nail to squeeze the edge of the SpO2 sensor cover, then move in upward to the left to raise it up as shown below.
Daily Check provides the trending graph of heart rate, SpO2 and blood pressure. To view the trend, tap the button, then select one record, and then tap the button.
BP Calibration
Warnings and Cautionary Advices
- For a given user, it is suggested to make BP calibration every three months.To get blood pressure readings, this device should be calibrated by a doctor with a traditional cuff blood pressure (BP) meter. Because of individual differences, each user must make his/her own calibration before using Daily Check to measure or track the
blood pressure. The calibration should be performed when the user is under calm status.
To calibrate with a cuff BP meter, follow the steps as below.
- Select the <Settings> icon, select <BP Calibration>, and then choose the right user.
- Ensure that the cuff and the Checkme monitor are at the same level as your heart.Then start the blood pressure measurement from the cuff BP meter.
- Press the button on the Checkme screen, and start the Daily Check measurement.
- When the blood pressure measurement is finished, manually input the readings of systolic pressure reading in the Checkme.
- Repeat the calibration once again by following the above steps.
ECG Recorder
About ECG Recorder
The ECG recorder offers four different methods to measuring ECG. Tap the icon to switch between two pages.
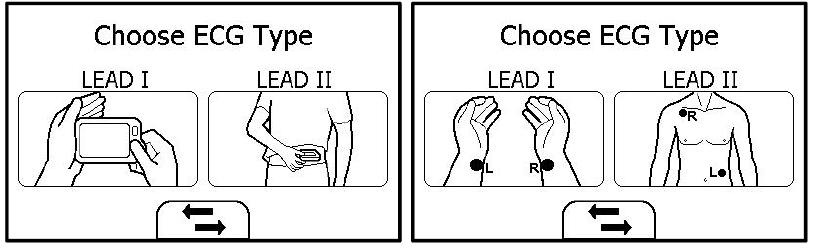
As shown above, from left to right, there are:
- Method A: Lead I, right hand to left hand
- Method B: Lead II, right hand to left abdomen
- Method C: Lead I, left wrist to right wrist
Care and Cleaning
Clean the device by carefully swabbing the device surface with a soft cloth swab with water or alcohol.
Trouble Shooting
| Problem | Possible Cause | Solution |
| The device does | 1. The battery may be | 1. Charge the battery |
| not turn on. | low. 2. The device might be damaged | and try again. 2. Please contact with your local distributor. |
| The ECG waveform | The lead you choose is not suitable for you. | Change another lead and try again. |
| amplitude is small | ||
| ECG waveform | 1. The pressure exerted | 1. Hold the device |
| drifts | on the electrode is not stable or too much. 2. Hand or body may be moving. | stably and gently. 2. Try to keep perfectly still and test again. |
| SpO2 or pulse rate shows no value, or the number | 1. Finger may not be inserted correctly. 2. Finger or hand may be moving. | 1. Remove finger and reinsert, as directed. 2. Try to keep perfectly still and test again. |
| fluctuates | ||
| “Error XX” | Software or hardware | Restart the device. If |
| occurred. | failure. | the error persists, contact with authorized service |
| center. | ||
| SpO2 value is too low when | 1. Finger pressed too hard. | 1. Reinsert your finger gently and stably. |
| measured using integrated sensor. | 2. Finger may not be inserted correctly. | 2. Make sure your finger is in right position. |
| BP calibration failed. | 1. The difference between two | 1. Try to keep perfectly still and calibrate |
| calibrations is too large. 2. Input a wrong systolic reading. | again. 2. Make sure input the right number. |
SPECIFICATION
| Environmental | |||
| Item | Operating | Storage | |
| Temperature | 5 to 45°C | -25 to 70°C | |
| Relative humidity (noncondensing) | 10% to 95% | 10% to 95% | |
| Barometric | 700 to 1060 hPa | 700 to 1060 hPa | |
| Degree of dust & water resistance | IP22 | ||
| Physical | |||
| Size | 88×56×13 mm | ||
| Weight | 64 g (main unit) | ||
| Display | 2.4” touch screen, color, backlit |
| Connector | Micro-USB connector |
| Power Supply | |
| Battery type | Rechargeable lithium-polymer battery |
| Battery run time | Daily check: > 200 times |
| Charge time | Less than 2 hours to 90% |
| ECG | |
| Lead type | Integrated ECG electrodes |
| Lead set | Lead I, lead II |
| Record length | 30s |
| Sampling | 500 Hz / 16 bit |
| Display Gain | 1.25 mm/mV, 2.5 mm/mV, 5 mm/mV 10 mm/mV, 20 mm/mV |
| Sweep speed | 25 mm/s |
| Bandwidth | 0.67 to 40Hz |
| Electrode offset potential tolerance | ±300 mV |
| HR measurement range | 30 to 250 bpm |
| Accuracy | ±2 bpm or ±2%, whichever is greater Heart rate is calculated based on average of every 5 to 30 QRS complex. |
|
Measurement summary | Heart rate, QRS duration, Rhythm analysis (Regular ECG Rhythm, High Heart Rate, Low Heart Rate, High QRS Value,. Irregular ECG Rhythm, Unable to analyze) |
| Standards | Meet standards of ISO 80601-2-61 |
| Measurement accuracy verification: The SpO2 accuracy has been verified in human experiments by comparing with arterial blood sample reference measured with a CO-oximeter. Pulse oximeter measurement are statistically distributed and about two-thirds of the measurements are expected to come within the specified accuracy range compared to CO-oximeter measurements. | |
| SpO2 range | 70% to 100% |
| SpO2 Accuracy (Arms) | 80-100%:±2%, 70-79%:±3% |
| PR range | 30 to 250 bpm |
| PR accuracy | ±2 bpm or ±2%,whichever is greater |
| PI range | 0.5-15 |
| Measurement summary | SpO2, PR, PI, Summary (Normal Blood Oxygen, Low Blood Oxygen, Unable to analyze) |
| Blood Pressure Variation | |
| Measurement method | Cuff-free non-invasive technology |
| Measurement summary | systolic pressure based on individual calibration coefficient |
| Review | |
| Waveform review | Full disclosure waveform |
| Storage | 100 pcs of records |
Electromagnetic Compatibility
The device meets the requirements of EN 60601-1-2. All the accessories also meet the requirements of EN 60601-1-2 when in use with this device.
Warnings and Cautionary Advices
- Using accessories other than those specified in this manual may result in increased electromagnetic emission or decreased electromagnetic immunity of the equipment.
- The device or its components should not be used adjacent to or stacked with other equipment.
- The device needs special precautions regarding EMC and needs to be installed and put into service according to the EMC information provided below.
- Other devices may interfere with this device even though they meet the requirements of CISPR.
- When the inputted signal is below the minimum amplitude provided in technical specifications, erroneous measurements could result.
- Portable and mobile communication equipment may affect the performance of this device.
- Other devices that have RF transmitter or source may affect this device (e.g. cell phones, PDAs, and PCs with wireless function).
| Guidance and Declaration – Electromagnetic Emissions | ||
| The Health Monitor is intended for use in the electromagnetic environment specified below. The customer or the user of the device should assure that it is used in such an environment. | ||
| Emission tests | Compliance | Electromagnetic environment – guidance |
| RF emissions CISPR 11 | Group 1 | The device uses RF energy only for its internal function. Therefore, its RF emissions are very low and are not likely to cause any interference in nearby electronic equipment. |
| RF emissions CISPR 11 | Class B | The device is suitable for use in all establishments, including domestic establishments and those directly connected to the public low-voltage power supply network that supplies buildings used for |
| Harmonic emissions IEC61000-3-2 | Class A | |
| Voltage | Complies | |
| Fluctuations / Flicker Emissions IEC 61000-3-3 | domestic purposes. |
| Guidance and Declaration – Electromagnetic Immunity | |||
| The Health Monitor is intended for use in the electromagnetic environment specified below. The customer or the user of the Health Monitor should assure that it is used in such an environment. | |||
| Immunity test | IEC60601 test level | Compliance level | Electromagnetic environment – guidance |
| Electrostatic discharge (ESD) IEC 61000-4-2 | ± 6 kV contact ± 8 kV air | ± 6 kV contact ± 8 kV air | Floors should be wood, concrete or ceramic tile. If floors are covered with synthetic material, the relative humidity should be at least 30 %. |
| Electrical fast transient/burst IEC 61000-4-4 | ± 2 kV for power supply lines ± 1 kV for input/output lines | ± 2 kV for power supply lines ± 1 kV for input/output lines | Mains power quality should be that of a typical commercial or hospital environment. |
| Surge IEC 61000-4-5 | ± 1 kV line(s) to line(s) ± 2 kV line(s) to earth | ± 1 kV line(s) to line(s) ± 2 kV line(s) to earth | |
| Voltage dips, short Interruptions and Voltage variations on power supply input lines | <5 % UT (>95 % dip in UT) for 0.5 cycle 40 % UT (60 % dip in UT) | <5 % UT (>95 % dip in UT) for 0.5 cycle 40 % UT (60 % dip in UT) | Mains power quality should be that of a typical commercial or hospital environment. If the user of our |
| IEC 61000-4-11 | for 5 cycles 70 % UT (30 % dip in UT) for 25 cycles <5 % UT (>95 % dip in UT) for 5 s | for 5 cycles 70 % UT (30 % dip in UT) for 25 cycles <5 % UT (>95 % dip in UT) for 5 s | product requires continued operation during power mains interruptions, it is recommended that our product be powered from an uninterruptible power supply or a battery. |
| Power frequency (50/60 HZ) magnetic field IEC 61000-4-8 | 3 A/m | 3 A/m | Power frequency magnetic fields should be at levels characteristic of a typical location in a typical commercial or hospital environment. |
| Note: UT is the AC mains voltage prior to application of the test level. | |||
| Guidance and Declaration – Electromagnetic Immunity | |||
| The Health Monitor is intended for use in the specified electromagnetic environment. The customer or the user of the Health Monitor should assure that it is used in such an environment as described below. | |||
| Immunity test | IEC60601 test level | Compliance level | Electromagnetic environment – guidance |
| Conduced RF IEC61000- 4-6 | 3 Vrms 150 kHz to 80 MHz outside ISM bands | 3 Vrms 150 kHz to 80 MHz outside ISM bands | Portable and mobile RF communications equipment should be used no closer to any part of the system, including cables, than the recommended separation distance calculated from the equation appropriate for the frequency of the transmitter. Recommended separation distances: d = 1 .2 P |
| Radiated | 3 V/m 80 | 3 V/m 80 | Recommended separation |
| RF IEC61000- 4-3 | MHz to 2.5 GHz | MHz to 2.5 GHz | distances: 80 MHz~800 MHz: d = 1 .2 P 800MHz-2.5GHz: d = 2 .3 P Where, P is the maximum output power rating of the transmitter in watts (W) according to the transmitter manufacturer and d is the recommended separation distance in meters (m). Field strengths from fixed RF transmitters, as determined by an electromagnetic site survey a, should be less than the compliance level in each frequency range b. Interference may occur in the vicinity of equipment marked with the following symbol:
|
| Note 1: At 80 MHz to 800 MHz, the separation distance for the higher frequency range applies. Note 2: These guidelines may not apply in all situations. Electromagnetic propagation is affected by absorption and reflection from structures, objects and people. | |||
| a Field strengths from fixed transmitters, such as base stations for radio (cellular/cordless) telephones and land mobile radios, amateur radio, AM and FM radio broadcast and TV broadcast cannot be predicted theoretically with accuracy. To assess the electromagnetic environment due to fixed RF transmitters, an electromagnetic site survey should be considered. If the measured field strength in the location in which the device is used exceeds the applicable RF compliance level above, the device should be observed to verify normal operation. If abnormal performance is observed, additional measures may be necessary, such as re-orienting or relocating the device. b Over frequency range 150kHz to 80MHz. For Resp field strength should be less than 1V/m. | |||
| RF communications equipment and the device | |||
| The Health Monitor is intended for use in an electromagnetic environment in which radiated RF disturbances are controlled. The customer or the user of the Health Monitor can help prevent electromagnetic interference by maintaining a minimum distance between portable and mobile RF communications equipment (transmitters) and the monitor as recommended below, according to the maximum output power of the communications equipment. | |||
| Rated max. output power of transmitter (W) | Separation distance according to frequency of the transmitter (m) | ||
| 150 kHz – 80 MHz d = 1 .2 P | 80 MHz – 800 MHz d = 1 .2 P | 800 MHz – 2.5 GHz d = 2 .3 P | |
| 0.01 | 0.12 | 0.12 | 0.23 |
| 0.1 | 0.38 | 0.38 | 0.73 |
| 1 | 1.20 | 1.20 | 2.30 |
| 10 | 3.80 | 3.80 | 7.30 |
| 100 | 12.00 | 12.00 | 23.00 |
| For transmitters rated at a maximum output power not listed above, the recommended separation distance d in metres (m) can be estimated using the equation applicable to the frequency of the transmitter, where P is the maximum output power rating of the transmitter in watts (W) according to the transmitter manufacturer. Note 1: At 80 MHz and 800 MHz, the separation distance for the higher frequency range applies. Note 2: These guidelines may not apply in all situations. Electromagnetic propagation is affected by absorption and reflection from structures, objects and people. | |||
Shenzhen Viatom Technology Co., Ltd.
4E,Building 3,Tingwei industrial Park,No.6 Liufang Road,Block 67,Xin’an Street,Baoan District,Shenzhen, 518101, Guangdong China www.viatomtech.com | Email: info@viatomtech.com MedNet GmbH Borkstrasse 10 · 48163 Muenster · Germany TEL: +49 251 32266-0 FAX: +49 251 32266-22 PN:255-00425-00 Version: A Dec, 2017Contents of this manual are subject to changes without prior notice. ©Copyright 2014-2017 Shenzhen Viatom Technology Co., Ltd. All rights reserved.