Table of contents
show
PYLE PDWM3360-3365 Wireless Microphone

FOREWORD
Your new series of a wireless systems is designed to give you the best of both sound reinforcement worlds: the freedom of a wireless system, and excellent quality. This manual covers each of the series systems: The Vocal Artist-UHF, and The Headset-UHF.
SYSTEM FEATURES
- Adopt the PLL-Synthesized control technique, 8 selectable UHF channels.
- The UHF frequency range is 573- 597.8MHz, avoiding frequency interruption.
- LCD information display.
- Double noise squelch operation circuit and the system will be higher efficient and much more steady.
- Use the dynamic type and Unidirectional cartridge, clear to show the sound.
- High efficient and low consumption design.
- Use the high extension antennas, the operating distance will reach 50m.
SYSTEM TYPE
- The Vocal Artist-UHF is a hand-held system designed for singers who desire high-quality microphones and the freedom of wireless performance. The Presenter-UHF is a body-pack system designed for public speakers who prefer an inconspicuous, hands-free lavalier microphone.
- The Headset-UHF is a body-pack system designed for users in physically active applications, who desire the freedom of hand-free microphones.
- The Guitarist-UHF is a body-pack system designed for use with electric guitars, basses, and other electric instruments.
DUAL CHANNEL RECEIVER FEATURES

- Power Switch: Power ON/OFF the receiver.
- Power Indicator: Indicate the power ON/OFF.
- “RF” Signal Indicator: It glows when the Receiver receives RF signal from Transmitter.
- “AF” Audio Level Indicator: Indicate the wireless system audio signal level.
- LCD Information Display: Shows the receiver frequency channel etc.
- Down Function Button: Sets channel data.
- Up Function Button: Sets channel data.
- Volume Knob: Adjust the volume output of the receiver.
- Antenna.
- XLR Balanced Output Jack: Connect the audio cable from this jack to the input port of the amplifier, and mixer.
- 1/4” Audio Output Jack: Connect the audio cable from this jack to the input port of the amplifier, and mixer.
- Power jack: Connect the AC/DC adapter to the receiver.
TRANSMITTER FUNCTION & FEATURES
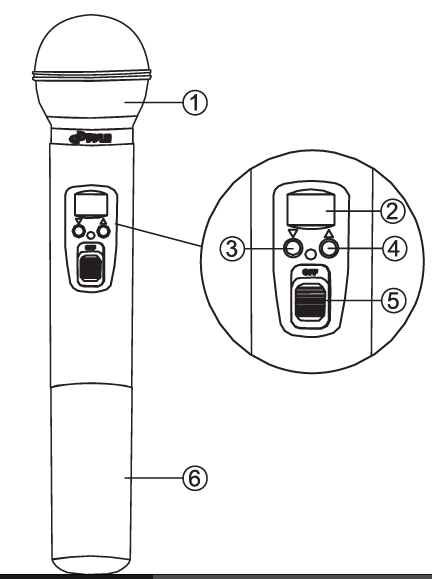
- Grille: Protects the cartridge and help reducing the breath sounds and wind noise.
- LCD Information Display: Show the transmitter frequency channel ect.
- Down Function Button: Sets channel data.
- Up Function Button: Sets channel data.
- Power and Audio Mute Switch.
- Battery Cover: Open it to install the battery.

- Power and Audio Mute Switch.
- Antenna: Transmit the RF signal of transmitter.
- Belt Clip: Attach the transmitter to the belt.
- Audio Input Jack: it is suitable for lavaliere system/headset system.
- Low Battery Indicator: Red light glows when it is lack of power and should renew the battery.
- LCD Information Display: Show the transmitter frequency channel etc.
- Gain Adjusting Volume: Adjust the transmitter audio input gain.
- State Setting Switch: Set the using state of lavaliere system (L)/headset system (H).
- Up Function Button: Sets channel data.
- Down Function Button: Sets channel data.
SYSTEM CONNECTIONS
- Receiver Power Connection: Connect the AC adapter into the DC power connector on the back of the receiver. Plug the AC adapter into a AC 120V /220V 50Hz outlet.

- Antenna: Keep the position of antenna at a 45 angle from vertical. (Shown as below)

- Audio Connection: Connect the audio cable from the audio output on the receiver to the input on your amplifier equipment.


BODYPACK TRANSMITTER CONNECTION
- Lavalier Microphone Connection: Connect the connector of supplied Lavalier microphone to the connecting jack of the transmitter (shown below) Set the transmitter work state in the wireless Lavalier system (L).

- Headset Microphone Connection: Connect the connector of supplied headset microphone to the connecting jack of transmitter (shown as below) Set the transmitter work state in wireless headset system (H).


TRANSMITTER BATTERY INSTALLATION
- Transmitter Battery Installation: Push open the battery cover, insert the supplied batteries into battery jar matching polarity and cover the battery.


TROUBLESHOOTING
| PROBLEM | INDICATOR STATUS | SOLUTION |
| No Sound | Red transmitter indicator is not flashing | Slide transmitter POWER ON/OFF switch to ON position. Make sure battery is inserted properly, observing battery (+/-). If the battery is inserted properly, replace with fresh battery. |
| No Sound | Red transmitter indicator is flashing | Slide transmitter MUTE/ON switch to ON position |
| No Sound | Red receiver POWER light off | Make sure AC adapter is securely plugged into electrical outlet and into DC input connector. Make sure AC electrical outlet works and supplies proper voltage |
| No Sound | Receiver signal indicators A/B lights glowing | Trun up receiver volume control. Confirm that the output connections from the receiver to the external equipment are secure |
| No Sound | Receiver signal indicators A/B lights off. Transmitter and | Confirm transmitter and receiver~ frequency match. Move transmitter |
| receiver POWER lights glowing | closer to receiver. | |
| Sound level differs from the level of a cabled Instrument. | Receiver signal indicators A/B lights glowing | Adjust transmitter gain level to compensate. Adjust receiver volume as necessary |
| Sound level differs from the level of different guitars | Receiver signal indicators A/E lights glowing | Readjust transmittergain level to compensate differences in guitar outputs |
| Distortion level increases gradually | Receiver signal indicators A/B lights and transmitter LOW BATTERY light glowing | Replace transmitter battery |
| Bursts of noise or other audible radio signals present | Signal indicators A/B lights ON | Identify potential sources of interference (other RF sources) and turn OFF, remove or use a wireless system operating on a different frequency |
| Momentary loss of | Receiver signal indicator A/B lights OFF when sound is lost | Reposition receiver and perform |
| sound as transmitter is | walk-through again. If audio dropouts | |
| moved around | persist, mark “dead” spot-and avoid them | |
| performing area. | during performance. |
SYSTEM SPECIFICATIONS
- RF Carrier Frequency Range:
Approximately 523 to 597.8 MHZ (Available frequencies depend on applicable regulations in country where system is used). - Operating Range: 50m (approximately 164ft) under typical conditions
- Audio Frequency Response: 100 to 18,000Hz, ±3dB
- THD: <1%
- Mobile state Range: > 100dB
Operating Temperature Range
-20.2°F to 165.2°F (-29°C to 74°C)
NOTE: Battery characteristics may limit this range.
OPTIONAL ACCESSORIES
- 1/4″ to 1/4″ Cable (The Guitarist -UHF only)
- 1/4″ to Miniature Connector
- 1.8 Meter (6ft.) Receiver-Mixer Cable
RECEIVER SPECIFICATION
| Power Requirements | 120V or 230VAC adaptor with 2.1 mm female plug |
| Power Requirements | 13 -15 V DC nominal,500mA+ |
| Signal/Noise Ratio | MORE THAN 85dB |
| Border Upon Channel Rejection | MORE THAN 70dB |
| Image & Spurious Rejection | MORE THAN 70dB |
| Audio Output Level | 0- ±300mV |
| Receiving Sensitivity | -105dBm |
| Dimensions | 8.5″ X 6.7″ X 2″ inches |
HAND-HELD TRANSMITTER SPECIFICATIONS
| Power Requirements | 1.5VAA battery X 2 |
| Nominal Current Drain | LESS THAN 100mA |
| Modulation Type | FM |
| RF Output | MORE THAN 10dBm |
| Max Deviation | ±70KHz |
| Spurious Emission | MORE THAN 55dB |
| Dimensions | 9.8″ X 2″ X 2″ inches |
BODY-PACK TRANSMITTER SPECIFICATIONS
| Power Requirements | 1.5VAA battery X2 |
| Nominal Current Drain | LESS THAN 100mA |
| Modulation Type | FM |
| RF Output | MORE THAN 10dBm |
| Max Deviation | ±70KHz |
| Spurious Emission | MORE THAN 55dB |
| Dimensions | 4″ X 2.5″ X 1″ inches |
REFERENCE LINK
https://pyleusa.com/products/pdwm3365https://pyleusa.com/products/pdwm3365


