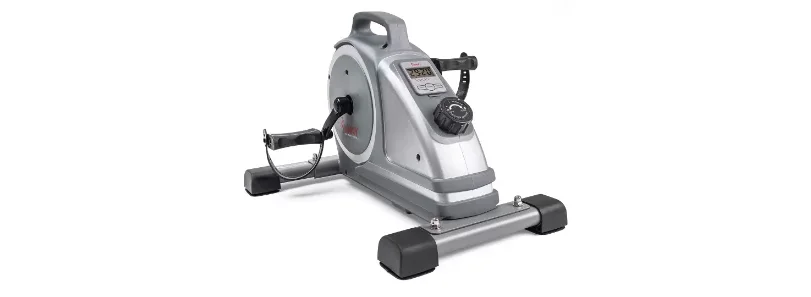
Sunny Magnetic Mini Exercise Pedal Cycle Manual

IMPORTANT SAFETY INFORMATION
We thank you for choosing our product. To ensure your safety and health, please use this equipment correctly. It is important to read this entire manual before assembling and using the equipment. Safe and effective use can only be achieved if the equipment is assembled, maintained, and used properly. It is your responsibility to ensure that all users of the equipment are informed of all warnings and precautions.
KEY POINTS
- Before starting any exercise program, you should consult your physician to determine if you have any medical or physical conditions that could put your health and safety at risk or prevent you from using the equipment properly. Your physician’s advice is essential if you are taking medication that affects your heart rate, blood pressure, or cholesterol level.
- Keep children and pets away from the equipment. The equipment is designed for adult use only.
- Use the equipment on a solid, flat level surface with a protective cover for your floor or carpet. To ensure safety, the equipment should have at least 2 feet (60 CM) of free space all around it.
- Ensure that all nuts and bolts are securely tightened before using the equipment. The safety of the equipment can only be maintained if it is regularly examined for damage and/or wear and tear.
- Always use the equipment as indicated. If you find any defective components while assembling or checking the equipment, or if you hear any unusual noises coming from the equipment during exercise, discontinue use of the equipment immediately and do not use until the problem has been rectified.
- Wear suitable clothing while using the equipment. Avoid wearing loose clothing that may become entangled in the equipment.
- Do not place fingers or objects into the moving parts of the equipment.
- This equipment is not suitable for therapeutic use.
- To avoid bodily injury and/or damage to the product or property, proper lifting and moving are required.
EXPLODED DIAGRAM

HARDWARE PACKAGE

PARTS LIST
| No. | Description | Spec. | Qty. | No. | Description | Spec. | Qty. | |
| 1 | Main Frame | 1 | 26 | End Cap | 2 | |||
| 2 | Spindle | 1 | 27 | High Cap Nut | M8 | 4 | ||
| 3L/R | Crank | 2 | 28 | Bolt | M6*15 | 4 | ||
| 4 | Magnetic Board | 1 | 29 | Nylon Nut | M6 | 4 | ||
| 5 | Idler Wheel Shaft | 1 | 30 | Belt Wheel | 1 | |||
| 6 | Axle for Crank | 1 | 31 | Belt | J310 | 1 | ||
| 7L/R | Pedal | 2 | 32 | C-clip | 2 | |||
| 8L/R | Belt Cover | 2 | 33 | Bearing | 6003 | 2 | ||
| 9 | Tension Control Knob | 1 | 34 | Screw | M5*15 | 2 | ||
| 10 | Meter | 1 | 35 | Flat Washer | Φ8.2*Φ16*1.5 | 2 | ||
| 11 | Inertial Wheel | 1 | 36 | Inductor Seat | 1 | |||
| 12 | Wave Washer | 1 | 37 | Bearing | 6000 | 2 | ||
| 13 | Idler Wheel | 1 | 38 | Inductor | 1 | |||
| 14 | Rear Stabilizer | 1 | 39 | Screw | M10*18*12 | 1 | ||
| 15 | Magnet | 2 | 40 | Nylon Nut | M10 | 1 | ||
| 16 | End Cap | 4 | 41 | Spring | 1 | |||
| 17 | Front Stabilizer | 1 | 42 | Wire Clip | 3 | |||
| 18 | Sleeve | 1 | 43 | Screw | M6*12 | 1 | ||
| 19 | Spring | 1 | 44 | Flat Washer | Φ6.4*Φ12*1.2 | 1 | ||
| 20 | Bolt | M8*35*15 | 1 | 45 | Nut | M5 | 1 | |
| 21 | Carriage Bolt | M8*42 | 4 | 46 | Washer | Φ10.2*Φ20*1.5 | 1 | |
| 22 | Washer | ID8.2*OD16*1.5 | 4 | 47L/R | Nylon Nut | M12 | 2 | |
| 23 | Nylon Nut | M8 | 3 | 48 | Spanner | S13-S14-S15 | 1 | |
| 24 | Screw | ST4.2*15 | 15 | 49 | Spanner | S17-S19 | 1 | |
| 25 | Flange Nut | M10 | 2 |
Ordering Replacement Parts (U.S. and Canadian Customers only)
Please provide the following information in order for us to accurately identify the part(s) needed:
- The model number (found on cover of manual)
- The product name (found on cover of manual)
- The part number found on the “EXPLODED DIAGRAM” and “PARTS LIST” (found near the front of the
manual)
Please contact us at support@sunnyhealthfitness.com or 1-877-90SUNNY (877-907-8669).
ASSEMBLY INSTRUCTIONS
We value your experience using Sunny Health and Fitness products. For assistance with parts or troubleshooting, please contact us at support@sunnyhealthfitness.com or 1-877-90SUNNY (877-907-8669).
1 STEP :
Attach Rear Stabilizer (No. 14) to the Main Frame (No. 1) with 2 Carriage Bolts (No. 21), 2 Washers (No. 22), and 2 High Cap Nuts (No. 27). Tighten and secure with Spanner (No. 48).Attach Front Stabilizer (No. 17) to the Main
Frame (No. 1) with 2 Carriage Bolts (No. 21), 2 Washers (No. 22), and 2 High Cap Nuts (No. 27). Tighten and secure with Spanner (No. 48).

STEP 2:
NOTE: The Pedals (No. 7L & No. 7R) are marked “L” and “R” for Left and Right.
WARNING! Read instructions carefully as improper assembly may cause permanent damage to your bike.
NOTE
Left Nylon Nut (No. 47L) is blue on the inside and Right Nylon Nut (No. 47R) is white on the inside.
Remove the 2 Left & Right Nylon Nuts (No. 47L & No. 47R) located on the Pedals (No. 7L & No. 7R).Align the Left Pedal (No. 7L) with the Left Crank (No.3L) at 90°. Gently insert the Left Pedal (No. 7L) into the Left Crank (No. 3L) and turn the Left Pedal (No.7L) counter-clockwise as tightly as you can with your hand. Use Spanner (No. 48) to tighten and secure.

Turn the Left Nylon Nut (No. 47L) clockwise as tightly as you can with your hand. Use Spanner (No. 48) to
hold the pedal bolt on the Left Pedal (No. 7L) and use Spanner (No. 49) to turn the Left Nylon Nut (No. 47L) clockwise at the same time, until it is tightened on to the Left Crank (No. 3L).Align the Right Pedal (No. 7R) with the Right Crank (No. 3R) at 90°. Gently insert the Right Pedal (No. 7R) into the Right Crank (No. 3R) and turn the Right Pedal (No. 7R) clockwise as tightly as you can with your hand.
Use Spanner (No. 48) to tighten and secure. Turn the Right Nylon Nut (No. 47R) counterclockwise as tightly as you can with your hand. Use Spanner (No. 48) to hold the pedal bolt on the Right Pedal (No. 7R) and use Spanner (No. 49) to turn the Right Nylon Nut (No. 47R) counter-clockwise at the same time, until it is tightened on to the Right Crank (No. 3R).
INSTALLATION & REPLACEMENT BATTERY

BATTERY INSTALLATION:
- Take out 1AAA battery from the manual bag.
- Remove the Meter (No. 10) from Main Frame (No. 1). Then disconnect the link wire of Inductor
(No. 38) with the Meter (No. 10). - Install 1 AAA battery into the battery case on the back of the Meter (No .10). Pay attention to the
battery + and – poles before installing. - Insert the link wire of Inductor (No. 38) into the hole on the back of Meter (No. 10).
- Attach the Meter (No. 10) onto Main Frame (No. 1). The installation is complete!
BATTERY REPLACEMENT:
Remove the 1 old AAA battery in the battery case and install 1 new AAA battery into the battery case on the back of the Meter (No. 10). Pay attention to the battery + and – poles before installing. The replacement is complete!
NOTE: Dispose battery according to your state and regional guidelines.
SPECIFICATIONS:
- SPEED 0.0~999.9MPH (Mile/Hour)
- TIME 0:00~99:59 MIN
- DIST (DISTANCE) 0.0~9999M (Mile)
- CAL (CALORIES) 0.0~9999KCAL
FUNCTION KEYS:
- MODE: Push down for selecting functions. If the long time holds down MODE button down for resetting
TIME, DISTANCE and CALORIES. - SET: To set the values of TIME, DISTANCE and CALORIES when not in scan mode.
- RESET: Push down for resetting TIME, DISTANCE and CALORIES.
FUNCTIONS:
SCAN: Press “MODE” button until “SCAN” appears, monitor will rotate through all the 4 functions: TIME,
SPEED, DISTANCE, CALORIES. Each display will be hold 4 seconds.
TIME:
- Count the total time from exercise start to finish.
- Press “MODE” button until “TIME” appears, press “SET” button to set exercise time.
SPEED: Display current speed.
DIST (DISTANCE):
- Count the distance from exercise start to end.
- Press “MODE” button until “DIST” appears, Press “SET” button to set exercise distance.
CAL (CALORIES):
- Count the total calories from exercise start to end.
- Press “MODE” button until “CAL” appears, Press “SET” button to set exercise calories.
NOTE:
- Please use 1pc of battery AAA 1.5V battery as a power supply. If there is an abnormal display on the meter, please replace the battery
- The meter will automatically power on when pedals are in motion or the MODE key is being pressed.
- The monitor will be auto-powered on when starting to exercise push button signal in.
- Automatically start calculating when you start to exercise and will stop calculating
when you stop exercising for 4 seconds.
ADJUSTMENTS & USAGE GUIDE
ADJUSTING THE TENSION
 Adjust the tension by rotating the Tension Control Knob (No. 9) clockwise to increase the level of resistance. Rotate the Tension Control Knob (No. 9) counter clock wise to decrease the level of resistance. Tension levels are set at Level 1 being the lowest and Level 8 being the highest.
WARNING

The machine is intended to use in a sitting position only, do not stand on the machine. Failure to follow all warnings and instructions could result in serious injury or death.


