LiftMaster Garage Door Openers User Manual

Warning
To prevent possible SERIOUS INJURY or DEATH from electrocution:
- Be sure the power is NOT connected BEFORE installing the door control.
- Connect ONLY to 12 VOLT low voltage wires. To prevent possible SERIOUS INJURY or DEATH from a closing garage door:
- Install door control within sight of the garage door, out of reach of children at a minimum height of 5 feet (1.5 m), and away from ALL moving parts of the door.
- NEVER permit children to operate or play with door control push buttons or remote control transmitters.
- Activate the door ONLY when it can be seen clearly, is properly adjusted, and there are no obstructions to door travel.
- ALWAYS keep the garage door in sight until completely closed. NEVER permit anyone to cross the path of closing the garage door.
- Unattended devices and features are to be used ONLY with sectional doors.
INSTALLATION
Unplug the garage door opener. Disconnect the battery (if applicable)
- Connect the wires to the back of the door control.
- Secure the door control to the wall.
- Connect the wires to the garage door opener
Plug in the garage door opener and reconnect the battery. The command LED on the door control will blink if installed correctly. To synchronize the garage door opener and the door control, press the push bar up to 3 times, until the garage door opener activates.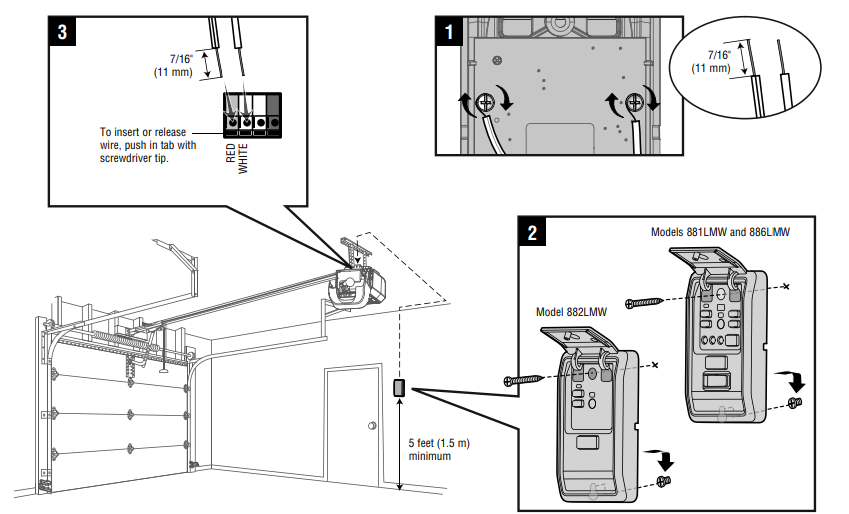
REMOTE CONTROL
- Press the LEARN button on the door control twice. The Command LED will blink
- Press and release the button on the remote control that you wish to operate your garage door.
The garage door opener lights will flash (or two clicks will be heard) and the Command LED will stop blinking when the code has been programmed.
KEYLESS ENTRY
- Press the LEARN button on the door control twice. The Command LED will blink.
- Enter a 4-digit personal identification number (PIN) on the keypad. Then press the ENTER button.
The garage door opener lights will flash (or two clicks will be heard) and the Command LED will stop blinking when the code has been programmed.
CONNECT YOUR GARAGE DOOR OPENER TO YOUR HOME WI-FI® NETWORK (for Wi-Fi garage door openers ONLY)
- Lift the push bar on the door control. Press and release the LEARN button. The garage door opener will beep once and the command LED on the door control will blink to indicate Wi-Fi learn mode. You have 20 minutes to complete the connection process.
- On your mobile device, go to Settings > Wi-Fi and select the network with the “MyQ-” prefix x.
- Launch the web browser on your smartphone or tablet. Enter setup.myqdevice.com into the browser address bar. Follow the on-screen prompts to connect the garage door opener to your Wi-Fi network. The MyQ serial number will be displayed on the screen. Write the serial number in the space below.
- Download the MyQ app from the App Store® or Google Play™ store. Sign up for your MyQ account and add the MyQ serial number to your account.
If you are unsuccessful in adding your device, try an alternate web browser or visit WiFiHelp.LiftMaster.com.
FEATURES
LOCK
Prevents activation of the garage door opener from remote controls while still allowing activation from the door control and keyless entry. Factory default is OFF. Turn ON: Press and hold the LOCK button for 2 seconds. The command LED will blink as long as the lock feature is activated. Turn OFF: Press and hold the LOCK button again for 2 seconds. The command LED will stop flashing and normal operation will resume.
LIGHT
Press the LIGHT button to turn the garage door opener lights on or off. The LIGHT button will not control the lights when the door is in motion. When the lights are turned on they will stay on until the LIGHT button is pressed again, or until the garage door opener is activated. Once the garage door opener is activated the lights will turn off after a specified period of time (see below). TO CHANGE THE AMOUNT OF TIME THE GARAGE DOOR OPENER LIGHTS WILL STAY ON Press and hold the LOCK button until the garage door opener lights flash (about 10 seconds). The garage door opener lights will flash up to 4 times to indicate the current setting
- Flash = Lights stay on for 1 ½ minutes
- Flashes = Lights stay on 2 ½ minutes
- Flashes = Lights stay on 3 ½ minutes
- Flashes = Lights stay on 4 ½ minutes (factory default)
Repeat the steps above until your desired time frame is reached.
LIGHT FEATURE FOR THE SAFETY REVERSING SENSORS
The garage door opener lights will turn on when the safety reversing sensor beam is interrupted. Factory default is ON.
Turn ON:
Start with the garage door opener lights on. Press and hold the LIGHT button to turn off the light, continue to hold until the light turns on (about 10 seconds).
Turn OFF:
Start with the garage door opener lights off. Press and hold the LIGHT button to turn on the light, continue to hold until the light turns off (about 10 seconds).
MOTION SENSOR
(for models 881LMW and 886LMW ONLY) The motion sensor will automatically turn on the garage door opener lights when motion is detected. The lights will come on for a set period of time, and then shut off. The factory default is on for 4-1/2 minutes. Turn ON/OFF: Slide the motion sensor switch ON or OFF.
MODEL 882LMW

MODELS 881LMW AND 886LMW
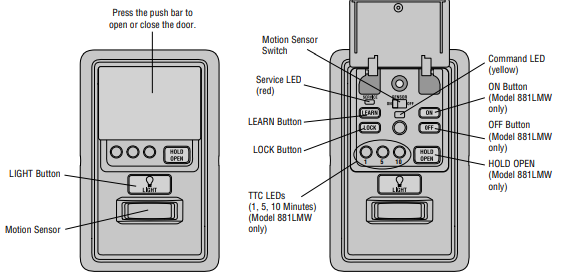
MAINTENANCE ALERT SYSTEM (MAS)
When the garage door opener needs to be serviced (approximately 4500 garage door opener cycles) the command and service LEDs will alternately blink back and forth. Factory default is OFF. Turn ON/OFF: Press and hold the LEARN button. Then press the LIGHT button. The service LED will blink the status; ON is 2 blinks and OFF is 3 blinks.
TIMER-TO-CLOSE (TTC)
(for model 881LMW ONLY) DO NOT enable TTC if operating a one-piece door. TTC is to be used ONLY with sectional doors. The TTC can be set to automatically close your garage door after a specified period of time (1, 5, or 10-minute intervals). Once the TTC has been set and the door is open, the selected close interval will blink and begin to count down to close the door. The garage door opener will beep and the lights will flash before closing the door.
Turn ON:
Press and hold the ON button until one of the TTC LEDs light up. Change the TTC Time Intervals: Press the ON button a second time to cycle through the time interval options (the corresponding TTC LED will light for each time interval). The garage door opener light bulbs will blink as confirmation. Temporarily suspend the TTC: Press and release the HOLD OPEN button. Press and release the HOLD OPEN button again to resume normal TTC operation. Turn OFF: Press and hold the OFF button until all TTC LEDs turn off and a beep is heard from the garage door opener.
The TTC WILL NOT work under the following conditions:
- If the door encounters an obstruction while closing, the garage door opener will make a second attempt to close the door. If the obstruction has not been cleared after the second attempt, the garage door opener will reverse open, stop, and WILL NOT close until the obstruction has been cleared.
- If the safety reversing sensors are incorrectly installed or misaligned the garage door will reverse open and WILL NOT close until the safety reversing sensors are correctly installed and aligned. When the safety reversing sensors have been aligned, the door will close when the garage door opener is activated.
- If the garage door opener is operating on battery power the TTC will not work.
NOTE:
If you have an 880LMW installed and the TTC is set to a custom time, the 3 LEDs on the 881LMW will blink. If the 3 LEDs are blinking and you have an 881LMW ONLY, press the ON button to set the time properly,
ONE-YEAR LIMITED WARRANTY
LiftMaster warrants to the first consumer purchaser of this product that it is free from defects in materials and/or workmanship for a period of 1 year from the date of purchase.
NOTICE:
To comply with FCC and or Industry Canada rules (IC), adjustment or modifications of this receiver and/or transmitter are prohibited, except for changing the code setting or replacing the battery. THERE ARE NO OTHER USER SERVICEABLE PARTS. Tested to Comply with FCC Standards for Home or office use. Operation is subject to the following two conditions: (1) this device may not cause harmful interference, and (2) this device must accept any interference received, including interference that may cause undesired operation. This Class B digital apparatus complies with Canadian ICES-003. Cet appareil numérique de la classe B est conforme à la norme NMB-003 du Canada.
REFERENCE LINK
https://www.liftmaster.com/for-homes/garage-door-openers


