Forever JS-200 Car Jump Starter User Manual

Important Safety Instruction
- DO NOT use the device to start your car when the remaining capacity is less than 50% or when it is still hot.
- The device is designed for starting 12V car batteries and should not be used for any other purpose.
- The device cannot be used instead of a car battery.
- Do not remove the cover of the device. There are no user-repairable parts inside. All repairs should be performed by a service technician.
- To reduce the risk of damage, closely supervise the operation and storage of the device Children should not have access to the device.
- Do not use the device more than 3 times in a row, as the device may overheat, malfunction or be damaged.
- Protect the device from contact with water and moisture to avoid electric shock.
- Use only original parts/accessories provided by the manufacturer.
- The company is not responsible for any personal or property damage caused by improper use of the product
Set Includes
- jump starter
- car charger
- travel charger
- 4 in 1 USB cable with USB-C, *Lightning, mini USB, micro USB connectors
- jumper cables
- user’s manual
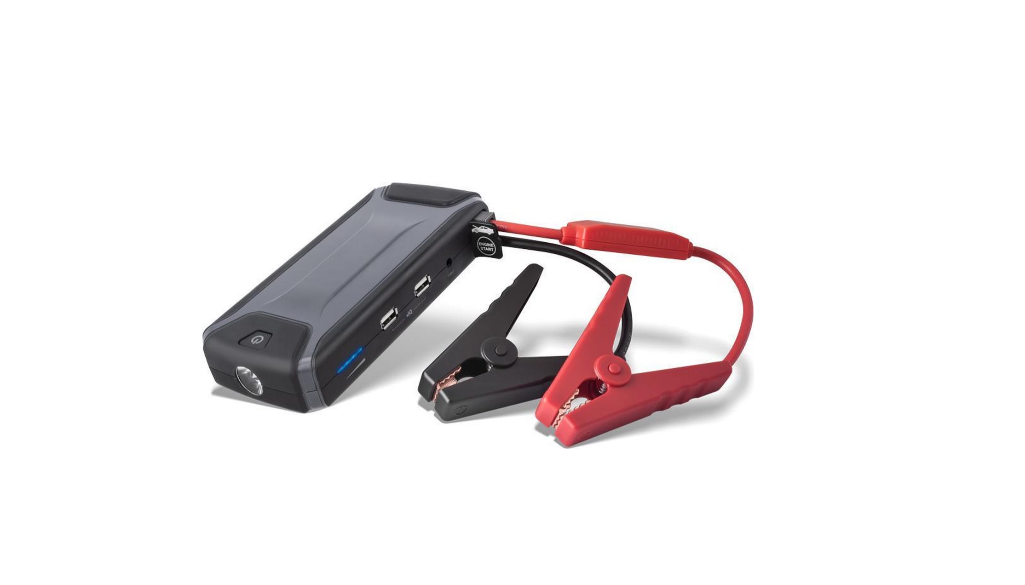
Appearance

- 12 V 200 A auto starter output ⎓
- 15 V ⎓ 1 A input
- 5 V ⎓ 2,1 A USB output
- 5 V ⎓ 1 A USB output
- battery life indicator
- ON/OFF button
- LED torch
Charging
To charge the travel battery, use the charger 15 V ⎓ 1 A, which is included in the kit. Plug the cable into a power source with a voltage of 110-240 V ⎓. In next step plug the cable from the side of the charger connector in the charging input of battery. Charging is indicated by flashing LED diodes. Blue LED diodes will light up in sequence in the following order starting from the right side of indicator:
- 1 LED – charged at 25%
- 2 LEDs – charged at 50%
- 3 LEDs – charged at 75%
- 4 LEDs – charged at 100% (fully charged)
When fully charged, disconnect battery from the power source. To check the battery power level you should shortly press the ON/OFF button (look at Appearance). If non of the LED diodes lights up, this means that you need to charge the device. LEDs will
Turn ON/turn OFF white LED
In order to turn on the white LED light, you need to press long ON/OFF button.
Charging modes
To change mode of white LED, press short ON/OFF button. Modes will change to the scheme: „Steady light ››› Slow blinking ››› Rapid blinking ››› LED OFF”
Charging external devices
To charge an external device, you need to use an USB cable with connector matching to your external device’s input. Place the USB end in the travel battery output and the second end in your external device’s input. Charging starts automatically and lasts until external device is fully charged. Travel battery is equipped with two USB outputs. They differ in the maximum charging current.
Starting Car
- Pin jumper cables to output for jumper cables.
- Pin pluses clamp of battery (red wire) to pluses clamp on the car accumulator.
- Pin minuses clamp of battery (black wire) to minuses clamp on the car accumulator.
- Start the car.
5. After successful launch of te car you need to unpin cabels in reverse way: first unpin black cable, and then unpin red cable.
IMPORTANT: High current! Always avoid clamp contact together and clamps contact with body. It can start the fire and can cause direct threat to life!
Specification
- Capacity: 40 Wh
- Cell lifetime: min 200 charging cycles
- Engine start current: 200 A (standard) up to 3s / 400 A (maximum) up to 3s
- IQ USB outputs: 5 V ⎓ 3.1 A (15.5 W), (3) 5 V ⎓ 2,1 A (10,5 W), (4) 5 V ⎓ 1 A (5 W)
- Charging input: 15 V ⎓ 1 A (15 W)
- Working temperature: from -20°C to +60°C